Showing posts with label step by step. Show all posts

Thursday, August 3, 2023

Creative QuickLink Balloon Walls - with Step-by-Step Guide

Balloon Walls are perfect for all occasions and create the perfect theme backdrop. 

QuickLinks are the quickest way to make a Balloon Wall! Creating a QuickLink Balloon Wall is a fun and colourful way to decorate for parties, events, or special occasions. QuickLinks are available in both 12” and 6” sizes.

QuickLink balloons have specially placed tail ends that allow you to easily link/tie them together. Below is a step-by-step guide on how to make a QuickLink Balloon Wall:

Materials you'll need:

  1. QuickLink balloons in desired colours
  2. Balloon pump (electric pump for speed and efficiency)
  3. Poles and bases or Command hooks or other hooks (for hanging the balloon wall)
  4. Scissors

Step-by-step instructions:

  1. Plan the design: Decide on the size and shape of your balloon wall. You could create a wall covering an entire backdrop, a small section of a wall, or even a free-standing balloon wall.


    To plan your design, you could use the Balloon Pro Design Tool. This is a great way to experiment, and design your balloon wall and share a concept design with your clients.


    Choose your balloon colours:

  2. Select various colours to create a visually appealing and vibrant balloon wall. Consider the theme of your event or party to pick the appropriate colours.


    Here are a few different examples of QuickLink Balloon Walls. You can easily identify the type of event each wall was for by simply looking at the colours.


    Design by Sue Bowler


    Probably one of my favourite X-Grid Wall designs is by the incredible duo, Avital & Nir Shechter. The fabulous colours and the different sizing of the fillers makes this design fun, exciting and oh so vibrant! 

    Inflate the balloons:

  3. Use a balloon pump to inflate the QuickLink balloons. Make sure to inflate them to the same size for a consistent look.


  4. Create balloon chains: Make multiple balloon chains of varying lengths, depending on your design plan. To create a chain, inflate your balloons to the desired size and tie the balloons end to end, ensuring that the tying connections are tight and cannot stretch.


    QuickLink Vertical/Horizontal Grids This is one of my favourite techniques, and I have used it many times when creating balloon walls at corporate events. The last wall I made before we headed into lockdown was for an event in London where the theme for the party was Great Gatsby! 
  5. Here is an example of a Grid Method QuickLink Balloon Wall. I have colour-coded it to make it a little easier to understand the construction technique.


    Step 1.
    This is the first step to constructing a wall. For this wall I will need to inflate:
    Make 6 chains using 9 balloons in each chain (this is shown in red)
    Make 10 chains using 5 balloons in each chain (this is shown in blue)
     

    Step 2.
    Once you have inflated your chains, lay them down in the correct sequence. To connect the chains together you will need Duplets, in the example shown above you would need 60 Duplets.

    Step 3.
    To fill in the wall, you will need 'plugs'. A plug is a Duplet that will fit in each of the holes within the wall. I would recommend to inflate the Duplets approximately 1" smaller than the size used to create the actual wall or if you are using smaller QuickLinks approx ½" smaller.


  6. Add support for larger walls: If you're creating a large balloon wall, you need to add support to ensure the balloons stay in place.


  7. Optional: Add embellishments: If desired, add other decorations like foil balloons, paper flowers, banners, or LED lights to enhance the balloon wall further.
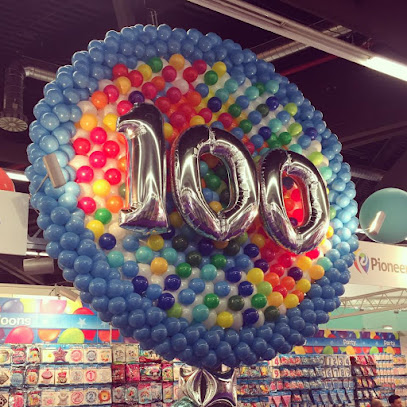


I also want to share with you this fabulous wall. Luc Bertrand, CBA of WaW Balloons in Vichte, Belgium created the original design he created this wall as part of the décor for the 100-year celebration of Pioneer Balloon Company on the Qualatex stand at the Nuremberg International Toy Fair in Germany. Luc's design uses the AeröPole System® to create the circular frame, and then Luc used 6" QuickLink balloons to create the central grid system filled with multi-coloured 5" latex balloons. 

100 Year Celebration Balloon Wall by Luc Bertrand
100 Years Celebration Balloon Wall by Luc Bertrand of WaW Balloons, Vichte, Belgium


I re-created Luc's design for the Pioneer Balloon Company's 100th Birthday Celebration Party in Wichita in 2017. The party theme was Black & White, and it was a great opportunity to use a fantastic selection of black & white printed balloons. This wall made the perfect photo backdrop!


QuickLink X Pattern Grids

This is another great technique using QuickLinks to create fabulous wall designs. 

Here are two grids that I have designed on the Balloon Tool to show you examples of how the frame looks with and without the balloon fillers.


Here are some examples of wall designs using the X-Pattern Grid


QuickLInk 'Love' Balloon Wall by Sue Bowler
'Love' X-Grid Wall designed and created by Sue Bowler

It's a Boy! QuickLink Balloon Wall by Sue Bowler
'Welcome Baby' X-Grid Wall Designed and created by Sue Bowler

Nir and Avital Shechter, CBA's of Baloney Nir in Katzrin, Israel
Nir and Avital Shechter, CBA's of Baloney Nir in Katzrin, Israel are all about design especially when they create their fabulous balloon walls! 

Back to School Balloon Wall by Nir and Avital Shechter, CBA's of Baloney Nir in Katzrin, Israel
'Back to School' X-Grid Wall Designed by Avital and Nir  

If you have never tried making a balloon wall, then start with QuickLinks! If you want to practice, you can use 6" QuickLinks wmeaning that your design will be much smaller than if you use 12". You can still make a great backdrop design using 6" QuickLink balloons, so make sure that whatever you make, you use it for a photo opportunity! 

A huge thank you to Nir & Avital Shechter, Alberto Falcone, and Luc Bertrand for sharing their beautiful balloon wall designs with the Very Best Balloon Blog! 

Happy Ballooning! 


Sue
Follow me @suebowler


Thursday, December 8, 2022

Learn how to make a Flat-Pack Christmas Tree - with an easy Step-by-Step Recipe


Balloon Christmas Tree using the Flat-Pack technique

There are so many different techniques when it comes to designing with balloons! Each technique has its own set of pros and cons, and we can use those factors to choose the best technique to suit the decor that we are creating or the location that we are creating it in.

We don't often see the Flat-Pack technique being used. This style of decor is known as Classic Balloon Decor where all the balloons are sized with precision to achieve a  perfect look!  I actually used this technique to create a Halloween design recently at a training event. The pros of using this style of decor is that it is flat, so it can be used in spaces where there is not much depth, like a shop window or a narrow room.

Here is a sideways photo of the same Christmas Tree. The tree is literally only one balloon in depth, making it very slim! 

Side view of the Christmas Tree


I have made a short video that explains how to construct a column using the Flat-Pack technique. This video will be of help to you if this technique is new to you, however, for the Christmas Tree, you will need to follow the sizing on the recipe sheet below for the balloon sizes, but follow the method shown in the video.


Here is the recipe for the tree that I made. You can change the sizing if you want to make bigger or smaller trees. For my design, I use Qualatex® Chrome™ Gold and Chrome Green and topped it with a 20" Ruby Red Microfoil™ Star.

Flat-Packed Christmas Tree Recipe by Sue Bowler

I would like to thank Lynda Webb from Bloon Away Boston in Boston, UK. Lynda attended the training session where I demonstrated the Flat-Pack technique and was so inspired with it that she started to play! I saw Lynda create a number of different designs including a variety of columns, and then she used the column technique to create tree's! I asked Linda to make some Christmas Trees for the recent BAPIA Funday - Christmas with Qualatex and they were a huge success! Lynda asked me to write this post so that we could share the recipe with others! 

Christmas Trees by Lynda Webb - Bloon Away Boston

Happy Ballooning! 

Sue
Follow me @suebowler


Friday, June 4, 2021

Father's Day - Balloon Delivery Inspiration 2021!

According to many different studies, consumers tend spend more when it comes to buying gifts for Mother's Day versus Father's Day! Buying gifts for women is easier, with flowers, chocolates and jewellery topping the list. When it comes to buying for men, it is a little trickier, with more practical and traditional gifts. 

With Father's Day fast approaching, this is the perfect time for us to tap into this market and help our customers to find the perfect solution for their Father's Day gift... here are some great ballooning ideas! 

Personalisation remains a top trend


The key to a successful Father’s Day for retailers will rely on the ability to tune into what the customer is looking for as they celebrate after a turbulent year. Balloon deliveries are still an extremely popular choice when it comes to ordering balloons!

It is clear that personalisation, a major trend in gifting over the last decade or so, will continue to be important for Father’s Day 2021. 

Qualatex Deco Bubbles are perfect for personalisation, especially when using a die-cutting machine such as the Silhouette Cameo. 

I absolutely love this design by Cam Woody, CBA, of Pioneer Balloon Company in Wichita, KS, USA. What could be more appealing than giving this to a Daddy for his first Father's Day! 


Don't forget, Qualatex has prepared some great ready-made social media posts that you can freely download - click HERE for a direct link or visit https://pioneerballooncompany.widencollective.com/c/zijzavod


Microfoil balloons can be personalised too! How about taking this 'Adorable Astronaut' Qualatex balloon and adding a special 'cosmic' Father's Day message! 

37" 'Adorable Astronaut' 
#87966

Cheers to Dad on his Special Day!


Design by Eve Antonello, CBA, of Pioneer Balloon Company.


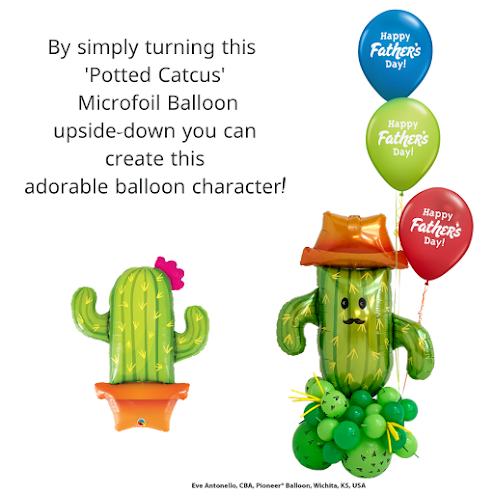
Only a balloon professional could look at a balloon, flip it upside-down and add a little facial feature to create a whimsical design like this Father's Day arrangement made by Eve Antonello, CBA, Pioneer Balloon Company, Wichita, KS, USA.


"Dad you are my Champion"

For all those champion Dads how about this 'You're the Best' balloon arrangement, and don't forget the trophy balloon can be personalised too! 

Designer name: Sam Jossie, CBA of Pioneer® Balloon Company in Wichita, KS, USA.


Message ideas!

Choosing the perfect message to illustrate on a balloon is never easy, so here are a few examples that should hopefully help! 

To the world’s best Dad, happy Father’s day!

Thanks Dad for everything you do for us.

Happy Father’s day to the coolest Dad ever!

Happy Father’s day to my wonderful Daddy. 

Thanks for always being there for us/me

Out of all the dads in the world I think we got the best one! 

 Happy Father’s day to my superhero Dad!

Sending you all my love and I wish I could be there to give you a big bear hug. 

I am so lucky to have you as my dad. 

Thanks for being so wonderful!

You truly are the best Daddy! Happy Father’s day.

Thanks for being the coolest dad on the block! Happy Father’s day!

Happy Father’s Day to the greatest Dad in the whole world!


If you would like to learn how to re-create some of the designs featured in this post, check out these fabulous video tutorials by Cam Woody and Eve Antonello! 


Once you have decided which designs you are going to offer for Father's Day, it is time to start promoting them on your social media channels. Remember that using the right hashtags is the key to success of your campaign! 

#fathersday #fathersdaygifts #dad #happyfathersday #love #father #family #mothersday #fathersdaygiftideas #daddy #gift #giftideas #birthday #fathers #fathersdaygift #gifts #handmade #diadelpadre #fatherandson #dadlife #shoplocal #fatherhood #papa #instagood #anniversary #giftsforhim #dads #smallbusiness #fatherdaughter #personalised #bhfyp (best hashtag for your post) it is also important to include at least one hashtag with your location, town or city, unless you are offering a national balloon delivery service.

Here is another great ready-made social media post from Qualatex. Some have messages added while others have been left blank to allow you to add your own messages and company details! 


Remember your Father's Day sales campaign does not need to be 100% about the products that you are selling! To attract attention and followers, you can always add in a few 'off the wall' posts! 


How about a Father's Day fact? 
While the exact date that the word “dad” came into use is unknown, it is estimated that it began around the late fifteenth century. It is believed that it was simply derived from baby talk, as in many languages “dada” or “tata” refers to a baby’s acknowledgement of father.

Good luck with your Father's Day campaign, I hope that this post has given a little bit of inspiration! 

Happy Ballooning!

Sue
Follow me @suebowler


Friday, September 4, 2020

How to Create Spiral Balloon Columns - with Step-By-Step Instructional Video

Spiral Columns made with modelling balloons such as 260Q and 160Q have always been a favourite of mine. They are quick to make, always look elegant, and are a great way to decorate a pole when creating a design that uses a pole and base structure. As with all techniques, they need to be practiced to ensure that you get perfect results every time! 

Design 1. Single, one colour Spiral - This beautiful column made with all shades of green was designed and created by Eve Antonello, CBA, Pioneer Balloon Company, Wichita, KS, USA.


Elegant Shimmering Emerald Stars Column - Design by Eve Antonello.
Shimmering Emerald Stars - Design by Eve Antonello.


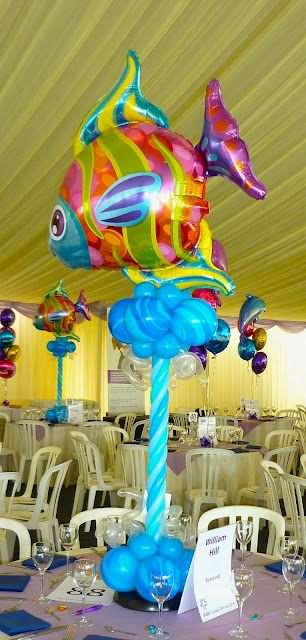
Design 2. Single, double or multi-coloured spiral column. Still working with four balloons, using two or more colours brings a whole new look to this style of design! - These colourful 'Fashionable Fish' centrepiece was the crowning glory at this summer party, and brought an explosion of colour into a huge and very plain marquee tent.


Fabulous Fish Centrepieces by Sue Bowler, CBA.


3. Double Spiral Column using Eight Balloons. This design takes this technique to the next level, and is a fabulous example of Candy Strip style decor! By simply changing the colours, we can completely change the look and easily execute the effect that we want to create.


Christmas Candy Swirl Arch by Sue Bowler, CBA.
Christmas Candy Swirl Arch by
Sue Bowler, CBA.


4. Double Spiral Column with Precision Bubbles. How lovely does this effect look as a finishing touch on this baby design column! Because you're working with eight modelling balloons, and you are introducing Precision Bubbles, this technique is a little bit trickier than the others shown above, but definitely worth the extra effort! 


It's A  Girl - Baby & Moon Column by Sue Bowler, CBA.
It's A  Girl - Baby & Moon Column by Sue Bowler, CBA.

To learn how to create this style of décor check out the video below! 


Here are some more inspiring design ideas using this technique! This video explains step-by-step how to create each of the styles of columns shown above.


Lion Tamer Pedestal Place two of these Columns at the event entrance, or use them to draw attention to other focal areas at a circus-themed party.  Designer name: Sue Bowler, CBA, Balloon Art by Sue Bowler, Oxfordshire, UK

Lion Tamer Pedestal

Place two of these Columns at the event entrance, or use them to draw attention to other focal areas at a circus-themed party.

Designer name: Sue Bowler, CBA, Balloon Art by Sue Bowler, Oxfordshire, UK


Got Treats? So cute it’s scary!  Designer name: Sam Jossie, CBA, Pioneer® Balloon Company

Got Treats?

So cute it’s scary!

Designer name: Sam Jossie, CBA, Pioneer® Balloon Company


It’s All So Magical! The perfect decor accent for the princess on her special day!  Designer name: Eve Antonello, CBA, Pioneer Balloon Company, Wichita, KS, USA

It’s All So Magical!

The perfect decor accent for the princess on her special day!

Designer name: Eve Antonello, CBA, Pioneer Balloon Company, Wichita, KS, USA


Come Close Valentine! Designer name: Eve Antonello, CBA, Pioneer Balloon Company, Wichita, KS, USA

Come Close Valentine!

Designer name: Eve Antonello, CBA, Pioneer Balloon Company, Wichita, KS, USA

If you have always wanted to know how to create this style of décor, or maybe have struggled to get the perfect, tight spirals, I hope that this post has helped!

Happy Ballooning! 

Sue
Follow me on Instagram @suebowler
Sue Bowler www.suebowler.com


Thursday, June 4, 2020

Part 2. Baby Moon Design - Step-by-Step Tutorial - How to Add the Balloons and Finishing Touches

In Part 1 of this two-part video tutorial, I demonstrate how to create the perfect frame for this super cute "Baby Moon" design. For a direct link to this video, click HERE.

Here is a reminder of the materials and equipment that you will need to make the frame:


Frame Material and Equipment List:

  • 1 x 3m length - 6mm or 1/4" Aluminium Rod 
  • Pipe or Bolt Cutters
  • Gaffa or Duct Tape
  • Pipe Bender if you have one but it's not essential
  • NOT (Lamp) Base - this is an inexpensive IKEA (lamp) product that many balloon professionals use to support designs.
  • NOT (Lamp) Pole x 1 (If you don't have access to an IKEA NOT Base and Pole you will need to find a good, similar alternative.) 
  • White Floral Quick Drying Spray Paint 
  • String or ribbon to measure
  • Circular Template - such as a hoop


Balloon Material List - you can change the balloon colours to suit your client's needs.

  • 18" Baby Girl Pink Stripes Microfoil™️ Balloon - #88004 
  • 11" White - only a few for the cloud base
  • 5"  Pink or Rose 
  • 5"  Pearl Pink - optional
  • 5"  White 
  • 5"  Pearl White - optional, but it does give a slightly different textural look to the plain white
  • 5"  Diamond Clear - approximately 10
  • 7"  Chrome Gold - approximately 10
  • 260Q Chrome Gold - approximately 15
  • 260Q Pink - 4-5

Other items:

  • Gold Metallic Confetti
  • Ultra Hi-Float - I use the NEW Mini Bottle - 148ml (5oz) as the nozzle is perfect for using with 5" and 260Q balloons
  • Premium Twin-Air Sizer II Balloon Inflator - this will help you naturally size your balloons using the "10th's of a second" timer adjustment. While you can use any inflator to make this design, I use the Twin-Air as it makes the sizing of the balloons very easy! 
  • Castration Pliers - to stretch open the 5" balloons
You may also want to use a few Uglu Dashes when connecting the foil balloon and pink ribbon for a nice finishing touch! 


Hi-Float - 148ml (5oz)

Premium Twin-Air Sizer II
Castration Pliers


I hope that you have enjoyed learning how to make this beautiful baby design, and I wish you every success making and selling this design in the future! 

Happy Ballooning!


Sue
Follow me on Instagram @suebowler