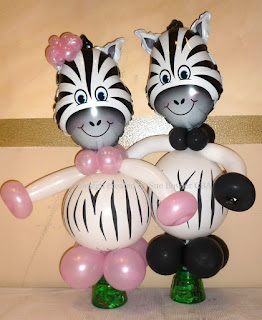
Last week I was thrilled to be a guest instructor working with Robbie Furman in Ireland for the first stop of his UK & Ireland BAPIA Tour.
 |
| Mr & Mrs Zebra Design created by Sue Bowler CBA using Qualatex Balloons, Premium Balloon Accessories and Clik Clik Balloon Bond |
My allotted time slot was after lunch, which was great as it gave me a few hours to play & prep working with some exciting products that had been supplied by the tours very generous sponsors before my demonstration!
After unpacking all my Qualatex balloons that I had selected to use for my demonstration it suddenly dawned on me that I did not have a heat sealer for the 9" & 14" Microfoil™ balloons that I was using in my designs... now that was a very big problem as I was using these in all but one of my designs, and therefore I needed to find a solution.
 |
| Balloon Bond by Clik Clik - www.clik-clik.com |
Now somewhere in the back of my mind I had heard that the Clik Clik Balloon Bond could be used to repair damaged foil balloons, but as yet I had never tried it out, so here was my opportunity, was Balloon Bond strong enough to seal a un-valved Microfoil™ Balloon?
Step 1.
Pre-Cut a length of Clik Clik Balloon Bond and carefully rest it on the reel of tape without putting your fingers on to the sticky part.
Inflate the un-valved Microfoil™ balloon that you are using ensuring that you have fully inflated it so that it is firm to the touch.
Step 3.
Now carefully twist the balloon to hold the air inside the Microfoil™.
Step 4.
Flatten down the Microfoil™ neck and place the cut piece of balloon bond across the opening of the balloons, at this point do NOT remove the backing of the tape.
Step 5.
Press firmly and hold your finger firmly onto the tape, personally, I would keep my finger there for a good minute or so as this helps the Balloon Bond to work well.
Step 6.
Remove the backing of the Balloon Bond Tape and the fold the neck of the Microfoil™ balloon over so that it covers the sticky backing and once again hold you fingers tightly for a few moments again to allow the balloon bond to work...
Hey presto... it works!!
I cannot tell you how relieved and excited I was, I was relieved because I could now make up the designs that I had planned to show and excited because it means that I always have an emergency solution for sealing a foil balloons! But this is not the end of my story!
So it's now time for my demonstration, as I am keen to share my findings with the group, but in my excitement I do not give the Balloon Bond enough time to work by keeping my fingers firmly pressed onto the tape for a minute or so... then worse than that, when I twist the neck of the Microfoil balloon I somehow managed to put a small tear into it and in normal circumstances I would throw the balloon away... but alas it was my last one! So I decided to put Balloon Bond to it's ultimate test and use it firstly to repair the tear, and then have a second attempt to seal it, but this time giving it the time that it needed, and yes you guessed it, it worked!
 |
| Sweetie Bug - Design created by Sue Bowler CBA |
Balloon Bond has many many other uses, and I am sure that I will be able to share many of these with you when I am teaching my classes or in my blog, but I strongly recommend that you invest in this mighty tape and it is truly a decorators life saver!
By the way, did I tell you how much I am loving the Qualatex Animal Head Shapes, so many design opportunities!
Happy Ballooning!
Sue
www.suebowler.com


Comments