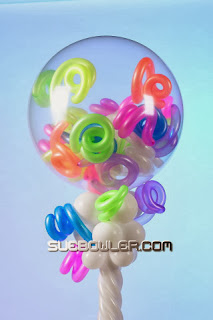
The art of putting balloons inside balloons is something that has evolved over the years, many balloon artists have found their own preferred ways to do this, there is no right or wrong way!
I have been spending a little time recently 'exploring' Pinterest and all the wonders that it holds and came across a picture (pinned on someones board) of a design that I created a number of years ago... The Noodle Balloon!
I was working for Conwin when I designed the 'noodle' balloon to demonstrate the use of the Conwin 'Insider Tool', the end result proved to be fun and very visual, with the 'how did they do that' factor!
When I found the picture I posted it onto my own Facebook page and it had a great reaction, it looks like a few people have not seen this design and have asked me how it was made.
I am always looking for something new, fun and all little bit exciting to blog about, and I thought that this would be perfect!
The original design was created using a Qualatex 3' Diamond Clear latex balloon and 260Q Neon Balloons. When I created this design I used the Conwin Insider Tool to help me to inflate the balloons inside the 3' latex, I also used a Dual Split Second Sizer with Nitrogen to inflate the balloons with the tool, but I turned the second stage regulator down to it's lowest pressure so that I could control the inflation speed. (Click on the Conwin Insider Tool link for a full demonstration on how this equipment works).
 |
| Conwin Insider Tool, for use with the Dual Split Second Sizer. |
The design that I am demonstrating for this blog is made from a 20" Qualatex Deco Bubble, you could use the 24" too and add even more 'noodles' inside!

Prepare the 'noodles', each noodle is a 260Q with a 160Q inside! This is very simple, just simply slip the 160Q inside a 260Q until it is fully inserted.
Now tie the 2 balloons together at the closed end.
Trim off the excess balloon above the knot as per picture.
Remove your Qualatex Deco Bubble from the packaging, do not do this until you have prepared your noodles, otherwise the Bubble will start to dry out.
Position the balloons so that all the necks line up.
You might find it easier using a small pocket pump.
This is IMPORTANT:
Grip the neck of the 160Q between your fingers, you are not inflating this balloon, and inflate the 260Q balloon only. The tighter you pull on the 160Q the curlier your 'noodle' will be!
Once you have fully inflated the 260Q you will notice that the knot that you tied at the end will pull inside, this looks a little like a belly button!
Be careful not to over inflate the 260Q, I always remove a little puff of air before I tie BOTH necks together.
This is what it will look like when you are inflating this balloon.
Here is the 'noodle' fully inflated inside the Qualatex Deco Bubble. I trim off the excess neck too as this makes it look neater.
Now all you have to do is repeat the process until you have filled the Qualatex Deco Bubble with the desired number of 'noodles', I decided on 5 for the 20" Deco Bubble.
So now I have added in all my 'noodles' I am ready to inflate the Qualatex Deco Bubble.
Job done, all I have to do now is create a design using this lovely balloon!
This balloon is completely air-filled, if you want to make a helium version you will need to fill ALL the balloons with helium not just the Qualatex Deco Bubble (same gas rule).
The term 'Noodle' balloon is a name made up by me as I felt that it was appropriate for the design, you could name your whatever you felt worked best for you!
Happy Ballooning and I will look forward to seeing all your 'Noodle' balloons!
Sue
www.suebowler.com


Comments