 |
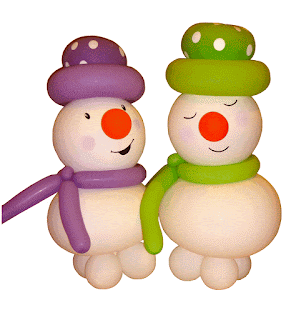
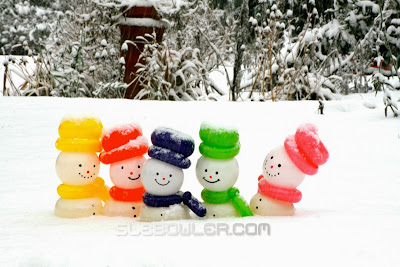
| Colourful Snowmen by Sue Bowler, CBA. |
A few winters ago during one very snowy day, when snowed into our home, I decided to make a collection of snowmen for my garden (picture below). I expect many of you will remember the picture! They were amazing. They lasted for two weeks — long after the snow had melted. These little guys were made from 5" balloons, and with their brightly coloured hats and scarves, they looked fabulous!
I have since gone on to create many different sizes and variations and have now created an easy to follow step-by-step recipe.
Material List: All Qualatex balloons, of course!
8 x 5" White (double stuffed for the water weight base)
1 x 16" White
1 x 12" White QuickLink™ Balloon
1 x 11" Printed balloon for the hat
1 x 260Q or 350Q for the hat
1 x 260Q for the scarf
1 x 5" Orange for the nose - or you can draw the nose.
1 x 5" for the pompom if you want to add a pompom to the hat!
Method:
1. To give this design stability, I use four water-weights at the base. You could use sand weights if you prefer. I size the balloons to measure approximately 3" or 7cm's.
2. I recommend that you use a White 16" balloon for the body and use an Apple Twist to give it a more donut-like shape. Add 260Qs at each end of the donut-twisted balloon to allow you to connect the body to the base and the head to the body.
3. Inflate the 12" White QuickLink balloon for the head. Make sure that it is in proportion to the body! Connect the head to the body.
4. For the nose, you can either under-inflated a 5" orange balloon and connect this to the face using a r
Raisin Twist, glue dot, or draw on a carrot-style nose.
5. The eyes, mouth, and cheeks have been added using a pen (see below for detail). If you have a die-cutter, such as a Silhouette Cameo, you could cut out the eyes and mouth.
6. To make the hat, use an 11" balloon. I like using polka dots as they look really fun. Create an Apple Twist in the hat balloon and secure this to the head using the link.
7. Inflate either a 260Q or a 350Q to wrap around the hat to create the brim. Connect using a pinch twist and remove any excess balloon.
8. Use a 260Q to create a scarf to wrap around the snowman's neck.
Pens for face - the Pink pen that I use for the cheeks is a ZIG Art & Graphic Twin. It has a double end with one end almost like a paintbrush.
The other pens are Sharpies and edding markers, for the eyes and mouth.
 |
| Snowmen faces, hand-drawn by Sue Bowler |
If you have never made a snowman before, you will love making this design!
Happy Ballooning!
Sue
www.suebowler.com
#suebowler

Comments