
I love balloon walls and the fantastic impact that they create! A balloon wall can be used in many ways; as a backdrop for an entrance or stage, they are also great for photo opportunities, everyone will love to have their pictures taken standing in front of it! Balloon walls and Qualatex Quick Link Balloons® are the perfect combination making them easier and faster to build!
Luc Bertrand CBA, WaW Balloons, Belgium shares his wonderful Qualatex Quick Link & 5" Balloon Snowman Wall.

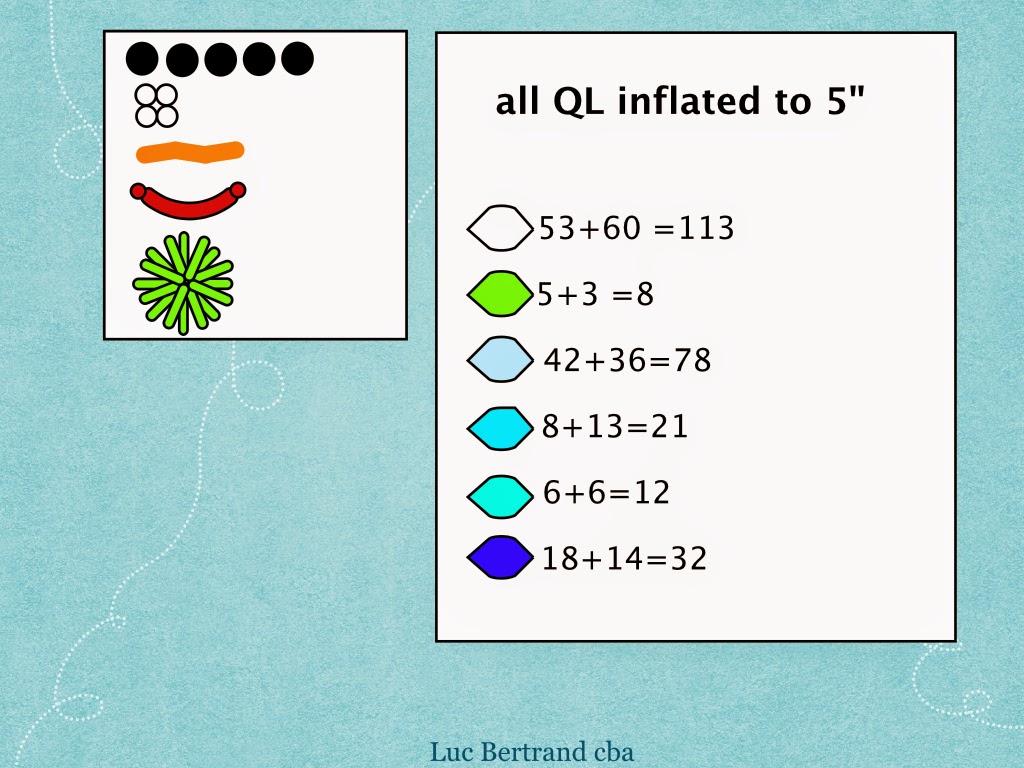
You will need to make the following duplets - see above, Luc has shown you only 1 of the 2 balloons used for each duplet. Here is an example; If you look at the chart you need to inflate 2 Pink duplets therefore you are using 4 x 5" Pink balloons, you then need to inflate 14 Lime Green duplets, therefore you are using 28 x 5" Lime Green balloons and so on. Once you have prepared all the duplets and remember that all the 5" balloons need to be inflated to 4.5".
You now need to create all the vertical chains as shown below and once again ensure that you keep these in the correct order. At the end of all the chains with exception of the first and last secure a duplet of 5" inflated to 4.5" using the colours as shown below.
Finally add the additional features such as the Snowman's eye's, nose (with a very small cluster of 4 white to hold the nose in position and mouth, buttons and the pom pom for his hat.

Luc Bertrand CBA, WaW Balloons, Belgium shares his wonderful Qualatex Quick Link & 5" Balloon Snowman Wall.
 |
| Snowman Balloon Wall designed and created by Luc Bertrand CBA |
Start by inflating all the 5" Balloons, see instructions below.
Other than the duplets , you will need quick links and details; a pom pom, the nose and more.
The chart below shows the quantities (with the exception of the snowflakes).
The Wall
The first step to make this wall is to create the horizontal chains as shown below and ensure that you keep them in the correct order. Please note that Luc has used 4 different blue's. Light Blue, Robin's Egg Blue (R), Caribbean Blue (C) and Dark Blue. At the ends of all the chains with exception of the first and last you need to attach a duplet of 5" balloons inflated to 4.5", ensure you use the colours as shown on the plan.
 |
 |
You can now position the 2 sets of chains together to form the frame for the wall, see below.
Twist these together, or even better; use the duplets as you go and twist these around the lines of quick link where they cross. In this way there is less confusion with the lines of Quick links.
 |
| Step 3 Horizontal and Vertical Quick Link chains locked together. |
You will already have the outer edge of the wall locked together with the duplets that you added to each of the chains, you now need to add all the other duplets as per the design (see below for complete chart that shows both Quick Links and the 5" in position).
Note this will be in the holes in between as well. No tying is needed, just push these in place.
 |
| Step 4 |
A huge thank you to Luc Bertrand for sharing another fantastic design with The Very Best Balloon Blog!
Happy Ballooning!
Sue
www.suebowler.com
Happy Ballooning!
Sue
www.suebowler.com
Comments