I don't know about you, but I love Northstar's trendy, and wonderfully colourful Jelli Balloons!
 |
| 30th Birthday Design by Sue Bowler, CBA. |
These Pastel ombré numbers are available from 0-9, and each is a mix of your favourite colours! With a little bit of creativity, I believe that there are endless ways to use them, which I am sure that we will begin to see more and more over the next few months! I love to design new ideas for decor and retail sales, so my immediate thought was, what other balloons can I use that will compliment and add value to my Jelli Balloon designs?
My eye is immediately drawn to the ombrè range, and particularly the pastels!
 |
Rainbow Drip Cake
|
 |
Birthday Pastel Ombre & Stars
|
 |
Pastel Ombre
|

Recently, I've enjoyed creating a new style of air-filled displays that are just a little bit different from the norm. I loved creating this Jelli Birthday design using this technique. The colours are so fun and vibrant, and it coordinates well with the Qualatex Ombre Microfoil balloons!
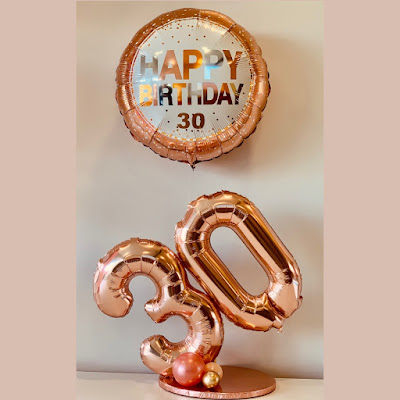
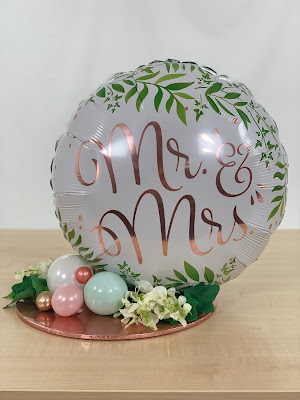
Here are a few examples that I have made using this same technique. This idea works well with 16" Numbers as well as 18" Microfoil balloons. For added impact, helium balloons can be added to the displays.
 |
| Rose Gold 30th Birthday Design by Sue Bowler |
 |
| Mr & Mrs Wedding Design by Sue Bowler |
The secret to this design is its base! I started with a sturdy cake board, and then cover it using half of a foil balloon. To learn how to recreate this view the video below.
I used the 18" Pastel Ombre to cover the base for the Jelli Balloon design as it compliments it perfectly. It gave the appearance of the Jelli balloon reflecting onto the base.

Once you have covered the base, you can add your balloons. To stick the balloons to the base you can use a variety of different adhesives. My preference is Oasis™️ Uglu Dashes, or Click-Click Balloon Bond, they are both very strong and will work well for a design like this.
Start your design with the focal balloons, and begin by inflating these with air. If they have connection tabs, secure these with tape at the back of the balloon. This helps to keep the design looking clean, tidy, and gives a professional finish.
If you are connecting two numbers together, use either Uglu Dashes or Balloon Bond to connect.

Position the balloons onto the base so that they look visually balanced. Connect to the base using Uglu Dashes or Balloon Bond. If the room that you are working in is cold, you may find that the glue is not as effective as it would be in a warm environment. A small travel hairdryer, which you can keep in your tool box, can be used to heat up the glue a little and then add your balloons, which will make them stick very well. Having a hairdryer in your tool kits is a great asset, as not only does it warm up adhesives and make them stickier and stronger, it also makes it easier to remove any bubbles from vinyl!
The focal balloon should be able to stand up without any additional support, but we will still add in some small balloons that will offer a little extra support, and additionally will add detail and more pops of colour to the design.
These are the balloons that I used for this design. Each of the 5" balloons were double-stuffed to intensify the colours. I also used the tips of Chrome Gold 260Q's.
I started with my largest 5" balloon, which was inflated to approximately 3.5". Make sure that the balloon is nice and round. Trim off any excess balloon after the knot and add an Uglu Dash or Balloon Bond to stick it to the base.
This first balloon should be positioned behind the number and will acts as support to make sure that it is sitting in the correct position.

Repeat at the front using a different coloured balloon.

To complete the design, add a few more balloons so they look like they are scattered on the board in a random yet appealing way! Ensure that each of the balloons are well secured and that the knots of the balloons are out of sight.
I hope you have enjoyed learning how to make this design!
Happy Ballooning!
Sue
www.suebowler.com
#suebowler


Comments
birthday party decorations in Hyderabad
balloon decoration in Hyderabad
event planners in Hyderabad.
Buy Balloons for Parties and Celebrations in UK