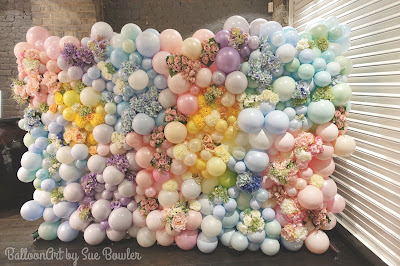
Sometimes I have to pinch myself! Not only do I get to do what I love every day - writing the Very Best Balloon Blog and being a Qualatex Training Instructor - I also get the opportunity on occasions to work with fabulous clients to create some amazing balloon decor!
A few weeks ago, I was contacted by a brand development agency who asked me to create a balloon and flower wall for a press event in London. As some who loves working with both balloons and flowers, I jumped at the opportunity!
The Logistics
When building a wall like this, it is important to consider how stable it needs to be. The balloon themselves are not heavy, but when you load it with lots of faux flowers the weight increases considerably. So my first consideration was how was I going to support my balloon wall?
Thinking about what would work best, I came up with the idea of using a grid frame. My next task was to find a grid frame that would be suitable. After a little research, I found the perfect solution!
The Prep
One of the client's criteria was that the balloons needed to be pastel tones to suit the faux flowers that they were supplying for the wall. How excited was I to see that Qualatex had recently published a trending article Custom Pastel Colours and included a fabulous Custom Colour Pastel Colour Chart. I spent a couple of hours during the evening double-stuffing 5" and 11" balloons in preparation for the job the next day - definitely worth doing in advance.
 When inflating double-stuffed balloons, make sure that you have an electric air-inflator that is powerful enough to inflate the balloons. I use the Premium Twin-Air inflator. It works perfectly and never over-heats!
To find out more about this inflator, visit Premium Balloon Accessories.
Here is a really short video that gives a close-up view of the wall.
A few weeks ago, I was contacted by a brand development agency who asked me to create a balloon and flower wall for a press event in London. As some who loves working with both balloons and flowers, I jumped at the opportunity!
 |
| Pastel Balloon and Flower Wall by Sue Bowler |
The Logistics
When building a wall like this, it is important to consider how stable it needs to be. The balloon themselves are not heavy, but when you load it with lots of faux flowers the weight increases considerably. So my first consideration was how was I going to support my balloon wall?
Thinking about what would work best, I came up with the idea of using a grid frame. My next task was to find a grid frame that would be suitable. After a little research, I found the perfect solution!
 |
| Adding the balloons to the grid frame. |
 |
The Prep
One of the client's criteria was that the balloons needed to be pastel tones to suit the faux flowers that they were supplying for the wall. How excited was I to see that Qualatex had recently published a trending article Custom Pastel Colours and included a fabulous Custom Colour Pastel Colour Chart. I spent a couple of hours during the evening double-stuffing 5" and 11" balloons in preparation for the job the next day - definitely worth doing in advance.
 When inflating double-stuffed balloons, make sure that you have an electric air-inflator that is powerful enough to inflate the balloons. I use the Premium Twin-Air inflator. It works perfectly and never over-heats!
 Here is a really short video that gives a close-up view of the wall.
Summary
I loved making this wall and learned a great deal whilst building it. Although I was really happy with the end result, as was the client, I am already thinking about how I could make it even better! This wall took eight hours to build, including the construction time to build the panels. Tonight, I am heading back to London to take the wall down and recover the framework, poles, and bases so that I can re-use them for my next fabulous balloon wall installation!
Happy Ballooning!
Sue
www.suebowler.com

Comments
did you pre build or build it on site?
I made it all on site :)
Pricing something like this is never easy, I had no way of knowing how many balloons I would actually use or how long it would take. I priced it in terms of what it was worth to me to do this job. It was worth much more than I actually charged, and if I did the same job again, I would probably charge a great deal more. However, I really wanted to do this job and having this opportunity made it worth my while :)
This looks so amazing. I love reading your blog. what is the name of the Gridz panel you used?
Guest House Booking in Madurai | Guest Houses in Madurai
Adidas showroom in madurai | Woodland showroom in madurai
flower wall hire Melbourne