Showing posts sorted by date for query Puffed Heart. Sort by relevance Show all posts

Monday, January 10, 2022

Inspiration for Valentine's Day!


Last year, when I originally wrote this blog post we were still experiencing difficult times with Covid restrictions, one year on and life has resumed back to normality... well almost! 

Valentine's Day falls on a Tuesday this year, which is actually a great day for Valentines sales! People love to send Valentine's surprises to workplaces rather than to home, giving you some great sales opportunities! When I ran my balloon business, I would target offices to get orders and most of my orders were from women to men! 

Here is a little inspiration from last year... more ideas to follow in the next few weeks! 


Personalised balloons remain a top favourite with customers
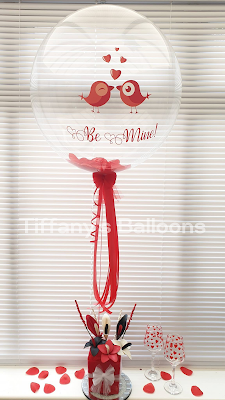
Valentine's Design by Jacqueline Pettitt 
of Tiffany's Balloons in
Chelmsford, Essex


Adding a name and/or a personalised message to a balloon can really add value to an order and increase the value of a sale. You can personalise Qualatex Bubbles and foil balloons, but remember that any personalisation will add weight to the balloon and reduce its floating time!

Personalisation can be quick and easy with the correct tools. One of the most popular methods is cutting out vinyl using a die-cutter such as the Silhouette Cameo, that many balloon artists use. 


If you would like to learn how to personalise a balloon using vinyl, check out this post: Customising Balloons with Vinyl  or click HERE for a direct link.

An alternative to using a die-cutter is to personalise Bubble balloons by hand! Here is an extract from an article posted in Balloon Images Issue 1 2019.

Steven Shippy, Creative Art Director at Pioneer® Balloon Company
3 Ways to Personalise a Bubble Balloon® by Hand
"Whether it be a unique name or special message, customers are clamoring for personalized products – and they are willing to pay for the extra service. A recent edition of The Deloitte Consumer Review, focused on the growth of personalization, revealed that 36% of consumers are interested in purchasing personalized products. Of those interested, 1 in 5 consumers are willing to pay a 20% premium for customization.

Keith Stirman, CBA, of All Things Fun in Durham, UK, reports a significant demand for personalized balloons in his store. “We sell at least 40 custom Bubble Balloons every week,” said Keith. “We automatically offer personalization with almost every balloon display that is sold in our store.”

With those numbers, it seems obvious to add custom balloons to your repertoire. But where to start? Are you intimidated by the learning curve and cost of a Silhouette Cameo to cut custom vinyl designs? Never fear! Using a Qualatex® Deco Bubble Balloon and a marker, you can produce any phrase or message that your customers desire. The following tutorials will have you customizing balloons to your heart’s content.

We asked Steven Shippy, Creative Art Director at Pioneer® Balloon Company, to demonstrate three ways to achieve different styles of personalized looks: tracing, faux calligraphy and traditional calligraphy.

Helpful Tips
Most importantly, you will need a paint pen or permanent marker that is not water soluble. Some of our favorites are: POSCA, Sharpie™, Zig® Painty®, DecoColor™ and Pen-touch™. There are different markers available in different parts of the world, so you may have to shop around and test different options to find the right fit for your needs.
Follow the package directions on your paint pen to prime the colors you plan to use before you begin drawing. Make sure each side of the marker is properly moistened, and that each color you plan to use is ready. You should also make note of the dry time for your utensil of choice.
Have tape on hand to secure your balloon to the surface you’re working on to minimize mistakes.
Make sure your work surface is clean and stable so it doesn’t move under pressure.
If you are right-handed, work right to left; if you are left-handed, work left to right to avoid smudging.
If the design takes some time to complete and the Bubble Balloon has been outside of its packaging for more than 15-30 minutes, be sure to wipe it down with a wet paper towel (after ink has dried) before inflating.
Calligraphy and faux calligraphy can be done on an inflated or uninflated balloon. Tracing must be done on an uninflated balloon. While an uninflated balloon provides a flat and solid surface, an inflated balloon is pulled taut and the ink/paint will not lose its vibrancy when inflated. The choice of inflated or uninflated is yours to make based on personal preference.
These techniques take time to master, but they will astonish customers when done well. We recommend Lettering and Modern Calligraphy: A Beginner's Guide: Learn Hand Lettering and Brush Lettering to start you on your way to creative lettering.
Personalization Option 1: Tracing
With this method, you trace a predetermined design through an uninflated bubble. Because it does not require freehand skill, it is the most beginner-friendly option. The most important point of this method is to determine the size of your design area beforehand. If you want all of your design to be visible and not wrap around the balloon, it should have at least 2-3 inches of open space on all sides.


Directions: Secure design on workspace and tape Bubble Balloon over design, making sure it is centered. Once marker is primed, begin your design by slowly tracing the outline of the letters. Use smooth, steady strokes to complete each line. Hold the balloon taut with your thumb and forefinger to keep the line smooth. As you fill in the shape, go in the same direction, rather than scribbling, to create a consistent surface that moves in the same direction. Be patient, don’t feel the need to rush or finish quickly.


To find out how to hand personalise balloons using Faux Calligraphy and Calligraphy, check out the complete article and videos in Balloon Images Issue 1 2019 or click HERE for a direct link."

Love Hearts 

The greatest symbol of love is a heart! Whether it's a simple 18" Red Heart Microfoil balloon or a fabulous heart sculpture, hearts are always a winner for Valentine's Day! 

Organic Puffed Heart by Sue Bowler, CBA

One of the great things about this design is that it can be made into any sizes! You can use 6" or 12" QuickLinks to create the exact same design! This design is perfect as a store or shopping mall display, displayed outside as yard art or delivered to an unsuspecting recipient! 

To learn how to create the basic Puffed- Heart (How to make a 'Puffed Heart' using Qualatex QuickLink™️ Balloons) follow this link https://theverybestballoonblog.blogspot.com/2014/07/how-to-make-puffed-heart-using-qualatex.html


The Heart Frame below was made using a Nikoloon Frame for Balloons. They are easy to assemble, and then it is up to you how you fill them! I chose to create an ombré effect starting with shades of pink and gradually ending with a deep red at the base. I also added 4", 9" and 18" Microfoil balloons and 'pops' of Chrome™️ Gold 7" and 260Q bubbles! 

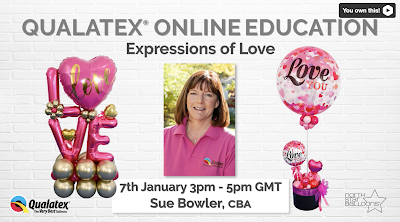
If you would like to learn how I made this design and other very sellable Valentine's designs check out the Qualatex Expressions of Love Video on Vimeo! 
Balloon Heart Frame by Sue Bowler


And finally, check out the latest Balloon Images Magazine - Valentine Issue. This Valentine's 2022 issue of Images™ Magazine contains more inspiration and information for each of the seven trends presented in the 2022 Valentine's Day catalog. We adore our customers' creativity, which you will see throughout the following articles, as artists from around the world lead the way on these love-themed trends. Be sure to check out all of the supporting links and educational resources to help you in your business this Valentine's season!


With just over one month to go until Valentine's Day you still have time to get ready for your best Valentine's Day trading yet! 

Happy Ballooning! 💕

Sue 


Monday, January 7, 2019

2019 Valentine's Day Sales Strategy


If you would like to learn how to create this fabulous
organic style "Puffed Heart" design, check out the
NEW "Simply Organic" course being taught by
Sue Bowler in the UK and Europe this year! 


Do you have a sales strategy? Do you know what a sales strategy is? It's simple really, a sales strategy is a plan by a business or individual on how to go about selling products and services and increasing profits.


Valentine's Day is a super big event in the ballooning world and one that you cannot afford to miss out on! In 2017, Brits spent a whopping £1.5 Billion celebrating Valentine's Day which was a massive increase from 2016 when we spent a mere £908m. In the US it is predicted that 19.6 Billion will be spent this year!


Valentines decor by Sue Bowler & Nicci Rene
Valentine's opportunities come in many different guise  This decor was created for a Valentine's product launch for an on-line retail company.
Decor by Sue Bowler, CBA, and Nicci Rene.

Valentine's Sales Strategy

1. Define your target market - who are you trying to sell to?
  • Businesses using the Valentine's season to promote their products. For this you may need to think outside of the box, some will be obvious, but others not so. 
    • Restaurants - to decorate a restaurant to make it look special during their Valentine's dinner service.
    • Hotels - this could be before Valentine's to promote that they are offering a Valentine's event, and also to decorate the restaurant and other rooms being used.
    • Shops and Shopping Malls- for window and counter displays - check out my blog post "Valentine's Shopping mall decor with Romana Kolenc, CBA, of Baloni Romana in Šoštanj, Slovenia."
    • Night clubs and other party venues.
    • Car and furniture show rooms - maybe not an obvious target, but this is a great opportunity for these types of businesses to bring a big splash of colour and the Valentine's vibe into their stores! 
  • Retail Sales - this is your obvious target market!
    Valentines Balloon Decor by Romana Kolenc
    Fabulous Shopping Mall Decor by Romana Kolenc, CBA

2. How do you reach your target markets?  Now you have defined who your target market is, you need to be able to reach out to them. Some will be local businesses within your community and you may have done work with them before. Others you may be connected to through LinkedIn or community and networking groups that you are a member of. Some you will need to cold call. If you are not confident enough to walk through a door without an appointment, you could create a professional looking postcard using an app such as www.canva.com and follow-up afterward with a phone call - it's important to remember to follow up! If you have never used Canva before check out this fabulous tutorial by Zoe Adam-Jones - Good Design Matters for your Business.
Zoe created this fabulous example postcard using Canva - Zoe says "when promoting b2b we want to focus on how we can help them stand out, increase customer engagement, and in turn increase sales... what better way than with balloon decor given that it is one of the biggest trends on social media right now." 

To download the organic heart image that Zoe has used for this postcard click HERE
or follow this link: https://us.qualatex.com/en-us/news/organic-heart-decor/

3. Plan your social media campaign to target different groups of customers. Your Facebook page will be directed at your regular clients, whereas you can use your Instagram account to target businesses and clients alike to give you a further reach. 

4. What are you going to sell? It's important that you plan what you are going to sell. You can start by checking to see what you have left over from last year, though it's good to rotate your stock, especially latex balloons. Also be sure to feature current trends - check out all the new and exciting Valentine's balloons in the Qualatex Valentine's catalogue.


Plan your designs - choose maybe five or six different display styles that you are going to sell. Make sure that you have a good variety of pricing points and themes, not everyone wants balloons that say "I love you" or a red balloon!


5. Order your stock early! As the saying goes "you must speculate to accumulate." This proverb says little to help people in search of a sensible long-term investment strategy, but it does suggest something important about one of the basic principles of investing; the relationship between risk and reward. If you don't have the stock, then you cannot sell it. 


6. Plan your window and other store displays, remember what you show you will sell, so make sure that you put your most profitable designs on display - most profitable does not necessarily mean most expensive. Do a job cost form for each of the designs you are planning to make, and check your profitability! If you struggle to cost your designs check out these past blog posts, both are really helpful.
How Much Would You Charge For This Design
How Much Should I Charge For That


7. Make selling fun! If you have a sales team, set targets and incentives for each staff member - make sure that targets are measurable, create a sales record sheet so that staff can easily record sales of specific designs as they sell them. Make sure that you reward the winners - make the prize meaningful, like the opportunity to leave work early!

It might seem a lot of work and effort but a good sales strategy will:


Help you acquire new customers
Help you expand/strengthen existing relationships with customers
Help you sell more products and services 


A sales strategy is something you should work towards all year, but if it's new to you then Valentine's is the perfect opportunity to start!

Happy Ballooning!

Sue
www.suebowler.com
#suebowler


Thursday, June 28, 2018

Wear Your Heart With Pride By Guest Blogger Stuart Davies, CBA


PRIDE Parades are all about love, equality, and happiness. One of the symbols that has been adopted by many is the Rainbow Heart!

This is not an ORIGINAL design. Although different, it has its origins from the “Puffed Heart” design  Sue Bowler posted in the Very Best Balloon Blog a few years ago. The main change is that it has been extended to enable a regular strip of six colours needed for the rainbow. 


This design is very versatile and can be created with either 6" or 12" Qualatex® Quick Links. It can be made bigger or smaller based on your needs. Adding it to a pole would make a fantastic parade piece, to a column for room décor, or even hung from a ceiling! A smaller version could also be used as a large table centrepiece.


For those of you who work with modelling balloons, it looks great woven with 260Qs or 350Qs. It is a relatively straightforward weave, even with six colours. I have tried it, and I made mine about 18" wide using 1.5" bubbles. I am sure those more skilled in the art of twisting and weaving could reduce the size below 10" - there's a challenge for someone! 
This heart is quick and easy to make, and regardless of size, it shouldn’t take much more than thirty to forty minutes from start to finish using an automatic air-inflator such as Conwin's Precision Air or Premium's Twin-Air Inflator


I used Chris Adamo's Quick Link Calculator to map out the theoretical look first, and below is a representation of what it looked like. The 11" round balloons on the outer edge are actually Quick Links.


As with the original "Puffed Heart" design, it is made up of two layers and then brought together with one final chain. In this design, I used 105 - Quick Links plus 102 - 5". To fill in further you could use additional 5" or 11" duplets (depending if you used 6" or 12" Quick Links) to close the gaps left in the x-grid Quick Link structure.

In the image below the greyed-out balloons are the sides shown in the image above. There is a single chain connecting side one and two together. The rounder images are Quick Links; I was being lazy when doing the design and it was the only way to show that there was a single balloon connecting two points.

My way of completing would be to make both sides first, then tie these together at the same points around the sides all the way around, and then connect the chain on the outside edge using duplets of 5" rather than weaving or tying it in. 


After only five years of developing and growing his small family-run balloon business, Stuart Davies, CBA, of Beyond Balloons in South Wales, U.K., has already established an enviable client list. Last year Stuart very generously shared his experience working with Walt Disney International to create fabulous interactive decor for the Pride London Parade made entirely with Qualatex® balloons! To read this blog post, click HERE.


To read "How To Make a Puffed Heart Using Qualatex Quick Link Balloons - Click HERE

A huge thank you to Stuart for sharing his fabulous design with us today!


Happy Ballooning!

Sue

www.suebowler.com


Thursday, July 24, 2014

How to make a 'Puffed Heart' using Qualatex Quick Link Balloons.

Wedding days are filled with love, romance and happiness and what greater symbol of love than a heart!

As many of you know working with the Qualatex Quick Links was a whole new world for me as well as a huge learning curve but an exciting journey, one that I am enjoying very much! I posted my first Quick Link blog last October  'How to make a simple Quick Link Heart for the uninitiated Quick Link users' , this shows how to create 2-dimentional hearts that are perfect for hanging as backdrops at a wedding and other suitable occasions.


When I found out that I was teaching at the 2014 World Balloon Convention earlier this year I decided that I would make it my mission to learn how to create a 3-dimentional 'Puffed Heart' for my Wedding Excellence class and was very happy with the results! Of course hearts are not just for weddings and can be used for many different events such as Valentines, Engagements and Anniversaries!

The heart shown below was created using 12" Quick Links in Rose & Goldenrod and for the connectors I used Caribbean Blue this created a triadic colour harmony, and it looked great!


This heart is quick and easy to make, it took me less than 30 minutes from start to finish using a Precision Air Inflator.