Over the past few years, a new and exciting style of deliverable design has emerged – Balloon Stacks, or Balloon Bouquets.
The Evolution of Balloon Bouquets over Time ⏰🎈 Back in the day (we're talking many years ago 🦕), a balloon bouquet was simply a bunch of helium-filled latex and foil balloons tied together and securely fastened to a weight. Nowadays, balloon bouquets have become much more sophisticated. These stacks are creatively arranged and have a unique blend of colours, techniques and designs that make them a perfect fit for any occasion.
Check out this stunning example of a creative Balloon Bouquet! Designed by Jackie Ochitwa of With a Twist Balloon Creations in Alberta, Canada, this masterpiece showcases the artist's mastery of this style of decor. I usually live by the philosophy of "less is more", but in this case, more is definitely better!
Design by Jackie Ochitwa, CBA
For me, it is all in the detail, and that is what Jackie is especially good at! Jackie's twisting skills really give her the edge when creating these intricate designs. Learning a few twisting techniques definitely elevates any balloon artist's work!
Jackie has her own YouTube channel 'Jackie O' where you will find a selection of video tutorials that show a number of techniques she uses in her designs.
I have also included below, Jackie's Kawaii class from the Q Corner Balloon convention 2020. This FREE video class is approximately 1 hour and 45 mins long and is packed with some great techniques and twisted design ideas to recreate for your bouquet designs... Happy viewing!
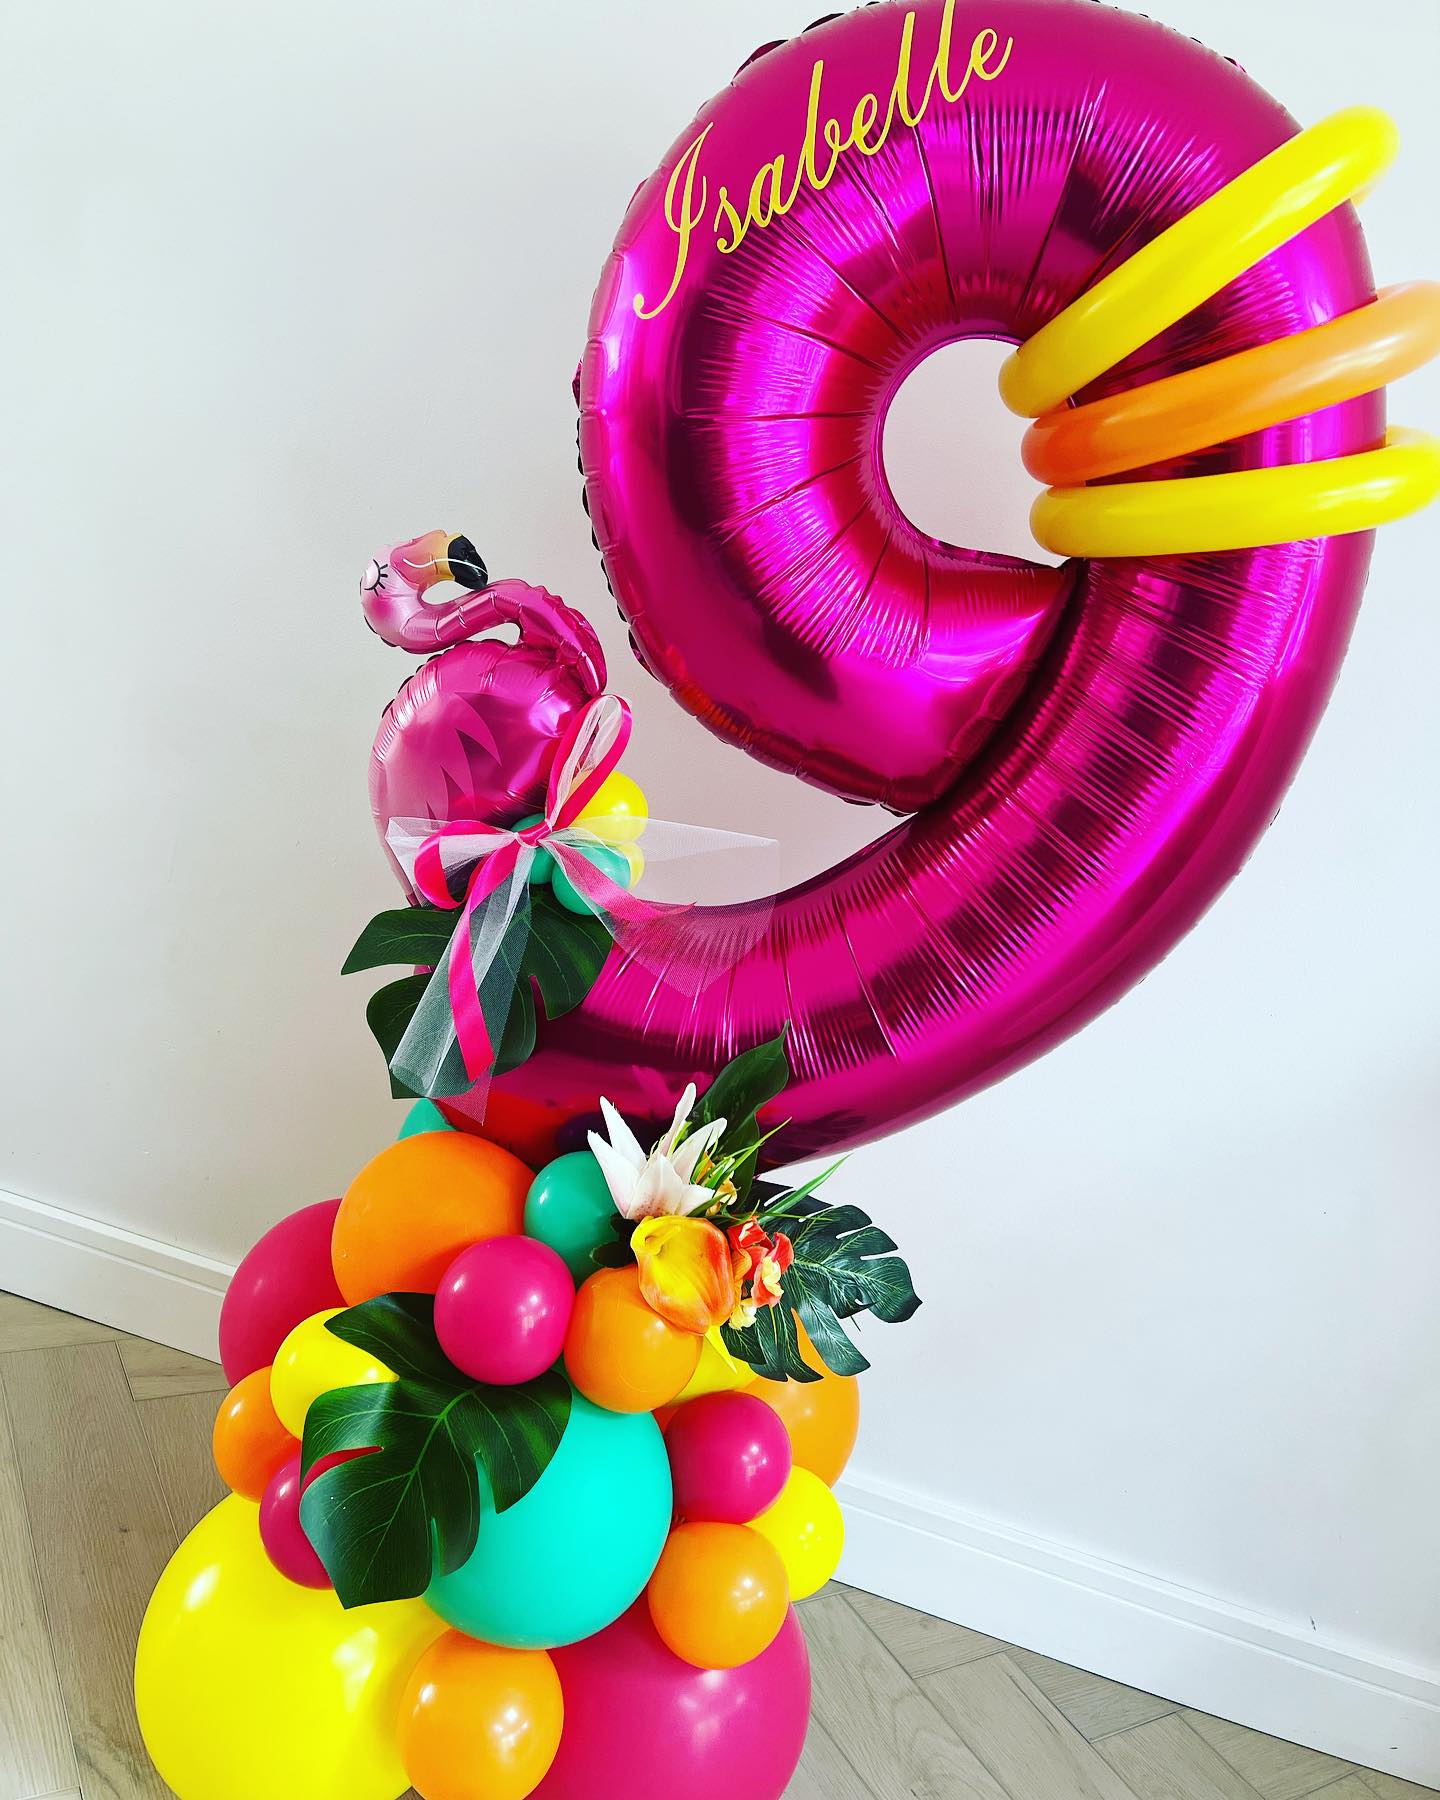
Balloon Number Stacks are also extremely popular, and they make the perfect gift for anyone celebrating a special birthday from 1 to 100! There is definitely no age limit for these fabulous balloon designs! I love this vibrant tropical theme Number Nine design by Debbie Boxhall of Dream Higher Events. Those HOT colours really do 'pop'.
Balloon Design by Dream Higher Events in Kent. UK
Here are some more great example of creative balloon bouquets.
There is no limit to the amount of creativity you can use within one of these displays. The only limitation is your ballooning abilities. If you would like to learn more, there are some truly great resources:
1. You can tune into Q Corner's FREE Balloon Show or you can join the Q Corner School of Balloons for a monthly nominal fee where you will get access to lots of video tutorials and extra Q Corner content.
2. You can tune into Happy Hour with Cam & Eve. Simply click on the link to view all the past live streams. Once again, these are all free!
Balloon Walls are perfect for all occasions and create the perfect theme backdrop.
QuickLinks are the quickest way to make a Balloon Wall! Creating a QuickLink Balloon Wall is a fun and colourful way to decorate for parties, events, or special occasions. QuickLinks are available in both 12” and 6” sizes.
QuickLink balloons have specially placed tail ends that allow you to easily link/tie them together. Below is a step-by-step guide on how to make a QuickLink Balloon Wall:
Materials you'll need:
QuickLink balloons in desired colours
Balloon pump (electric pump for speed and efficiency)
Poles and bases or Command hooks or other hooks (for hanging the balloon wall)
Scissors
Step-by-step instructions:
Plan the design:
Decide on the size and shape of your balloon wall. You could create a wall covering an entire backdrop, a small section of a wall, or even a free-standing balloon wall.
To plan your design, you could use the Balloon Pro Design Tool. This is a great way to experiment, and design your balloon wall and share a concept design with your clients.
Choose your balloon colours:
Select various colours to create a visually appealing and vibrant balloon wall. Consider the theme of your event or party to pick the appropriate colours.
Here are a few different examples of QuickLink Balloon Walls. You can easily identify the type of event each wall was for by simply looking at the colours.
Probably one of my favourite X-Grid Wall designs is by the incredible duo, Avital & Nir Shechter. The fabulous colours and the different sizing of the fillers makes this design fun, exciting and oh so vibrant!
Inflate the balloons:
Use a balloon pump to inflate the QuickLink balloons. Make sure to inflate them to the same size for a consistent look.
Create balloon chains:
Make multiple balloon chains of varying lengths, depending on your design plan. To create a chain, inflate your balloons to the desired size and tie the balloons end to end, ensuring that the tying connections are tight and cannot stretch.
QuickLink Vertical/Horizontal Grids
This is one of my favourite techniques, and I have used it many times when creating balloon walls at corporate events. The last wall I made before we headed into lockdown was for an event in London where the theme for the party was Great Gatsby!
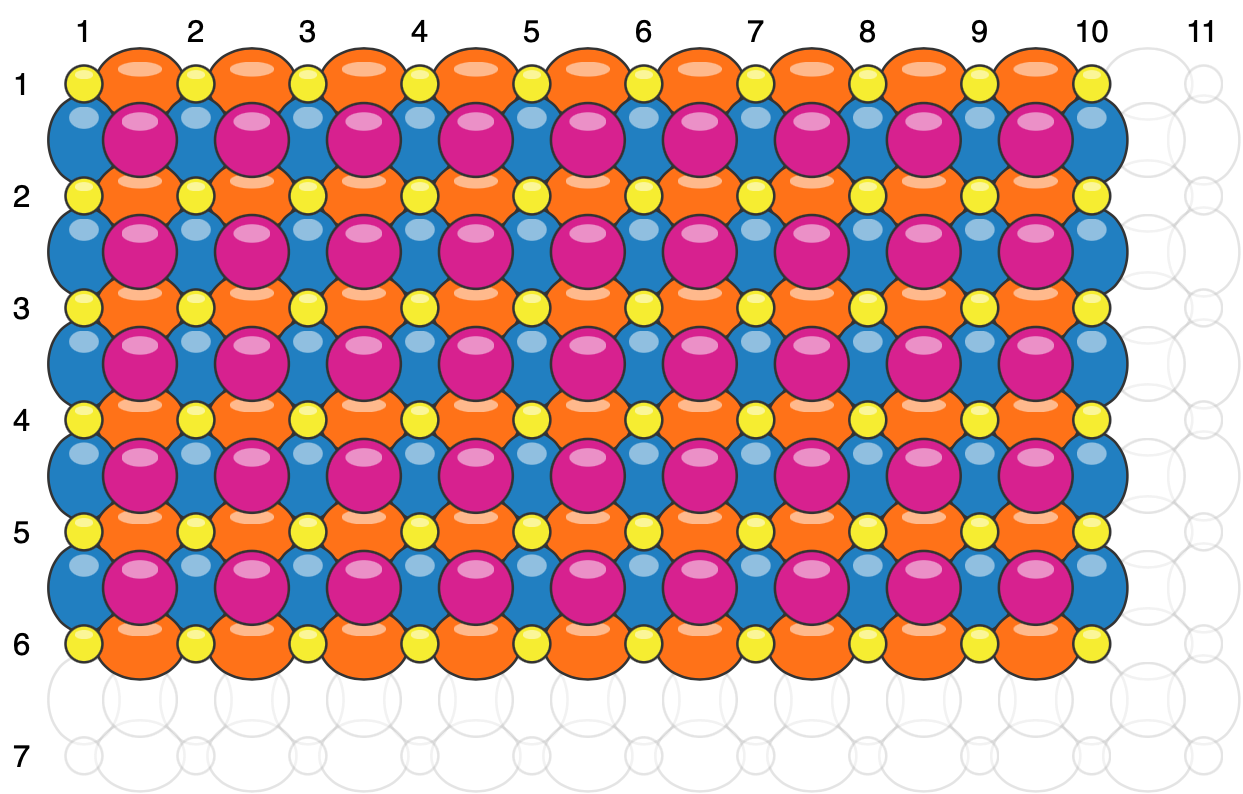
Here is an example of a Grid Method QuickLink Balloon Wall. I have colour-coded it to make it a little easier to understand the construction technique.
Step 1. This is the first step to constructing a wall. For this wall I will need to inflate: Make 6 chains using 9 balloons in each chain (this is shown in red) Make 10 chains using 5 balloons in each chain (this is shown in blue)
Step 2. Once you have inflated your chains, lay them down in the correct sequence. To connect the chains together you will need Duplets, in the example shown above you would need 60 Duplets.
Step 3. To fill in the wall, you will need 'plugs'. A plug is a Duplet that will fit in each of the holes within the wall. I would recommend to inflate the Duplets approximately 1" smaller than the size used to create the actual wall or if you are using smaller QuickLinks approx ½" smaller.
Add support for larger walls:
If you're creating a large balloon wall, you need to add support to ensure the balloons stay in place.
Optional: Add embellishments:
If desired, add other decorations like foil balloons, paper flowers, banners, or LED lights to enhance the balloon wall further.
I also want to share with you this fabulous wall. Luc Bertrand, CBA of WaW Balloons in Vichte, Belgium created the original design he created this wall as part of the décor for the 100-year celebration of Pioneer Balloon Company on the Qualatex stand at the Nuremberg International Toy Fair in Germany. Luc's design uses the AeröPole System® to create the circular frame, and then Luc used 6" QuickLink balloons to create the central grid system filled with multi-coloured 5" latex balloons.
I re-created Luc's design for the Pioneer Balloon Company's 100th Birthday Celebration Party in Wichita in 2017. The party theme was Black & White, and it was a great opportunity to use a fantastic selection of black & white printed balloons. This wall made the perfect photo backdrop!
QuickLink X Pattern Grids
This is another great technique using QuickLinks to create fabulous wall designs.
Here are two grids that I have designed on the Balloon Tool to show you examples of how the frame looks with and without the balloon fillers.
Here are some examples of wall designs using the X-Pattern Grid
'Love' X-Grid Wall designed and created by Sue Bowler
'Emoji' X-Grid Wall Designed and created by Alberto Falcone, CBA.
'Welcome Baby' X-Grid Wall Designed and created by Sue Bowler
Nir and Avital Shechter, CBA's of Baloney Nir in Katzrin, Israel are all about design especially when they create their fabulous balloon walls!
'Back to School' X-Grid Wall Designed by Avital and Nir
If you have never tried making a balloon wall, then start with QuickLinks! If you want to practice, you can use 6" QuickLinks wmeaning that your design will be much smaller than if you use 12". You can still make a great backdrop design using 6" QuickLink balloons, so make sure that whatever you make, you use it for a photo opportunity!
A huge thank you to Nir & Avital Shechter, Alberto Falcone, and Luc Bertrand for sharing their beautiful balloon wall designs with the Very Best Balloon Blog!


.png)


.png)