Wednesday, December 22, 2021

A FANtastic Centrepiece Design for New Year's Eve Celebrations!


This is such a lovely design to make. It is not too complicated, and it would make the perfect centrepiece for an elegant New Year's Eve event! Remember, designs like this are easily adapted to suit any occasion, simply choose your focal balloon and then use complimentary balloons and accessories to coordinate with your design.

I opted to use the Qualatex® 18" New Year Black & Gold Fans Microfoil balloon(#89858) as the focal point. Paper fans remain on trend and featuring this balloon gave me the ability to add fans into my design.


Material List

For the pole and base, I used a product called Lomey®, however you could also use Plexipoles™️ as an alternative. Both Lomey and Plexipoles are available from balloon wholesalers and suppliers. 

1 x 31" Lomey Clear Pedestal
1 x 9" Lomey Dish
Lomey Adhesive

#85111 - 7" Chrome™️ Gold
#85109 - 7" Chrome Silver
#43548 - 5" Onyx Black
#58283 - 260Q Chrome Gold
#58282 - 260Q Chrome Silver
#89858 - 18" New Year Black & Gold Fans

Gold/Silver Paper Fans
Uglu Dashes

To learn how to make this design, check out this video that Sue filmed with Greg Brown at BMTV recently.


Here are a few more ideas for a fabulous New Year celebration! 

I love this wall decor created by Alberto Falcone, CBA, of Balloon Lab, Europe. Alberto cleverly uses the Golden Unicorn Horn to create shooting stars! 


Smile, There's Bubbly!

The perfect holiday gift or decor piece to bring in the New Year.

Designer name: Eve Antonello, CBA, Pioneer Balloon Company, Wichita, KS, USA.


Bring in the New Year with this very elegant on-trend geometric design! Designer name: Cam Woody, CBA, Pioneer Balloon Company, Wichita, KS, USA


It is always good to get a little last minute inspiration, and if you cannot use these designs this year, you can always store the ideas away until next year, when hopefully life will have returned back to normal once again! 

Happy Ballooning! 

Sue
Follow me @suebowler


Monday, December 20, 2021

Balloon Distortion to Create Fun, Exciting and Fascinating Decor

The technique of distorting balloons to create a differing shape or form has been around for as long as I can remember, so at least 30 years! We often see balloons manipulated to create faces, flowers and many other exciting shapes.

One of the hottest trends right now is distorted flowers: these are often used as an accent detail in  'marquee' style balloon decor as shown below. This beautiful design was made by the extremely talented duo Aleks Hernández, CBA and Nelly Mildred, CBA of Waikiki Incredible in Yucatán, Mexico. If you look closely, you will also see that the ballerina's face shape in the centre of the design was also created using a distortion technique.


In the video below, Avital Shechter, CBA of Nir Balloons, Israel, demonstrates how to make a distorted balloon flower.

I have experimented with distortion many times with varying success. It is definitely a case of practice makes perfect!  A few years ago I demonstrated how to make a toadstool using the distortion technique on BMTV, along with some other cute design ideas! Check out the video below to learn step-by-step!


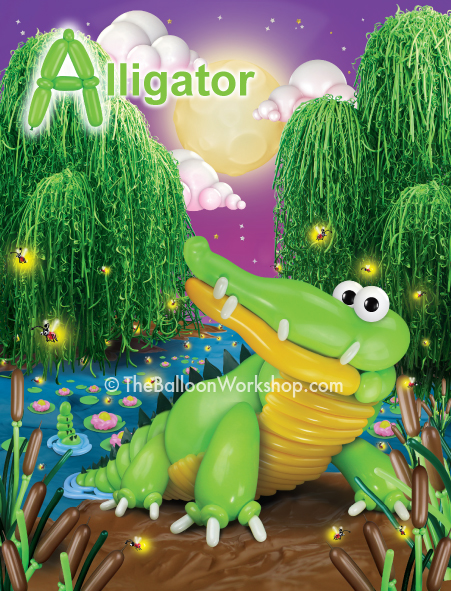
I know many balloon artists who are, at least in my opinion, masters of distortion. One of my favourites is the extremely talented Steven Mayhew, CBA, Owner/ Balloon Illustrator at The Balloon Workshop and Director of Marketing & E-Commerce at L.A. Balloons.

Steven Mayhew, designer/illustrator and author of the truly amazing ABC Balloon Book. 


Steven at work creating his incredible Walrus sculpture! 

I interviewed Steven for a past Very Best Balloon Blog post - A creative hobby that turned into a wonderful children's book - an interview with Steven Mayhew. One of the questions that I asked Steven was:
You have used a lot of distortion to create fantastic shapes for your animals. Do you use anything to help you when you distort your balloons?
‟Distortion was a very important technique used to create parts of the animals, as I didn't want them to all just look like the balloon animals we all know and love. I kept my tools simple when it came to distorting the balloons - a balloon straw, a basic pump, an Air-Pro inflator, the Nikoloon System by Niko Fric, and whole lot of patience.” 
To read the full interview and to see some more of Steven's incredible animal designs click HERE or go to


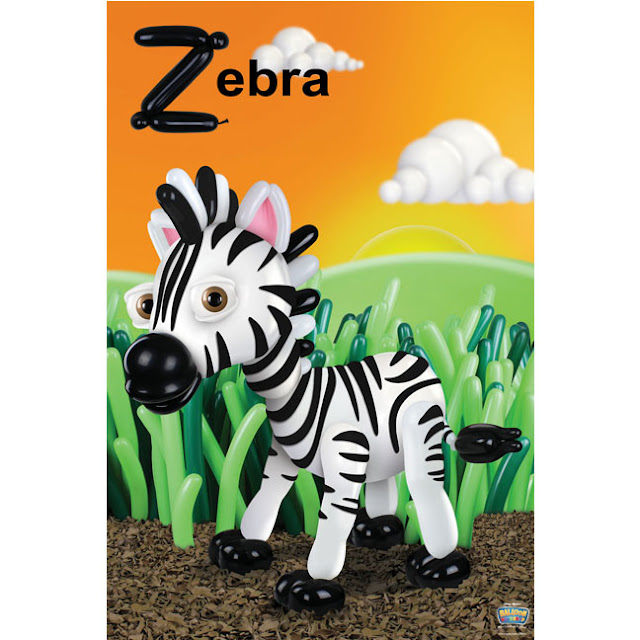
Zebra Balloon Sculpture by Steven Mayhew The Balloon Workshop.
Zebra Balloon Sculpture by Steven Mayhew
The Balloon Workshop.


Check out Steven's website; The Balloon Workshop - https://www.theballoonworkshop.com and on Facebook; https://www.facebook.com/TheBalloonWkshop


To learn more about Steven and his amazing book, check out this video! 


From a simple toadstool, to the amazing creations that artists such as Steven makes, distortion is definitely a unique and incredible art form! 

To read further posts on distortion and techniques, check out these posts:

Once again I would like to thank all the wonderful contributors to the Very Best Balloon Blog! I hope like me you are truly inspired by their creativity and generous contributions and of course, and thank you to you for reading my posts! 


Happy Ballooning! 

Sue
Follow me @suebowler

Tuesday, December 14, 2021

A Very Merry Christmas from Luc Bertrand CBA

Over the years, Luc Bertrand, CBA of WaWballoons in Vichte, Belgium has kindly created and shared a number of amazing designs with the Very Best Balloon Blog so that we can share them with the 'balloon community.' This year he has generously shared his updates to his wonderful QuickLink 'Santa' mural that he made a few years ago! 


Medium Santa Head

This is probably my favourite variation! I definitely need to make one of these! 


Small Santa Head


If you would like to learn how to make the original version - Large Santa Head, click HERE or visit

A huge thank you once again to Luc for sharing his fabulous balloon art with us all! 

Happy Ballooning! 

Sue

www.suebowler.com

Follow me on Instagram @suebowler

Wednesday, December 8, 2021

How to Take and Tweak Good Photographs of your Balloon Designs

How many times do we create a fabulous balloon design or décor only to find that the photographs that we take do not translate into that perfect shot... I am sure that we can all relate to that! 

Photography is definitely an art, and professional photographers work hard for years to ensure that they get great results. For us, this is one of many of our roles as a balloon professional. Great photos are vital for our marketing and social media campaigns, so getting the perfect shot is very important.

Balloon Decor by Sue Bowler


Here are some simple tips:

Keep your photos simple

If you are taking iPhone photos for social media like Instagram, do not forget that most people will see your work on small mobile screens.

Paring your compositions down to a few key elements makes them easier to understand on a small screen.

Below are two photographs from the same event. The first one shows the whole room, capturing the decor and room en masse. 

Balloon Decor by Sue Bowler & Team
Photograph by Nicci Gibson

The second photograph, shows the same decor but is highlighting the 3' confetti balloons and not the rest of the room, allowing the balloons to be the star of the show. I would choose the second photo to promote my event decor on social media and my website.


Balloon Decor by Sue Bowler & Team
Photograph by Nicci Gibson


Shoot from a different angle

Shift your perspective. When we start taking photos, often our first instinct is to take them from about the same position we see them from. Unfortunately, this does not make for the most exciting photos.

To step up your game, try taking photos from outside your regular sitting or standing position. This is achieved by shooting the subject from higher or lower angles.

The image below was from a corporate Valentine's event that I decorated a few years ago. It was shot from a low angle and only captures a small section of the decor. 

Balloon Decor by Sue Bowler & Nicci Gibson
Photograph by Nicci Gibson

Capture close-up detail

Good photography is all about showing people the world and all it contains in an original and beautiful way. Shooting close up can make everyday objects look interesting, exciting and unexpected.

Look for interesting colours, textures, or patterns in your subject that might go unnoticed if viewed from afar. This close up method can also highlight exciting elements within your designs.

Balloon Design by Sue Bowler

The design above is a Christmas Gift box design idea. The customer can put a little message inside the 5" balloon that can only be popped on Christmas Day! 

To emphasis this feature, I took a close-up shot of the 5" balloons to make it clearer to my customers.


Balloon Design by Sue Bowler


Slide the exposure meter to brighten (or darken) images

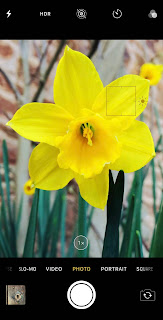
When using an iPhone, if you have seen the yellow focus square, you have probably paid attention the icon right on its right-hand-side. This little icon along with the slider will help you adjust the exposure of your image.

If you need it to be darker and underexposed, simply drag your finger down on the screen. If you want it to be brighter and overexposed, then you just drag it up.

There are a number of reasons why you would want to sacrifice a perfectly exposed image for a darker or for a brighter one – it all depends on what mood you want to convey.


Keep your camera lens clean

Most smartphones spend a very significant time of their lives in the hands of their owners and that means they’re covered in fingerprints.

Very often those fingerprints are found on the place where you want them the least: your lens!

A useful habit to develop is to get used to quickly cleaning your lens before taking a photo – that can ensure there will be no smudges, dust spots or blurry areas on your image.

It may sound like a really simple tip, but this one thing alone can have the biggest impact on getting a clear photos… and most people never bother wiping their phone’s lens (they usually wipe the screen!)

Use Smartphone photography apps for professional-quality touch-ups

  • TouchRetouch (cost £1.79) - this app allows you to declutter your photos and it is so very simple to use. How many times have you taken a photograph only to notice that there is a plug socket or fire extinguisher in the shot! 


Here is a great example of how this app works! 

This was a photo that I took of a design from a class that I was teaching. Unfortunately, I was unable to get a clean backdrop and therefore you can see a plug socket on the wall, plus a door, window and a radiator! 

Balloon Design by Sue Bowler


Here is the after-shot once I had used the app working with the OBJECT REMOVAL tool! It took a matter of seconds and the result is fantastic! The plug socket has gone, as has the door, window and heater that was on the wall! 

Balloon Design by Sue Bowler


An alternative to touching up and removing elements from your photographs is to use a background removing tool, as previously mentioned. I use this feature on CANVA.com which is part of the PRO version. Alternatively you can use www.remove.bg that allows you to remove the background from a photo free. Be warned, however, you can only save it at a low resolution, which is fine for social media posts but not for printing. To get a higher resolution, you need to pay for this service.

Here is a design that I removed the background using www.remove.bg 

Balloon Design by Sue Bowler

This is the before shot of the design sitting on my dining table. This is not really the end result image that I would want to share with my customers.


Balloon Design by Sue Bowler
By removing the background it gives me so many options. When an image has it's background removed it saves the file as a PNG, this means that the background is transparent, which allows you to drop that imagine onto a new background or keep it white.


Balloon Design by Sue Bowler

To bring my design to 'life', I have dropped my Reindeer image into a stock photo that was available on CANVA. This helps to give my design perspective and scale, enabling my customers to imagine what this design would look like in their home. The Christmas Tree photo was only available with the Pro version, so you would need this version to use this particular photograph. However, there are still many free photographs available. 


There are many more apps and editing tools available, however, these are the tools that I personally use and recommend.

If you are unsure how to use CANVA, I have a number of blog posts that will help you! 

This is the tutorial that helped me greatly when learning how to use CANVA - 

"Good Design Matters for your Business" - Zoe Adams-Jones Shows You How to Create Fabulous Social Media Posts Using CANVA.

How to Create Inspiring Instagram and Facebook Posts for the Non-Designer - Part 2


Happy Ballooning!

Sue
Follow me @suebowler


Thursday, November 25, 2021

Oh Christmas Tree - Creative Balloon Tree Ideas for the Festive Season

There is nothing more iconic than a Christmas Tree! The tradition of bringing a tree indoors at Christmas time actually began in the 16th century. Today, however Christmas trees come in many forms, including those made from balloons! 

In this post I would like to share with you a selection of inspiring styles of 'balloon trees' that could be used as part of a display or as decor at an event! 

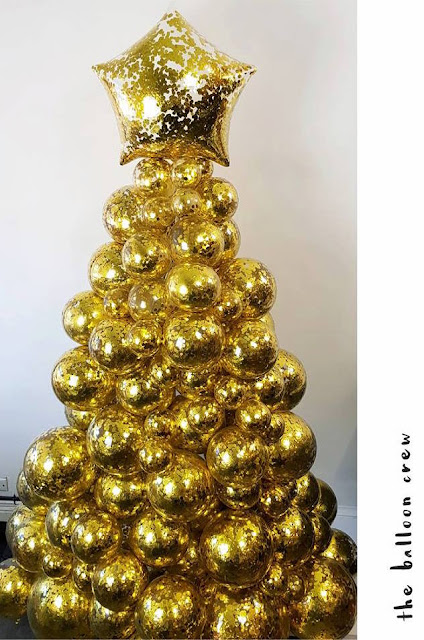
Let's start with a little bit, well actually a lot, of sparkle! What could be more spectacular than Chris Adamo's incredible gold confetti Christmas tree! Confetti-filled balloons are certainly a big hit with customers, and this tree looks simply F-A-B-U-L-O-U-S! 

Design by Chris Adamo, CBA,
 of Balloons Online, Sydney, Australia.


For decorative air-filled confetti balloons:
  • Inflate the balloon with a small amount of air to stretch open the balloon, and then let the air out. 
  • Use the funnel to insert confetti inside the balloon or you can use a balloon stretching tool* to open up the neck of the balloon.
  • Fill the balloon with air to the desired size and be sure to tie the balloon carefully afterward, ensuring that there is no confetti in the neck of the balloon.
  • Check that the confetti is distributed across the balloon, you can use static to get the confetti to stick. If using metallic confetti, you can use Hi-Float as an adhesive inside the balloon before you add the confetti.


This organic Chrome Gold and Chrome Silver Christmas Tree is absolutely gorgeous and beautifully finished with greenery and berries!  
 Zoe Adam-Jones, CBA, of JAZ Trading,
Queensland, Australia

Balloon Mosaic Frame  by Sue Bowler, CBA in Henley On Thames, England

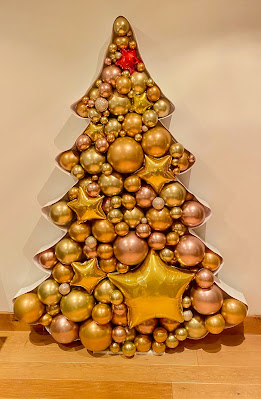
I really enjoyed making this mosaic tree design. The frame itself was so easy to assemble using a Nikoloon Frame kit. I used a combination of Chrome Gold, Chrome Copper and Chrome Rose Gold 7" and 11" balloons. I also added a few Metallic Gold 4", 9" and 18" Stars, plus one single 4" Red Star at the top! As a finishing touch, I created mini bubbles from the tips of Chrome Gold 260Q's. This tree lasted many weeks and looked absolutely fantastic! 


QuickLink Christmas Trees made by Sue Bowler

I made these QuickLink Christmas Trees for the entrance decor for a corporate Christmas party! When I made these, I was very new to working with QuickLinks.I was very grateful to Sean O'Kelly of BalloonDecor, VIC, Australia who shared his design recipe with me and the Very Best Balloon Blog! To learn how to create this tree, click HERE, or follow this link: https://theverybestballoonblog.blogspot.com/2015/08/how-to-make-quick-link-christmas-tree.html

This Christmas tree entrance decor scene was created for a Qualatex Event in France, in 2017
by José Luthman CBA of Ballonrama in Mulhouse, France.
 
These fabulous Christmas Trees were made using partially inflated 260Q balloons, and clearly the effect was stunning! 

Here is another fabulous QuickLink Christmas Tree, designed and created by Glen LaValley, of Glen the Balloon Guy in Edmonton, Alberto, Canada. If you would like to learn how to make this design click HERE or follow this link: https://theverybestballoonblog.blogspot.com/2015/08/how-to-make-quick-link-christmas-tree.html


Designer name: Cam Woody, CBA, Pioneer Balloon Company, Wichita, KS, USA


Here are a few more inspiring ideas from #balloonchristmastree on Instagram

This first design by Rejoice Event Design is simply spectacular! I love all the fabulous twisted tree decorations! 
Stunning White and Chrome Gold Tree by
Rejoice Event Design, New Jersey, USA
www.rejoiceeventdesign.com

White Tree with Red and Chrome Silver accent details by
Little Balloon Box in Bromley, England
www.littleballoonbox.co.uk

This pastel Christmas tree is so elegant.
Design by
The Balloon Crew in Barrie, ON, Canada
https://theballoooncrew.wixsite.com/theballoooncrew-1

And finally, a fabulous collection of Christmas Trees by Dream Higher Events completes the display! 
Design by Dream Higher Events in West Malling, England
www.dreamhigher.co.uk

There are so many different ways to create a Christmas tree from balloons, some being quicker and easier to make than others! Looking at these beautiful designs has definitely inspired me to make a 2021 tree! 

For even more inspiration and ideas, I recommend that you check out #balloonchristmastree.

Happy Ballooning! 

Sue
www.suebowler.com
Follow me @suebowler


Monday, November 15, 2021

How to Make this Festive Gnome Design by Sue Bowler

Finding quick, easy and sellable designs is always a little challenging, especially when you are building your seasonal offerings! Today, I would like to share this cute and festive gnome design that I recently created and shared with the viewers of BMTV.


Christmas Gnome Design by Sue Bowler

Material List

1 x Merry Christmas Gnome
#19772

1 x 42" Gnome
#20055


4 x 7" Gold Chrome Latex Balloons #85111
8 x 11" Gold Chrome Latex Balloons #58271


1 x 260Q Chrome Gold
#58283


1 x 260Q Red
#43958 

You will also need:

  • Balloon weight (for the overall design)
  • Small balloon weight & helium (for the Merry Christmas foil balloon)
  • Nylon Line and red satin ribbon
  • Stretchy Balloon Tape

To find out how to make this design please watch the video below! 


Balloon inflation sizes as a reminder:

  • Base and 3rd cluster inflated to 8"
  • 2nd/middle cluster inflated to 3.5"

Additional Tips:

  • This design is perfect for personalising with someone's name for Christmas.
  • Add Hi-Float to the 260Q's to help the balloons last longer.
  • Always ensure that any helium-inflated foil balloons are safely secured to a balloon weight.
  • This design could be made with alternative latex balloons to create a completely different look for the box/gift base. 


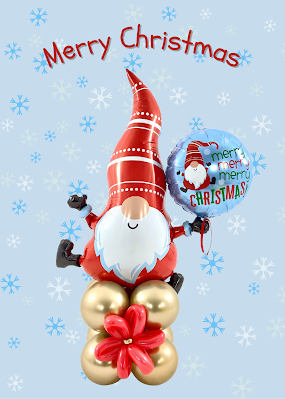
Here is another quick, easy, and festive idea! When you create a design that you really love, why not make it into a gift card that you can share with your friends, family and customers!

Christmas Gnome Design created by Sue Bowler


Here is my 2021 Christmas card, made using CANVA! It is so easy to do and gives you the opportunity to create something very special and unique! 

Happy Ballooning! 

Sue
Follow me @suebowler


Thursday, November 11, 2021

'Jingle All The Way' with these Festive Preparation and Christmas Balloon Design Ideas!

Christmas Gnome Design  By Sue Bowler CBA - www.suebowler.com
Christmas Gnome Design 
By Sue Bowler CBA.


During Christmas 2020, many were obligated to stay at home and avoid spending time with family and friends due to coronavirus restrictions. I know we are all hoping that Christmas 2021 will be a very special celebration as a result of last years lack of celebrations. With that in mind, it is time to get our businesses ready for Christmas if you haven't already started! 


And November is the perfect time to start marketing for Christmas:

Decorate your shopfront: 


How fabulous is this display by Trish Robertson of Barossa Helium Balloons and Party Supplies in Tanunda, South Australia. Trish was inspired to re-create Luc Bertrand's beautiful QuickLinks Santa Mural  which has taken centre-stage in her window! 


  • Decorate your outdoor area with festive window art, banners and decals. 
  • Inside, get shoppers in the Christmas spirit by playing your favourite seasonal tunes and lighting some autumn and winter-scented candles to set the mood. 
  • If your shop is on the smaller side and you’re concerned about capacity (and your ability to enforce social distancing), think about ways to get people shopping without the crowds — like hosting virtual or limited-capacity events or scheduling personal shopping appointments.

Trish said; "I look at my window as real estate, just like shelving in stores is real estate. But the window is the most important real estate because it can decide if someone comes in or not. The other thing I don't do is fill it. I keep it simple so it jumps out. 

Trish also leaves her lights on in her store allowing her window displays to keep on working even when the store is closed!  

Deck out your website:

Your digital space is just as important as your brick-and-mortar location. So, if you have a website, make sure to decorate your digital "shopfront as well — whether it is through creating a curated gift shop page, adding a Christmas decor-inspired banner to your homepage, or changing your colour scheme to incorporate more festive colours.


When it comes to decorating your website and social media pages, don't forget that Qualatex has some excellent FREE marketing materials, such as this animated Facebook cover (above) and other helpful seasonal social media posts (see below) that can be personalised to suit your business or ready made to simply pop into your campaigns. For a direct link to all the Ready Made Social Media Posts and other marketing materials click HERE


Christmas Decor Ideas:

For me, air-filled and personalised designs are the way forward! Here in the UK, Christmas for the balloon industry really kicks off with the a naughty elf, known by many as 'Elf on the Shelf" arriving in family homes on the 1st of December.
The Christmas elf is fast becoming an annual tradition in many homes. The elf is a special scout that is sent to children's homes from the North Pole to encourage kids to behave themselves. The idea is that Santa's little helper watches the children by day, and each night, it returns to the North Pole to report on whether they were naughty or nice. 
This Christmas tradition has just two rules: First, children are not allowed to touch the elf or it will lose its magic. 
Second, the elf will not speak or move while the kids are awake. The elf only moves at night when it makes its trip back to the North Pole. Once it returns home, it then assumes a new position in the house.
"Elf on the Shelf" was created by Carol Aebersold and her daughter Chanda Bell in 2005. The concept is heavily protected by copyright laws, and therefore anyone making and selling elf balloon designs should be very careful not to infringe copyright laws. 

There are a number of different manufacturers of this cheeky little character, with varying different names - Naughty Elf, Elves Behaving Badly, Elf for Christmas are all protected by copyright rules and laws. My recommendation is to do your research to ensure that you don't infringe on any of them, as it can be a costly mistake! 

One of the most appealing ways for the elf to arrive is inside a balloon! 


Christmas Elf Balloon by Naomi Spencer of
Candy Bubbles in Birmingham, UK.

I’ll be Gnome for Christmas! A fun and whimsical design for the holiday.


Designer name: Eve Antonello, CBA, Pioneer Balloon Company, Wichita, KS, USA

The Gnome tradition came to us from Scandinavia. Unlike the elves of other cultures, which reside at the North Pole, legend has it that gnomes pop out of their forests niches come Christmas Day, and walk through the front doors of homes to hand-deliver presents.

The top ten hashtags for gnomes are #gnomes #gnomesofinstagram #gnome #gnomelife #gnomesweetgnome #gnomestagram #gnomelove #gnomehome #handmade #handmadegnomes 


Shine Bright! It’s all things merry and bright with Rudolph!

I absolutely love this design by Cam Woody! Everyone loves the Red Nose Reindeer at Christmas and Cam has created a fabulous air-filled design that would take pride of place in any home. If you are a QBN member, there are step-by-step instructions available to recreate this adorable design. Simply sign in using your QBN number and then you will be able to view and download for future reference! 


Designer name: Cam Woody, CBA, Pioneer Balloon Company, Wichita, KS, USA

Happy ballooning! 

Sue
Follow me @suebowler