Showing posts with label QBN - Qualatex Balloon Network. Show all posts

Monday, September 13, 2021

Classic Balloon Décor vs. Organic Balloon Décor

When I look at Facebook, Instagram, and other social media channels, I see far more displays of organic balloon designs and installations than I do of Classic Balloon Decor. I believe that social media has played a huge part in the rise in popularity for the organic style of décor. So is Classic Décor going 'out of fashion?' Before we look further into this possible change of trend, let us look at what is meant by each of these styles of balloon decoration.

Classic Balloon Décor

Classic Balloon Décor is the building blocks of ballooning, and almost all balloon artists/decorators begin here! It is as basic as learning how to inflate balloons to a specific size, tying a duplet, twisting balloons into clusters, as well as the art of adding balloons to line or framework! Classic Balloon Décor is taught as part of the Qualatex Fundamentals course. Fundamentals is the balloon course for beginners, and it provides the grounding that retailers and decorators need before starting a business that includes professional balloon work. It is also taught as part of the QBN Program (Qualatex Balloon Network).


Striking Balloon Arches by Dianna Glandon, CBA, of Above the Rest Event Designs, 
Knoxville, TN , USA.

So what is Organic Décor?

Organic decor is best described as latex balloons that are styled to mimic the beauty in nature. When a piece has organically, or randomly, sized balloons placed throughout, it adds an elegance within the design that helps set the mood of an event space.

However, organic décor is not created by simply using a range of different sizes of balloons. It consists of  intentionally sized balloons that have been arranged to create a natural flow whilst also ensuring that the principles and elements of design have been applied to ensure that the design maintains rhythm, balance and harmony.

Balloon Decor by Sue Bowler of Balloon Art by Sue Bowler & Nicci Gibson of Balloon Bouquet Events

So is it actually true that there is a greater demand for organic décor, or is it that we are seeing more of it on social media and therefore are led to believe that it is more dominant?

I recently asked some of our QBN members if they are offering Classic Balloon décor more often than Organic Style Décor? Here are some of their responses:

Cindy Chait of Balloons N Beyond, LLC, USA, reports "I do more classic over organic; almost 2 to 1 classic vs organic."

"Corporate customers love Classic Decor!"  is the statement from Nina's Balloons, CBA, in Norwalk, California, USA.

Balloon Columns by Ninas Balloons

Kahla Sharp-Leggett of Altitude Balloon Décor in Naperville, IL, USA. "I love the classic style, and try to steer customers to it. Corporate clients prefer it."

Red, White and Blue Columns by Kahla Sharp-Leggett of Altitude Balloon Décor

"Classic can look fun and hip!"  suggests Rachel Porter, CBA, of Balloon Splendor of Mount Vernon, Washington, USA.


How fabulous is this balloon arch! Rachel describes it perfectly on her website.
 "Bright fun colors served as the entrance decor to an outdoor company picnic at the Microsoft campus. 6 colors in a well-disbursed pattern accented with small round balloons attached to long skinny balloons (balloon bauble accents) made the cold July day not seem so dreary."

 Bob Armstrong, CBA, of Doctor Bob's Balloons Unlimited in Barry, Wales. "We create the same amount of classic and organic. It’s good to offer both."

PRIDE Balloon Decor created by Doctor Bob's Balloons Unlimited
Bob uses Classic Décor to create these fabulous letters to spell out 'PRIDE' for an event in Cardiff, Wales.

Maria Alvarez of Balloon Decorations by Maria, in Los Angeles, California, USA says "I love classic décor. Too bad Customers prefer organic right now hopefully it will pass soon."

Classic Balloon decor is often described as being "Timeless", "fast to create, making it highly profitable", and as a balloon companies "bread and butter" work!

Reading the responses from some of our QBN members, it is apparent that many of them still prefer to offer classic over organic décor. This is mainly because their client base is more corporate-based, and that the classic style of Arches and Columns lend them better décor opportunities for corporate events. However, organic décor can be visually softer and often offers a sense of artistic creativity and elegant movement, which are usually better suited to more personal occasions such as birthdays and weddings! 

I know that there are a number of balloon companies, possibly those who have started ballooning more recently, who only offer organic décor, and equally there are some more established balloon businesses that only offer classic décor! In my opinion, I believe that both are missing out. Being able to offer both styles of decor makes a balloon business more appealing to clients. 

From my own personal experience, I like to mix both styles when decorating, especially corporate events. I love the crispness of classic décor, especially when it comes to building Balloon Walls and Columns. But equally, there is definitely a time and a place for offering organic decor too. 


I designed and created this 'Sculptured Column' for an event I decorated in 2019. The client  loved it so much that they ordered 12 for their forthcoming event later this year!

I love to create balloon walls, they make the perfect photo backdrop. Personally, I prefer the classic style wall compared to an organic balloon wall, however, each event is very different and therefore we should adapt our décor to suit the event and our clients needs. 


Here is a "Yin and Yang" Balloon Wall where I mixed a classic wall with an organic Garland, and I loved the end result!  

So which is your preference, classic or organic?

Happy Ballooning! 

Sue

www.suebowler.com

Follow me @Suebowler

Thursday, June 4, 2015

QBN Beginners Guide


As with all skills we have to start somewhere. In the balloon world people 'find' balloons through different routes.  Some through an already established business, such as a greetings card or gift stores and others more casually through a hobby.


When I started out, I suppose I would have come under the banner of being a hobbyist. I started my balloon business in 1990, I really did not know anything about balloons or how to run a balloon business or any business for that matter, but I was excited about building a business around balloons and that was enough for me to get started.


I was very much a beginner for the first 4 years of my ballooning career and fortuitously for me I was encouraged to join the Qualatex Balloon Network™. Why so lucky? After 4 years I had come to a bit of a crossroads with my business, I was busy enough decorating weddings and parties but I was not making any money and I was beginning to question myself if this was a viable business to be running?

Joining the QBN really helped me to turn my business around. It was the first time that I had ever even considered the business side of running my balloon business. It was a real eye opener and it gave me the knowledge and confidence to start running my business in a professional and profitable way!


You don't need to spend 4 years like me trying to work out how to make balloons into a fantastic as well as profitable business. Just read below and find out more about the Qualatex Balloon Network!

Tuesday, October 7, 2014

Part 5. Beginners Guide to the Elements & Principles of Design - Proportion and Scale

Scale and Proportion are closely linked and both are concerned with size. 


So let's consider how important is it for us to understand proportion & scale when designing our everyday displays. 
Here is a scenario  - " I have been asked to create table arrangements for a party in a venue that I have never visited".
When we start our design process, we think about the colours that we are going to use, and if there is a theme that also take high priority, but I wonder how many of us consider proportion and scale?

For me this is now a very important part of the design process that I need to consider right from the start. 
  • How big are the tables that the designs are being used on?
  • What is the size and height of the room?
Without knowing and using this information very early on in our design process we could suggest, propose and cost work that is total inappropriate for the room that it is intended to be used in! Believe me, I have been there... balloons too small or too big for the height of the ceiling and the size of the room and centrepiece that are too big or too small for the tables! 

You are the expert and you can use your knowledge and skills to advise and recommend to your customers.


So lets look at proportion and scale in greater detail.

Tuesday, September 23, 2014

Part 4. Beginners Guide to the Elements & Principles of Design - Rhythm

As we continue our journey to having a greater understanding of the elements and principles of design,  the next principle of design that we are going to look at is RHYTHM.

Rhythm is quite simple to understand,  Rhythm means movement, which creates interest within a design, if you think of music it's like the beat, there is always an underlying beat that takes us through a song or piece of music and rhythm in design is the same.

There are four main ways of creating rhythm within a design:

Transition
Repetition
Radiation
Variation

The primary purpose of rhythm is to guide the eye to the focal area but without trapping it there.


Transition:
Transition helps to create greater impact, similar shaped balloons can be graduated in size to add variety and therefore transition within the design, if you think about music again, the transition in music is when it changes from one key to another, so with balloons it can be when we change from one balloon size to another.

So looking at the 'Dolphin Arch' below, the transition in this design is where the balloons are decreasing/graduated in size from the base to the centre.

This design also uses repetition to create rhythm, this has been formed with the use of the 260Q curly spirals in the centre of the design.

The Very Best Balloon Blog


Monday, August 11, 2014

Part 1 Beginners Guide to the Elements and Principles of Design - Colour

Elements & Principles of Design

Creating the 'perfect' design is not something that just happens, well not for most of us anyway!  There are a number of factors that make it a perfect design, so lets take a look at what those factors are?

Elements of Design:
These are parts that make up the design, you can either touch or see the elements of design. These include colour, line, shape and texture.

Principles of Design: 
The basic principles of design include unity, proportion and scale, balance, rhythm and harmony.

By applying the principles to the elements of design brings them together into one design. How you apply these principles determines how successful a design may be!

Wednesday, September 19, 2012

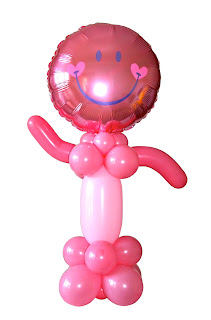
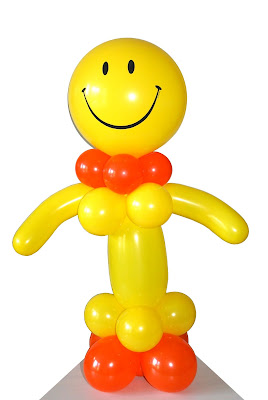
How To Make A Simple Air-Filled Balloon Character

I would like to share with you an easy and very cute character design, and how to make it step by step...

A great alternative idea to a helium foil filled balloon?

This is the first of a 'HOW TO' collection of clips, that will progress through a series of skills and techniques, this first one being a very easy design with no twisting skills required.

Sue Bowler


Product List - using Qualatex balloons
  • 18 x 5" Rose Pink balloons
  • 1 x 646Q Pink balloon
  • 2 x 350Q Rose balloons
  • 1 x Sweet Smile Face - Pink # 99573

How to:


Job Cost:

Now it time to work out how much you should sell your design for? Below I have shared two Job Cost forms using the QBN (Qualatex Balloon Network) Job Cost form. I have listed all the products and quantities for each of these designs, all you need to do is add your balloon costs and your hourly rate. I suggest that it should not take more than 10 minutes to make up these little guys!


Sue Bowler
Smile Face Guy 1 - Designed by Sue Bowler CBA


Sue Bowler
Smile Face Guy 2 - Designed by Sue Bowler


I hope you enjoy making this design? Let me know how you get on... I am sure that your customers are going to love these little guys!

Happy Ballooning!

Sue
www.suebowler.com


Friday, August 24, 2012

Working with Balloon Clip Art... and how to use a Image Manipulation Program to help you to present your ideas and suggestions to your clients and customers.

As a QBN (Qualatex Balloon Network) member you can get access to some great Clip Art templates that you can use to present your decor idea's to your customers and clients.

This blog is to help you to take a Clip Art design like this:

And with a little knowhow you can transform it to this, so you can show colours and pattern idea's!


Start by visiting www.Qualatex.com, if you look at the Purple headers on the left side of the homepage you will see under Qualatex Balloon Network, QBN Resource Centre, click on that and it open's the page that you can see below.

Now click on Marketing Resources

Before you can log in as a QBN Business Member and access your marketing resources, you’ll first need to read and agree to the terms of this limited license agreement. To be able to gain access to this area you'll need to have passed Test 1 Balloon Basics and have your QBN number and password. If you do not remember yours just email QBN@Qualatex.com and they will be able to assist you.


Once you have entered your QBN number and password you should reach this page:


This page offers you a few options. If you look at the top right you can download JOB COST FORMS in PDF or Excel!

But for now we are looking at Clip Art, so simply select CLIP ART from the Resources menu and leave the Theme and Item reading All, then click on search.


You will now see a selection of Clip Art templates that are available for you to use.


You simply click on the Clip Art that you want to download and save it to your computer, make a folder on your desktop and name it Clip Art so you can easily store and find it when you need it.

So, now you have a Clip Art template of the arch or bouquet that you want to show your customer, how can you add colour to it to use it in your quotes and or presentations?

After many attempts over the years trying to learn how to manipulate photographs and pictures, downloading various 'time limited trial design programs' and really not ever getting to grips with how they work (sound familiar) plus without spending huge amounts of money on a program that I would probably use less than 5% of it's capability, I finally discovered a free program called GIMP - GNU Image Manipulation Program. 


I am not going to say that GIMP is a really easy program to use unless you are already a Photoshop and Coral Draw users , and if you are then you probably already know how to colour fill and much more!


So, if you are like me and with anything new, especially when it comes to computers, it takes me a while to fully understand how things works, and find that it is a constant learning curve!

Here is a description of GIMP from the manufacturers.


I have read a number of different reviews and in the main they are all very good, but hopefully, I can get you started on some really simple tasks.

So, to get started, you need to download GIMP there are versions for MAC and PC, visit www.gimp.org ... it's been a while since I downloaded my version, so I hi-jacked John's computer to see how easy it is.

The first thing that I will warn you about is that your computers security software will probably advise you not to download it, but that's not unusual, but it's a decision that you have to make, but from a personal experience I have never had any issues.

Secondly, because it's a free program, it appears that they have lumped a whole load of other programs ahead of the download, so just keep declining these (unless you want them) and then it will eventually automatically start the download, just read everything that it shows, so you can see what they are offering you, but I just declined everything and on the last one I un-checked the box that said that it would send me up-dates...

It's quite a large folder approx. 77mb (megabytes), but it does not take too long to download.

Now it's downloaded, just complete the set-up as instructed and then your ready to start!

When I download programs such as GIMP, I always save them into my APPLICATIONS folder, when I open the Applications folder I am looking for this symbol.


To start working on a Clip Art image, you might find it easier to right click the Clip Art image that you have downloaded and saved and  that you want to colour and ask it to open with then select GIMP, there will be several options see below (your options will be different from mine).

Once you click on this GIMP will open and look like this:


It asks you if you would like to Assign the picture to the workspace allocated, just click on the Assign button - you actually have the option to change the size of the workspace at this point, but I would not bother. If you have already opened GIMP it will automatically assign the Clip Art to the workspace.

Now your screen should look like this...


I hope that you are still with me, once you have done this a few times it will become easier and you will start to enjoy all the things that you can do with GIMP... but baby steps for now:)

Should the toolbox not appear, you can open it by clicking on Tools, which is on the command bar just above the large balloon on the column. I keep the toolbox outside of the workspace so that I can always see it. If any other boxes open in addition to the workspace and toolbox, just close these as you will not need these today.

Now you need to learn how to fill the balloons with colours.

You are going to work with a tool called BUCKET FILL


Once you have the Bucket Fill tool open you can now start to fill in the balloons.

I have made a short DVD clip to show you how to do this... I hope that it helps?


Wow...this has to be the most challenging blog that I have written to date! I hope that you are able to understand how to preform this simple task and use it within your work... let me know how you get on!

If you have any comments please do not hesitate to leave them in the comments area at the end of this blog, or email me Sue@suebowler.com

I am no expert when it comes to using programs such as this, I hope that my very little knowledge just through trail and error will help some of you to experiment where you may not have felt confidant enough to do so.

Happy Ballooning!

Sue
www.suebowler.com

Friday, October 7, 2011

A few tips for those who are ready to take the CBA Practical Exam... I promise there is nothing to be nervous about!

With more and more balloon professionals working towards their CBA accreditation, I thought that it might be a good time to write a blog about how you can prepare for the big day!


Taking the practical exam is the final step in earning your CBA and this can only be accomplished after completing the 3 online tests, "QBN Balloon Basics", "QBN Balloon Deliveries" and "QBN Balloon Decor" and passing!

Now you are eligible to take the CBA Practical Exam and I want to share some tips with you that I hope will help you on the day!
You wont be doing this!


Firstly, I do not want you to think of this as an EXAM, the minute we use that word most of us go into complete panic mode and remember our schooldays of sitting hour after hour with a piece of paper in front of us desperately trying to recall all the information that we had learned over the past XX years! I can guarantee no desks, just a work table to work on and no written exam, you will just be asked to answer a few questions, no 'trick' questions, no 'curved balls', just things that you learned when you watched the DVD's!


We are a creative 'bunch' of happy people, working with balloons is our passion therefore I would rather you consider this as a your very best balloon job (which of course they all are) and the opportunity to shine and to confirm that you are the person who completed the online tests and that you understood the curriculum!

Let me start by talking about the practical side of the assessment process... I much prefer the word assessment :)

I would like to say at this point, that taking the CBA practical is not a competition! I believe that many people think that they have to create something that has never been seen before, in terms of idea's and techniques, I can assure you that this is not the case. Designs that score well are those that demonstrate a good knowledge of the principles and elements of design... all the 'stuff' that you just learned in the QBN program and not how you have invented the next great technique... there is plenty of time for that later when you enter competitions!

1. You are required to design and make one SOCIAL EXPRESSION bouquet.
What is meant by Social Expression? As usual I 'Googled' it!  I was pleasantly surprised with the result, it really defines what it means! Here are a few examples...

A friend has just had a baby. What do you say?
·        Congratulations!

Your  friend  is ill. What do you say?
·        I hope you feel better soon.
·        I hope you get better soon.
It’s a friend’s birthday. What do you say?
·        Happy Birthday!
·        Many happy returns!

So this is easy, you need to create a balloon bouquet that expresses a message... and there are many messages that you could choose from,  just simply open your Qualatex catalogue and you have a wealth of beautiful balloons with messages that you can use within your bouquet.

Here's an example using a design that I created:

Firstly, this design is called "Bottle Buddy Bouquet", it gives me the opportunity to make a bouquet that also acts as a gift! The bottle could be the recipients favourite 'tipple', but make sure you are within licencing  laws if the bottle contains alcohol, you could always use a non-alcoholic drink, which could be fun too...
Bottle Buddy designed by Sue Bowler CBA

What 'social expression' does this bouquet convey?
  • 'Happy 50th Birthday' - reflected through use of the Silver & Black Birthday Elegant Sparkles & Swirls and the 50-A-Round 11" Qualatex Balloons
  • Let's Party! - The wonderful 8-Point Star Shape topper -Let's Party Sparkle & Swirls, 28" Microfoil balloon.
  • With love - the 4" Gold Microfoil Heart, held by my Bottle Buddie that could be personalised with the recipients name!
This design says it all, it has a clear message, it's fun and perfect for a delivery!


Remember when you create your design... think California Law!


2. You are required to design and make one TABLE CENTREPIECE of your own design.
Centrepiece designs by Sue Bowler cba


What is a table centrepiece? It is simply an arrangement placed at the centre of a round or rectangular table where no part of the display blocks view lines. These are usually defined with the base element of a centrepiece not exceeding 14"  and a good clear visual gap before the use of any aerial balloons, usually a distance of 24" or more from the table top. Once again your design should demonstrate your understanding of principles and elements of design. Here are a few tips when you are creating your designs:
  • Have a strong focal point in the arrangement and draw the eye through the focal point by repeating balloons and other design material in a clear line or lines.
  • Make sure your design is visually balanced and mechanically sound.
  • Choose one of the colour harmonies for your arrangement and stick to it in all of your materials.
Your centrepiece design can be an air-filled design, using a central pole to give you the required distance between your base and top elements! Or it can be a base design connected with a complimentary helium filled arrangement. Remember when you create your design... think California Law!

3. Make a Duplicate Balloon Bouquet, working from a photograph, both the photo and materials are provided for this. I recommend that you practice 'specialty' skills & techniques such as creating 'Gumballs', Double Bubbles, correctly inflating GEO Donut's and GEO Blossom balloons! A new element to the assessment is that you are required to correctly inflate Qualatex Bubbles and Deco Bubbles, if these balloons are new to you I recommend that you watch the video clip on Qualatex.com  http://www.qualatex.com/qualatexbubbles/ It is important that you have the ability to re-create accurately designs from a photograph, this is especially important for referrals and relay business's.


4. Make a Duplicate 'Balloon Flower', working from a photograph, both the photo and materials are provided for this. Instructions for the Balloon Flower can be found at 'Instruction Sheets' on Qualatex.com or in the QBN Balloon Delivery & Bouquets' Kit. Just make exactly what you see, nothing extra, keep it neat and tidy!


5. Construct a 5' (length) of air-filled, 5-Balloon Cluster Spiral Garland, using 11" balloons, these do not need to be inflated to 11", between 9"-10" is perfectly OK, but you must ensure that all your balloons are the same size... use a template! The spiral pattern must be correct and the column should be constructed well and should not fall apart on a firm shake! You will be provided with the balloons and Dacron line for this.

6. KNOW YOUR KNOTS! You will be asked to demonstrate how to tie a temporary knot and a permanent knot as per the QBN curriculum!
Temporary knot


7. Answer 6.... only 6 questions from the curriculum, and either demonstrate a mock balloon delivery sales phone call or make a mock balloon delivery presentation during your assigned 15 minute panel interview.
OK, I would be lying if I said that this was easy... it's not difficult, but this is where most peoples nerves kick in!
 However, the panel will never allow nerves to stand in your way and they will try and make sure that you are relaxed as possible, if your mind goes blank, then you'll be asked another question or you can re-visit the question later and in most cases you'll be relaxed enough by then to remember.

Balloon Images Magazine Oct/Nov/Dec 2011


  • Make sure you know the principles and elements of design... as additional reading check out the great series of articles in IMAGES  magazines starting with April/May/June 2011 this issue covers Balance & Line, July/Aug/Sept 2011 covers Scale & Texture and Oct/Nov/Dec 2011 covers Colour and Proportion.

  • These articles are invaluable as they will really help you to fully understand the importance of these within your every day work.
Balloon Images Magazine Apr/May/Jun 2011
  • Make sure you understand the business side of your business, once again, in addition to the resources supplied with the QBN program look at the great articles featured in IMAGES magazine such as Protect Your Business Trade Secrets April/May/June 2011.


    With the mock delivery or telephone call... give it your all! Why not, everyone on the panel will have been through the exact same process, remember all the points to making a good delivery or talking a phone call order...  sing Happy Birthday or if you do not feel confident enough to sing, how about reciting a simple Birthday poem like some did in their delivery presentation, which was great! If you are asked to do a mock telephone call you can ask to turn your chair round, this may help you so that your not looking at the person you are suppose to be talking to on the telephone!


    There is a Guide to Taking the Certified Balloon Artists (CBA) Practical Exam, that you can download from Qualatex.com, this is full of other  very valuable information that I have not included in this blog and the actual CBA Practical Exam Score Sheet, so you can see how many points you are scored for each of the sections of the exam... a very helpful tool! 
    Design Basics Book


    Finally, review the DVD's, resources and your completed online tests, remember this process is simply to confirm your knowledge of the QBN curriculum!

    For me, becoming a CBA is not just about remembering what you have learned on the day, it is about using the knowledge and skills that you have learned each and every day within your business. I know that when I passed and became a CBA 16 years ago, it was a little like passing my driving test! I was certaininly not a perfect driver but I had the knowledge to be and from that day on I REALLY learned how to drive well... so once I became a CBA I started to look at my business in a totally new way, the designs that I created and still create today are all based round understanding the principles and elements of design, which colours I use together and how I can make my design look visually pleasing... and most importantly how to run my business... understanding how to price my work, and the list goes on and on! 
    I hope for those of you who are planning to take the final steps towards becoming a CBA that you have found this information useful... Good luck and I look forward to reading your name as a new CBA in Images magazine soon!

    Sue


    If you want to find out when and where the next CBA exam will take place you can visit Qualatex.com or contact your nearest Pioneer Office, there are often opportunities to take your exam at  Qualatex Events such as the one being held in Oxfordshire next month and the World Balloon Convention in Dallas next March!