Showing posts with label Step by Step design. Show all posts

Thursday, August 22, 2019

Fabulous Northstar Jelli Balloons Design Inspiration - With Step-By-Step Design Instructions

I don't know about you, but I love Northstar's trendy, and wonderfully colourful Jelli Balloons!


www.suebowler.com
30th Birthday Design by Sue Bowler, CBA.

These Pastel ombré numbers are available from 0-9, and each is a mix of your favourite colours! With a little bit of creativity, I believe that there are endless ways to use them, which I am sure that we will begin to see more and more over the next few months!
I love to design new ideas for decor and retail sales, so my immediate thought was, what other balloons can I use that will compliment and add value to my Jelli Balloon designs?
My eye is immediately drawn to the ombrè range, and particularly the pastels!

Rainbow Drip Cake

  • Size and shape: 39"
  • Package item #: 10506
  • Flat item #: 10494

Birthday Pastel Ombre & Stars

  • Size and shape: 18" Round
  • Package item #: 88052
  • Flat item #: 88046

Pastel Ombre

  • Size and shape: 18" Round
  • Package item #: 97430
  • Flat item #: 97429
www.suebowler.com


Recently, I've enjoyed creating a new style of air-filled displays that are just a little bit different from the norm. I loved creating this Jelli Birthday design using this technique. The colours are so fun and vibrant, and it coordinates well with the Qualatex Ombre Microfoil balloons! 


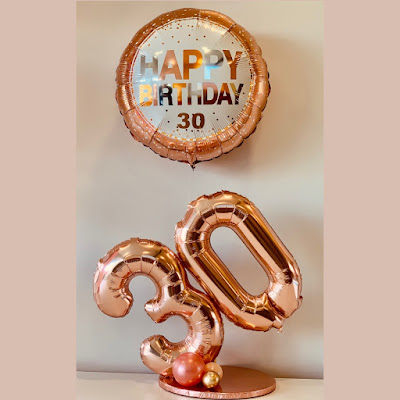
Here are a few examples that I have made using this same technique. This idea works well with 16" Numbers as well as 18" Microfoil balloons. For added impact, helium balloons can be added to the displays.

www.suebowler.com
Rose Gold 30th Birthday Design by Sue Bowler
www.suebowler.com
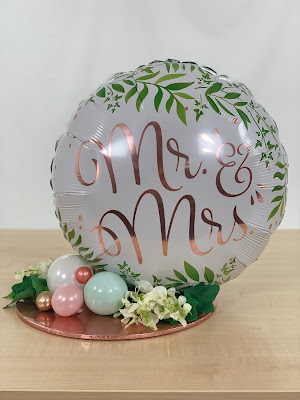
Mr & Mrs Wedding Design by Sue Bowler

The secret to this design is its base! I started with a sturdy cake board, and then cover it using half of a foil balloon. To learn how to recreate this view the video below.


I used the 18" Pastel Ombre to cover the base for the Jelli Balloon design as it compliments it perfectly. It gave the appearance of the Jelli balloon reflecting onto the base.


Once you have covered the base, you can add your balloons. To stick the balloons to the base you can use a variety of different adhesives. My preference is Oasis™️ Uglu Dashes, or Click-Click Balloon Bond, they are both very strong and will work well for a design like this.

Start your design with the focal balloons, and begin by inflating these with air. If they have connection tabs, secure these with tape at the back of the balloon. This helps to keep the design looking clean, tidy, and gives a professional finish.


If you are connecting two numbers together, use either Uglu Dashes or Balloon Bond to connect. 


Position the balloons onto the base so that they look visually balanced. Connect to the base using Uglu Dashes or Balloon Bond. If the room that you are working in is cold, you may find that the glue is not as effective as it would be in a warm environment. A small travel hairdryer, which you can keep in your tool box, can be used to heat up the glue a little and then add your balloons, which will make them stick very well. Having a hairdryer in your tool kits is a great asset, as not only does it warm up adhesives and make them stickier and stronger, it also makes it easier to remove any bubbles from vinyl!


The focal balloon should be able to stand up without any additional support, but we will still add in some small balloons that will offer a little extra support, and additionally will add detail and more pops of colour to the design.

These are the balloons that I used for this design. Each of the 5" balloons were double-stuffed to intensify the colours. I also used the tips of Chrome Gold 260Q's.


I started with my largest 5" balloon, which was inflated to approximately 3.5". Make sure that the balloon is nice and round. Trim off any excess balloon after the knot and add an Uglu Dash or Balloon Bond to stick it to the base.


This first balloon should be positioned behind the number and will acts as support to make sure that it is sitting in the correct position.


Repeat at the front using a different coloured balloon.


To complete the design, add a few more balloons so they look like they are scattered on the board in a random yet appealing way! Ensure that each of the balloons are well secured and that the knots of the balloons are out of sight.


I hope you have enjoyed learning how to make this design!

Happy Ballooning!


Sue
www.suebowler.com
#suebowler

Thursday, June 28, 2018

Wear Your Heart With Pride By Guest Blogger Stuart Davies, CBA


PRIDE Parades are all about love, equality, and happiness. One of the symbols that has been adopted by many is the Rainbow Heart!

This is not an ORIGINAL design. Although different, it has its origins from the “Puffed Heart” design  Sue Bowler posted in the Very Best Balloon Blog a few years ago. The main change is that it has been extended to enable a regular strip of six colours needed for the rainbow. 


This design is very versatile and can be created with either 6" or 12" Qualatex® Quick Links. It can be made bigger or smaller based on your needs. Adding it to a pole would make a fantastic parade piece, to a column for room décor, or even hung from a ceiling! A smaller version could also be used as a large table centrepiece.


For those of you who work with modelling balloons, it looks great woven with 260Qs or 350Qs. It is a relatively straightforward weave, even with six colours. I have tried it, and I made mine about 18" wide using 1.5" bubbles. I am sure those more skilled in the art of twisting and weaving could reduce the size below 10" - there's a challenge for someone! 
This heart is quick and easy to make, and regardless of size, it shouldn’t take much more than thirty to forty minutes from start to finish using an automatic air-inflator such as Conwin's Precision Air or Premium's Twin-Air Inflator


I used Chris Adamo's Quick Link Calculator to map out the theoretical look first, and below is a representation of what it looked like. The 11" round balloons on the outer edge are actually Quick Links.


As with the original "Puffed Heart" design, it is made up of two layers and then brought together with one final chain. In this design, I used 105 - Quick Links plus 102 - 5". To fill in further you could use additional 5" or 11" duplets (depending if you used 6" or 12" Quick Links) to close the gaps left in the x-grid Quick Link structure.

In the image below the greyed-out balloons are the sides shown in the image above. There is a single chain connecting side one and two together. The rounder images are Quick Links; I was being lazy when doing the design and it was the only way to show that there was a single balloon connecting two points.

My way of completing would be to make both sides first, then tie these together at the same points around the sides all the way around, and then connect the chain on the outside edge using duplets of 5" rather than weaving or tying it in. 


After only five years of developing and growing his small family-run balloon business, Stuart Davies, CBA, of Beyond Balloons in South Wales, U.K., has already established an enviable client list. Last year Stuart very generously shared his experience working with Walt Disney International to create fabulous interactive decor for the Pride London Parade made entirely with Qualatex® balloons! To read this blog post, click HERE.


To read "How To Make a Puffed Heart Using Qualatex Quick Link Balloons - Click HERE

A huge thank you to Stuart for sharing his fabulous design with us today!


Happy Ballooning!

Sue

www.suebowler.com


Tuesday, June 5, 2018

Silver Balloon Wall Installation


I really love to work with Qualatex® Starpoint and Taper balloons. There is something really elegant and a little different about these balloons - they are perfect for making balloon walls!


A few weeks ago, I was approached by a brand development agency who wanted me to build two balloon installations using silver square balloons to create an "immersive walkway." The client had been inspired by Andy Warhol's "Silver Balloons" exhibit that he first made in the 60's! The silver square balloons were hand-made - in fact, they were known as "floating Metallic Pillows." 

After further discussions with the client and a computer-generated visual image, we agreed that I would create two Starpoint and Taper balloon walls. These balloon walls offered the fabulous shiny effect that they were looking for. Plus, we added a little visual movement within the walls by positioning the sections so that it created a slight wave rather than being totally straight. 


Today, I am going to share with you some simple steps on how to make these fabulous balloon walls!

Firstly, I created a design on my computer for my client to see and approve. This also functioned as my working design sheet on the day. This is really easy to do. You simply go to www.Qualatex.com and download the balloon images that you want to use. I love the fact that they save as a .png file, which means that it does not have any background to the image! I then simply added and arranged the balloon images in a WORD document to create the design of the proposed wall. 


Each wall consisted of forty 40" Silver Starpoint balloons and seventy-seven 27" Silver Taper Balloons.

We found it easier to make the wall in smaller sections rather than trying to build the wall in one go. We connected eight Starpoint balloons together using a cable tie gun before inflation, making sure to not to connect the valve points. We tied these after inflation.


Connecting the valve points after inflation.


Once we had prepared all the sections, we connected them all together. You can use a cable tie gun or a scrap of 260Q. Both work very well! 


You can see from this photo how the balloons looked when connected together, several people commented on how they did not look like balloons once they were connected!


The first section of wall made - sharing our work-space with some amazing vintage dummies.
To inflate the foil balloons we used the Premium FoilPro™. This machine is designed for easy, hands-free (using a foot pedal) inflation of foil balloons as well as latex and balloons that require higher-pressure. The great thing about this inflator is that it has a special nozzle that provides the correct inflation pressure for foils, with no risk of damaging self-sealing valves.


Each wall was made up of five sections as shown above. Once all the sections were prepared, we connected them together.


Here is a view of the wall from outside - we had to make sure that it looked good from both sides!


This was a really great project to work on. We learned a lot on the way. Needless to say, that the second wall was made in half the time of the first wall! The client was really happy and gave us great feedback! 
"We loved working with you on this project and want to thank you for doing such a fab job,. Everyone loved the installation!"

A huge thank you to my team, Nicci Rene and John Bowler. And thank you Nicci, for the great photographs!

Happy Ballooning

Sue
www.suebowler.com 


SaveSave

Wednesday, May 16, 2018

Dive into the latest trend on Instagram - #mermaids (1,331,460 posts and growing!)

Being trend-savvy is the key to success, especially in the world of balloon artistry. Knowing what's hot will give us the edge over our competitors and excite our clients.


A sea-world theme is a favourite for me. I love colour, and this theme allows me to use so many wonderful hues to create magical decor. Earlier this year I created a number of visual displays for Pioneer®  Europe at Spring Fair. Spring Fair is the UK's No.1 trade show for gift and home products, held at Birmingham's N.E.C. One of the displays I made was designed to feature the new Qualatex® Enchanting Mermaid Microfoil®  balloon. 
It was also the perfect opportunity for me to showcase the NEW Qualatex Chrome Balloons™ and their unique vibrancy and versatility, especially when double-stuffed inside Jewel- coloured balloons.


I have been asked on several occasions how I made this display, so I thought that I would share it with you on the Very Best Balloon Blog.

It's all about the base!

The base is an integral part of the design. Without it, the design would not be as eye-catching as it is. It allows me to use many of the colours that are featured in the "Enchanting Mermaid" Microfoil. 


38" "Enchanting Mermaid" #57815


To start, I made a very simple Quick Link x-pattern wall using Chris Adamo's fabulous Balloons Online Design Tool. The wall consists of six chains using 6" Caribbean Blue Quick Links inflated to approximately 5", or five pumps on a Qualatex Green hand pump.

Two - chains of 10
Four - chains of 6
Total number of 6" Quick Links - 44


The chains are locked together using 5" Caribbean Blue and or 5" Tropical Teal duplets. 
Inflate to 3" or one pump using the Qualatex Green hand pump.
Total number of 5" balloons - 62.

With this type of "wall", we have spaces between each of the "X's" - the wall above has fourteen spaces to fill. This was where I was able to introduce a range of fabulous colours.
Each of the coloured balloons used one of the balloons listed below inflated to 5", 5.5", and 6" - the variation in size creates visual movement within the design, but be careful not to make the size differences too extreme. Each balloon is made into a Duplet with a 4" Caribbean Blue as the base balloon. This holds the balloons in place and keeps the wall flat at the base.


Chrome Silver 11" #58270
Chrome Silver looks fabulous when inflated. It creates a solid shine and has a reflective surface, unlike any other latex balloon. Chrome Silver also works extremely well when inflated inside a Jewel colour balloon (double-stuffed) - I renamed these "Jewel-Chromes," and they look stunning! 

Chome Gold 11" #58271
Chrome Green 11" #58273
Chrome Purple 11" #58274


To create the Jewel-Chrome balloons, use; 


Jewel Teal 11" #43753 
Jewel Quartz Purple 11" #43789
Jewel Sapphire Blue 11" #43793


18" "Happy Birthday Mermaid" - #57799 


To complete the display, you can add a selection of balloons that complement the "Enchanting Mermaid" special shape. Deco Bubbles are perfect for this display. They create a "bubble" look and allows to feature 11" latex balloons, making the display longer lasting. 


Qualatex has just released a fabulous new Chrome Balloon Custom Colour Chart, to download it click HERE or visit www.Qualatex.com


Happy Ballooning!

Sue


Tuesday, November 21, 2017

Small Snowflake Design by Luc Bertrand, CBA.

Every year, Luc Bertrand, CBA, of wAw Balloons in Vichte, Belgium, very kindly shares one of his festive designs. This year, he shares his lovely small snowflake!


Material List:

11 -  5" White balloons
12 -  6" White Quick Link balloons

Method: 

Step 1.

Inflate each of the 5" White balloons with two pumps on a hand pump and tie the balloons as close as you can to the nozzle end.


Step 2. 

Squeeze the air from the balloon so that it inflates the whole balloon, including the neck. 
Now, make two small bubbles (see photo).


Step 3.

Bring the neck of the balloon up below the larger bubble and twist. Pull the neck of the balloon through the middle of the two smaller bubbles to hold these in place.


Step 4.

Twist each of the smaller bubbles into a Pinch Twist. 


Step 5.

Repeat this process with all eleven balloons.


Step 6.


Now inflate the twelve 6" Quick Links with five pumps of a hand pump and tie these into duplets.


Step 7.

Twist all the duplets together to form a Topiary.


Step 8.

Attach the 5" balloons to the tips of each of the Quick Link balloons with the exception of the top balloon. This will enable you to hang it easily.


Thank you once again, Luc, for sharing a wonderful design that we can use this festive season!

Happy Ballooning!

Sue