Wednesday, August 12, 2020

2020 - On-Trend Bright, Beautiful and Very Colourful Rainbow Decor

Rainbows are the symbol of hope in many cultures, and during this pandemic, they have taken on that same meaningfulness. I don't think there has ever been a time when I have seen so many beautiful rainbow arches and other creative rainbow-themed decor displayed on social media.

The rainbow theme continues to trend, and now seems like the perfect time to share some inspiring decor! 

Rainbow and Unicorn Decor by Sue Bowler
Qualatex® Chrome™️ Rainbow Arch by Sue Bowler


Balloon Arches are the obvious choice when it comes to making rainbow dècor, and the best part is there is an abundance of different styles of arches that you can make! 


Sunshine Smile Face Rainbow Arch
Sunshine Smile Face Rainbow Arch by Cam Woody, CBA,
Pioneer Balloon Company

If you would like to learn how to make this 6-balloon Spiral Arch - click HERE to download the full instructions.

Here is another very artistic Rainbow Balloon Arch. Karoline Massey of Bewitched Parties, in Lancashire, UK, made this display.

Rainbow Arch

Have you been watching Happy Hour with Cam & Eve? This is a weekly Facebook Live show that is hosted on Mr Q's Facebook Page on TUESDAY's at 1 pm (CST)?


Here is a selection of rainbow theme designs that Cam Woody & Eve Antonello have made during one of their shows. To see this episode and learn how to make these designs, check out the video below.Rainbow Design

Rainbow Balloon Design by Cam Woody

Rainbow Column Design by Eve Antonello
Eve displays the NEW "Rainbow" Microfoil as the Column topper for her 


Luc Bertrand, CBA, of WaW Balloons, in Vichte, Belgium shows us a simple, yet effective QuickLink® Rainbow Arch with a Bubble Balloon® focal feature. This would be a prefect display to decorate a table.
Rainbow Arch by Luc Bertrand

How about a Rainbow Column? Dominic Cassidy, CBA and Keith Stirman, CBA, The Boys from Q Corner, Durham, UK, have created this pretty pastel Rainbow Column that compliments the "Radiant Rainbow" Microfoil balloon perfectly! 

Rainbow Column by The Boys from Q Corner
Here is another idea using the "Radiant Rainbow' Microfoil balloon, with an added smile face on this appealing 646Q Column.
Qualatex Rainbow Column
Carolynn Haymen, of POP! Designs and Creations LLC, creates her trendy Rainbow Column using a combination of QuickLinks and 260Q's! 

Carolynn Haymen, of POP! Designs and Creations LLC, creates her trendy Rainbow Column using a combination of QuickLinks and 260Q's!

How about this gorgeous 30th birthday display? Zahraa Jaward, CBA, of Forever Balloon Boutique, Beirut, Lebanon, shares her truly beautiful Rainbow Hoop, another truly inspiring way to incorporate the rainbow theme into a design.
Zahraa Jaward, CBA, of Forever Balloon Boutique, Beirut, Lebanon, shares her truly beautiful Rainbow Hoop
Did you know that Qualatex has even launched some fabulous new rainbow theme balloons? 

24" "Rainbow Clouds"
#13036
Front View

24" "Rainbow Clouds"
#13036
Side View


22" Birthday Bright Rainbow
Stripes
#13037


And finally, if you are looking for a little bit of a boost in your social media posts, check out the fabulous FREE resources in the Marketing Materials section on the Qualatex website.

Here is an example of one of the ready-made rainbow theme posts and images available for you to use.

Qualatex Social Media Posts


I hope this has provided you a with some fun new ideas for this exciting and colourful theme! 

Happy Ballooning!

Sue
Follow me on Instagram @suebowler


Monday, August 3, 2020

Q Corner Live Column Competition - the results!

I just wanted to take the opportunity to congratulate everyone that took part in the recent Q Corner Live Column Competition. Competing live in front of your peers is definitely not easy, but it certainly is a great and rewarding challenge! 

Fourteen balloon professionals from around the world came together during a Q Corner Show.  Through the power of the internet, and some technical know-how from Keith and Dominic - The Boys of Q Corner, they created their own unique columns during a 'live' 60 minutes window. 

The competitors were required to follow these simple rules:

Rules:
  • Only Qualatex® or Northstar balloons can be used, including latex rounds and non-rounds, Microfoil®, and Bubble balloons. 
  • The arrangement should be air-filled only, please do not include any helium-filled balloons.
  • Accessories such as flowers, greenery, ribbons and other decorative items can be used, however balloons should represent at least 70% of the design.
  • No balloons can be pre-inflated prior to the start of the competition.
  • Should you wish to add Fantasy Flowers, these may be pre-made and used within your design.
  • The design should be suitable to be displayed on a table.

Here is the winning design as voted by a judging panel made up of Cam Woody, Luc Bertrand, Eve Antonello, and Sue Bowler. Also featured is the People's Choice winner as awarded by a public vote and of course all the other fantastic entries too!

And the winner is....


Larysa created this beautiful and artistic design using Qualatex Chrome® balloons, her prize for winning first place was the fantastic Premium Twin-Air Sizer II.


The People Choice winner is...


And here are all the other wonderful entries! 


Once again congratulations to everyone who took part, and to our fabulous winners! To watch the competition, just click on the video below!


Happy Ballooning!

Sue 
Follow me on Instagram @suebowler

Tuesday, July 28, 2020

How to Create Inspiring Instagram and Facebook Posts for the Non-Designer - Part 2

Are you ready to step it up a notch and learn a few more tips and tricks that help make great posts for Instagram and Facebook! 

By now, you might realise (if you have watched How to Create Inspiring Instagram and Facebook Posts for the Non-Designer - Part 1) that I am a little bit of a Canva enthusiast, and enjoy spending time experimenting with the fantastic features that Canva offers. So far, in my video demonstrations, I have only demonstrated the use of the free version of Canva. In this tutorial, I will show how to create designs using features from both the free and from Canva Pro which is a paid for subscription. 

It is defiantly worth trying Canva Pro - they even offer a free 28 day trial of the pro version. You will need to use a credit card to set up your account, but you can easily cancel the subscription if you decide that Canva Pro is not for you! Just make sure that you make a note to do this before the subscription kicks in. 

Let's look at a few more great features on the free version before we head off to Canva Pro.

Check out the video below to see how to add a background and text to an image and also how to add a little animation too! 


This is the adorable 'Shine Bright' image by Cam Woody, which I downloaded from the Qualatex - Inspiration - Balloon Decor section. Please note that only QBN members and CBA's have the ability to download high-resolution copies of these images. If you are not a QBN member or CBA, remember that Qualatex has some amazing and FREE marketing materials available to everyone, and all are welcome to use these resources for social media posts. Even better, you can use Canva to add your own text and create your own unique posts! 

Beautiful Reindeer design created by Cam Woody
With a little (free) Canva magic, I added a background and a little seasonal text - view the video to see how! 


Canva marketing post created by Sue Bowler

Canva also has the ability to 'animate' your post (also a free function) although there are some professional options too which you can use when you upgrade to the pro version. Posting little videos on Instagram is a great way to attract new followers! Statistically, videos are viewed even more than photographs! 


Here is another free marketing image from the Qualatex Lifestyle Photo section that I downloaded, then added my own slogan to! 

Tropical Balloon Design

How to smarten up your own photos

Check out the video to see how to remove the background from one of your photos and replace it with a new background! 


I know that many of you are very keen to know how you can turn some of your own ballooning photographs into more appealing Instagram posts. Getting the perfect photo is almost impossible without being in a professional studio. Let me show you a few tricks that will hopefully change all that! 

I will start with one of my more recent images of a Number Five frame that I made. Before taking the frame outside, which was where it was intended to go, I took a photograph with the frame on a table. The lighting was appalling, and the setting not much better!

Number Five Balloon Frame designed by Sue Bowler

Using one of the Canva Pro features, I was able to remove the background and replace it with something that helped my design to stand out better!

Number Five Balloon Frame design by Sue Bowler


Here are a few more before and after shots! 

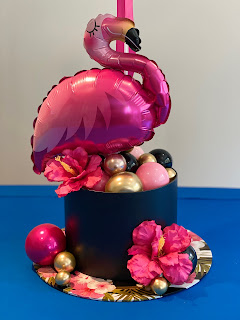
Before

Before editing shot of Flamingo in a box design

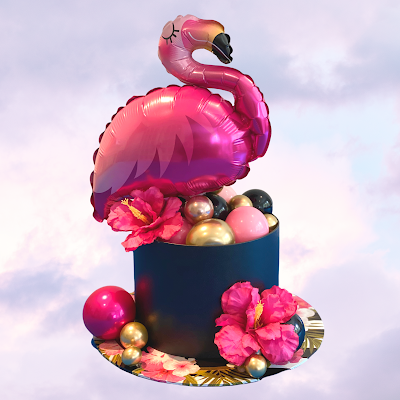
After a little Canva Pro Makeover

Tropical Flamingo Design by Sue Bowler


Flamingo Balloon Design by Sue Bowler

Keep in mind, not all photos edit successfully using the Canva Pro Background Remover Tool, and the results can be disappointing. Something to keep in mind in this case is you don't always need to show the whole image; sometimes just showing a small section of a photo can be just as appealing! 

Elegant Balloon Frame by Sue Bowler


Beautiful Balloon Fairy Tree by Sue Bowler

I hope that you have enjoyed this tutorial and that it has been helpful! Hopefully this quick tutorial will get you started, and maybe like me, you will even get a little bit addicted and start producing some truly beneficial posts! 

Happy Designing! 

Sue
Follow me on Instagram @suebowler

Wednesday, July 22, 2020

How to Create Inspiring Posts for Instagram and Facebook for Non-Designers - Part 1

We all know that good attractive visual posts are really important for our social media presence, especially on Instagram and Facebook. But I think that many are not sure how to go about creating these posts, and often don't have the time or skills to do it! 


Today I want to share with you a few of the skills that I have learned. I am certainly no expert and will never profess to be one, but I know I have really enjoyed learning and becoming more competent in areas like this. The knowledge I have gained has greatly benefited my social media journey, and I hope that it will do the same for you! 

You really don't need to be a design expert to create good posts, are there are a number of different resources that offer good design tools and templates.
  • PicMonkey - offers a 7 Day Free trial but charge after that.
  • Canva - has a free version and if you want to try the Pro Version they have a 28 day free trial.
  • Easil - free Easil Basic version and a monthly charge for Easil Plus that has many more features.
I first started working with PicMonkey some years ago, but I have now gravitated towards Canva after watching a fabulous video tutorial, called Good Design Matters for Your Business by Zoe Adam-Jones. For me, Canva offers almost everything that I need to create great posts!

As Easil is very new to me, so I really cannot give any constructive information about this app but it was mentioned recently on a podcast that I was listening to and thought it would be worth mentioning. If you use Easil, I would love to hear your feedback!

To assist with this tutorial, I have made a video that shows how to find great FREE resources that can be used as part of a social media content schedule. I will also demonstrate a few of the many benefits of using the paid Pro version on Canva (I recommend that you try out the 28 day free trial to see if the investment is worth it for you and your business.)

It is important to have a variety of different post types, as this will help to attract new followers as well as keeping your current followers engaged and stimulated by your posts. It is just as easy to lose followers as it is to gain them!

Post content can vary from;
  • Product Posts
  • Promotion of a Blog Post
  • Competitions
  • Behind the Scenes
  • Videos 
  • Questions
  • Holidays and Special Events
  • Quotes
In this tutorial we will look at how to create a selection of creative posts that will help you to create exciting content for your social media campaigns.

Qualatex Free Marketing Materials

How lucky are we that the Qualatex team is constantly looking at ways to help and support the ballooning community. Have you seen the fabulous range of free marketing materials that are available to use?

These are:
  • Ready-Made Social Media Posts
  • Coronavirus Marketing Materials
  • Facebook Cover Photos
  • Qualatex Lifestyle Images


During the video we will look at each of these marketing materials and talk about how we can use them as part of our marking program.

To access the full range of Qualatex Marketing Materials click HERE

Check out this video where you will learn how to access all the free marketing resources on the Qualatex website and more!


Canva
I have already mentioned that I use Canva as my preferred design tool. But watching Zoe's tutorial really helped me to get started! Canva also have their own Design School with some fabulous free tutorials that cover a wide variety of topics.

Templates

For non-designers business owners, having ready-made templates available to work with can really help. Professional designers have done all the hard work; all we have to do is make a few minor adjustments to make the design template work for us.

Original Canva Template


The above examples are the Canva templates that I selected with a few simple edits that I made. I tried to keep the essence of the template the same - which is what attracted me to the template in the first place.

If you have set up your brand kit, you may want to use your brand colours for your background and your brand fonts for the text. 

When you change the images, change them to similar sized images.

If you attempt to change too much you will completely change the 'look' of the design and it will probably end up looking messy.

Try to make any changes like-for-like - if you change the font, do not change a bold font to a soft whimsical script. If you change a background colour from dark to light, be sure to make sure that you change the font colour so that it stands out and is easy to read.

Check out this great video where you will learn how to create posts using Canva Templates.


Watch out for Part 2, where I will show you many more exciting ways to create inspiring posts and a very simple way to remove the not so great backgrounds from some of your photographs! 

Happy designing! 

Sue
Follow me on Instagram @suebowler