Showing posts with label step by step. Show all posts

Wednesday, April 8, 2020

Q Corner Convention - A Bonus Design from Sue!

Wow, have you had time to recover from watching all those amazing classes from the Q Corner Convention yet? What a truly fabulous five days that was, and definitely one that will go down in ballooning history! A huge thank you to Susan Dhillon, Eve Antonello and the entire Pioneer Balloon Company team who made this happen in such an incredibly short time! And of course, a very special thank you must go to Keith Stirman and Dominic Cassidy of Q Corner, who did an incredible job of both hosting and running this event, all while coping with very little sleep, and a fair share of technical glitches! 

As with all classes, 90 minutes is never quite as long as you think, and I still had one design in the wings that I sadly did not have time to show. So rather than waste the balloons and the design that I had prepared, I thought that I would make a short video that shows the bonus designs, plus a few additional tips! 

To understand the new design, you will need to watch the original class, so I have added the video here. Please note that the convention was filmed in parts, in which each of these parts is a number of classes (mine was the first to be recording in Part 6).


Here is the bonus video, I hope that you enjoy it! 


To help you to recreate these designs, I have included product and material lists.

Product and Material Lists


100th Birthday Celebration Balloon Arrangement 


#57050, #57048  (pkgd.) 2 - 18" Rose Gold Round Microfoil™️ Balloons

See listed below the range of latex balloons that I used: 

#58283 - 260Q Chrome Gold
#12939 - 260Q Chrome Rose Gold
#85111 - 7" Chrome Gold
#12936 - 7" Chrome Rose Gold
#43562 - 5" Ivory Silk
#43591 - 5" Pearl Peach
#57340 - 5" Rose Gold
#43584 - 5" Pearl Ivory

1 - 16" Cake Board Base  Silk Roses & Greenery
Double-sided Tape
Strong Sticky Tape
Uglu™️ Dashes/strong glue dots or Clik-Clik™️ Balloon Bond


Happy Birthday Tropical Hat Box Arrangement

#57280, #57278 (pkgd) 2 - 18" Birthday Hibiscus Stripes
#10464 1 - 14" Mini Pink Flamingo

#58283 - 260Q Chrome Gold
#85111 - 7" Chrome Gold
#43548 - 5" Onyx Black
#99326 - 5" Jewel Magenta
#43575 - 5" Pink
#25571 - 5" Wild Berry


1 x 12" Cake Board Base
1 x Black Hat Box
1 x Premium MaxiCup™️ II
1 x Premium Balloon Accessories MaxiStick™️ II 
2 x Premium Balloon Accessories Original Cello-Cup Clear 

1 x Premium Balloon Accessories Balloon Stick Clear
Pink Satin Ribbon
Silk Flowers
Low Temperature Glue Gun
Uglu Dashes
Double-Sided tape
Strong Sticky Tape


I created this Tropical Centrepiece to compliment a design that I recently made with Balloon School Pro, Setting the Scene Part 1 - Duplet Square Pack Balloon Walls and Setting the Scene Part 2 - Tropical Theme Organic Garland and other accent details! This is a paid download - to find it click HERE


Tropical Centrepiece

1 x Plexipole Base & Pole

#68824 1 - 20" Deco Bubble
#10464 1 - 14" Mini Pink Flamingo

#43793 - 11" Jewel Sapphire Blue
#85112 - 7" Chrome Blue

#85142 - 7" Chrome Green
#43602 - 5" Jewel Sapphire Blue
#99332 - 5" Fantasy Assortment - this includes both Jewel Sapphire Blue and Jewel Teal
#43552 - 5" Diamond Clear
#43607 - 5" White
#58284 - 260Q Chrome Blue

Tropical Leaves
Metallic Confetti
Hi-Float
Uglu Dashes


Fairy Number Design

#97429, #97430 (pkgd.) 1 - 18" Pastel Ombré 
#12245 1 - 14" Mini Fairy
#86369 1 - 16" Number Two Jelli Ombré 

#43566 5" Pastel Pearl Assortment - in the video I said that I used the Sorbet Assortment, but this was an error.
#43607 5" White
#58283 260Q Chrome Gold

1 x 12" Cake Board Base
Uglu Dashes
Double-Sided tape
Strong Sticky Tape
Heat Sealer

I hope that you enjoyed the bonus design and the few little extra tips! And don't forget, that you can catch-up with all of the classes anytime! Simply visit Q Corner on YouTube, find the class that you want to watch, and enjoy! 

Happy Ballooning!

Sue
www.suebowler.com
Follow me on Instagram @suebowler


Wednesday, May 15, 2019

Customising Balloons with Vinyl - including Step-By-Step Video Tutorials

Personal Bubble Balloon by Jacqui Pettitt of Tiffany's Balloons - UK
This beautiful personalised Deco Bubble is 
by Jacqui Pettitt, of Tiffiny's Balloons 
in Chelsmford, U.K.

The ability to professionally personalise balloons has revolutionised the balloon industry. The simplest approach to personalising balloons is to use glue pens and glitter, or a marker pen. But unless you have perfect handwriting and the ability to write on a curved surface, neither of these beat using a die-cutter machine like a Silhouette Cameo or Cricut - there are many other brands available, but these are the two brands that appear to be the most popular in the balloon industry.

Personalised gifts are currently the "in thing" as far as the giving and receiving of gifts is concerned. The ability to be able to offer your customers the option to write a special message or add a name or special age to the balloon is an absolute winner!


If you are thinking about buying a die-cutter such as the two listed, there are some fabulous tutorials to help you on your way!

If, like me, you're not great at reading instructions and want to get started immediately, I recommend that you watch this helpful tutorial by Dominic Cassidy, CBA of Q Corner first. He talks you through the setup of your work area in the software for the Silhouette Cameo & Portrait, Silhouette Studio - and it is probably one of the best 16 minutes you will spend before actually trying to use your machine! 


The next tutorial below covers how to use the TEXT TOOL - I truly wish that I had watched this video sooner! In this video Dominic shows how to use the text tool, and also shows some great tricks to make the text follow a curved line or any other shape!


Now what if you want to personalise a balloon with an image, like the unicorn face? The next tutorial - TRACE TOOL will show you how to trace an image that you want to use.

The unicorn face was made from a number of different resources. First, I used a 24" Deco Bubble with a 16" White latex balloon inside to make a solid white balloon rather than a clear Deco Bubble. I found the unicorn eye lashes and ears by Googling UNICORN FACE clipart - be careful as some clipart images are free, whilst others are licensed and require payment. I was initially unsure how to make the horn but I found a great horn shape that worked perfectly. The flower shape was already available in the cameo library and the cheeks are simply circles.


Here is another beautiful example of a personalised balloon by Jacqui Pettitt. I love Jacqui's attention to detail as well as the way that she composes her balloon designs for her social media marketing.

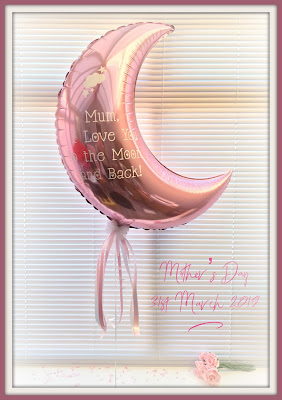
Personal Crescent Moon Balloon by Jacqui Pettitt of Tiffany's Balloons - UK
Personalised Crescent Moon Design by Jacqui Pettitt.

If personalising balloons is something that you have been thinking about doing for a while, or maybe you have already bought your machine but have not found the time, then this is the time to get started! 

If you are in need a little inspiration, check out #personalisedballoons on Instagram - with over 160K  posts, it's packed with some truly outstanding design ideas.


A huge thank you to Dominic Cassidy and Q Corner for allowing me to share these great video tutorials, and to Jacqui Pettitt for sharing some of her beautiful designs!

Happy Ballooning!


Sue
www.suebowler.com
#suebowler


Thursday, February 21, 2019

How to Design a Window Display From Concept to Creation - With Bonus Tips and Tricks Videos

Each year, I have the privilege to design the window displays for the Qualatex trade stand at Spring Fair, NEC, Birmingham, U.K. It truly is a job that I love doing, although challenging, I find that I can really allow my creative juices to flow!


Baby Boy window display by Sue Bowler - Balloon Art by Sue Bowler
Baby Boy Window Display by Sue Bowler. CBA.


Designing a window display is definitely worth pre-planning. Otherwise, you can end up filling a space without really knowing what you are trying to achieve. My role at Spring Fair is to showcase a range of new Qualatex balloon designs in a way that makes them look exciting and striking. 

Probably one of my favourite displays this year was the "Baby" window. I love the NEW "Baby Stripes" balloons; the beautiful pastels with gold and white are so elegant and completely on-trend!


18" "Baby Boy Blue Stripes"
also available in 9".

18" "Baby Girl Pink Stripes"
also available in 9".

Designing my displays

Sometimes I find the process quite easy, but not always, and so planning is especially essential for me. I start by creating a design board. I want to be sure that the ideas I imagined will be functional as well as pretty. I often use this same technique when I am proposing a design to a client, and have found that it really helps them to get a good understanding of what they will get. Below is the design/mood board that I made when working on this window. It helped me see how the balloon would look with a crescent moon shape and garlands. Although I did not re-create exactly what I had originally designed, I really did not deviate too far - that's pretty unusual! 

The ability to be able to download images directly from the Qualatex website in a png format (clear background) has made designing so much easier. I simply download all the balloons that I want to feature and then play around building shapes. If you are working on Columns, Arches or balloon walls, you can use Chris Adamo's fabulous design tool that will help you to produce good look design images every time! Designing the crescent moon was fairly simple. I import shapes into a Word or Pages document and build the shape that I am looking to make, add circles and fill them with the colours that I want to use. 


Balloon Display Design by Sue Bowler

Making the design

The display was created from two main elements - the crescent moon and the air-filled garlands. Using air-filled balloons in window displays is the key to longevity. The garlands are extremely long lasting and could be easily stored and re-used for a future display. The crescent moon has a limited life but to ensure that it looked its best for the entire show, I double-stuff all the latex balloons or treat with hi-float.


The crescent moon frame was made from a length of 6mm aluminium rod bend into a crescent moon shape. I actually used one of my hoops from another display as a template to ensure that I had a good curve. I secured the frame to a NOT base, which worked perfectly for this design. If you look at the finished design you will note that the base is white. I like to spray my bases with a white, quick-drying floral paint when I am creating pastel and light-coloured designs. 

Colour

To achieve the beautiful pastel blue that has been used for the Baby Boy Blue Stripes balloon, I double-stuffed Caribbean Blue with either White or Pearl White on top. Using both whites and mixing them into the design gave a subtle change in texture, some of the balloons looked a little more shiny whilst others had a subtle softness.

I also added a few under-inflated 11" Chrome Gold and some Gold Confetti-filled balloons too! If you are wondering what the tiny gold balloons are, they are a mix of small gold baubles and the inflated tips of 260Q Gold Chrome balloons! Excepting the 11" Chrome Gold balloons and the 260Q bubbles, all the other balloons are 5" inflated to different sizes.


Air-Filled Garlands

Making the garlands takes a little time, but the effort is truly worth it! My garlands were made from 4" Metallic Gold Stars, 9" & 18" "Baby Boy Blue Stripe" balloons. These were all air-filled and heat sealed as required. Each balloon was connected together using a very fine monofilament line. The finishing touch was to decorate each balloon with a tiny hand-made satin ribbon bow - it's the finishing touches that makes the difference!


The Display

The window space is quite small, so to make the best of the space, I use a layering technique to ensure that each element stands out in its own right. The long garland with the 18" balloon at the base was positioned towards the front of the window. The crescent moon was centred and slightly angled, and the shorter garland was positioned towards the back of the window. This gave the display a visual balance as well as the opportunity to see each of the elements very clearly for every position. The gold glitter balloons added an elegant twist to the design and reflected the confetti that is printed on the balloons.

Tips and Tricks

Here are two very short video clips that will show you how to make the mini 260Q Bubbles and how to make 5" Confetti-Filled balloons using Hi-Float, both of these techniques I used for the crescent moon design. 


Getting both window and in-store displays right are critical for the success of a business. They are the opportunity to show your brand and to promote products or seasonal themes. 


Happy Ballooning!


Sue
www.suebowler.com
#suebowler


Monday, October 29, 2018

Introducing Toñy Moncada CBA, and sharing a video of one of her fabulous NEW techniques!

Earlier this month I attended the OnArt Event held in Barcelona, Spain. It was a rare opportunity to be able to attend a convention as a guest and not an instructor.

I was very excited to be able to see some of the instructors at work teaching some truly awesome classes! One of the classes that I attended was "Table Settings" taught by Toñy Moncada, CBA of Globofiesta, in Elche, Alicante, Spain.


Rose Gold Table Setting by Toñy Moncada, CBA
Here is one of Toñy's beautiful wedding table settings that she sells
not only as a balloon display but also filled with treats and candies! 

I first met Toñy Moncada in 2008 at the first OnArt Event. Toñy is very passionate about balloons and creative decor. She loves exciting her clients with her fabulous ideas. Toñy's explains that her day-to-day sales mainly come from clients wanting balloons for newborns and birthdays. She specialises, however, in wedding and communion decor. In a six week-period from the end of April to the beginning of June, Toñy says that her store averages 50-60 communions per week!

Toñy told me that she loves to create wedding decor. She feels that her work fills the couple's day with many emotions. All of Toñy's weddings are bespoke, designed specifically to achieve the client's dreams. Toñy loves to build a good relationship with her customers so that she can fully understand their desires and wants.


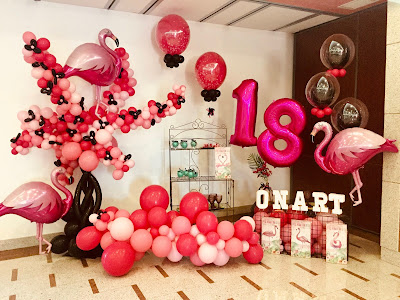
Flamingo's and Japanese Tree event decor by Toñy Moncada
I love Toñy's Japanese influenced design for an 18th birthday! 

One of Toñy's favourite balloons is the Qualatex® Deco Bubble! 
"Bubbles are so versatile. There are so many beautiful things that you can do with them! They are long-lasting and one of my top-selling balloons!"

Toñy offers some great advice for someone new to the balloon industry.
"To work with balloons, you must feel a passion. Without passion you will not be able to find your creativity. You must also understand how to run a business. This is vitally important for the future success of your business.
Make sure that you build a good relationship with your customers, as this will result in repeat business and good recommendations." 
During Toñy's class, she shared a fabulous technique that I had never seen before. I asked Toñy if she would be happy to share this with the readers of the Very Best Balloon Blog and she agreed! 

Friday, March 23, 2018

How to make a Confetti-Filled Deco Bubble with Ultra Hi-Float - Step-by-Step Video


Confetti Deco Bubble Balloons


Everyone loves confetti-filled balloons, and that includes the fabulous Qualatex® Deco Bubbles, too! I know that many of you are using the static method to stick your confetti to the inside of the Bubble, however, as we also know, this does not always work. Or the static drops out of the Bubble when moved to a new environment. Here is a surefire way to make sure that the confetti stick and stay in position.

Check out the instructions below and then watch the video clip for a demonstration on how to do this technique. 


INGREDIENTS
• ULTRA HI-FLOAT®
• 20
" or 24" Deco Bubble
• Mylar or foil confetti
• A kitchen/canning funnel

20" Deco Confetti Balloon

1) Add a ½ squirt of ultra HIFLOAT with purple clip on pump.
2) Rub the outside of the Deco Bubble to spread the coating over the inside surface.
3) Blow a puff of air into the Bubble so the sides of the balloon are not touching.
4) Add about a ¼ cup of chopped mylar confetti.
5) Inflate the Bubble with helium to about the size of a soccer ball.
6) Shake the Bubble vigorously to spread the confetti uniformly inside.
7) Fully inflate the Bubble with helium and tie.

24" Deco Confetti Balloon

1) Add 1 squirt ultra HIFLOAT with purple clip on pump.
2) Rub the outside of the Deco Bubble to spread the coating over the inside surface.
3) Blow a puff of air into the Bubble so the sides of the balloon are not touching.
4) Add about a ½ cup of chopped mylar confetti.
5) Inflate the Bubble with helium to about the size of a soccer ball.
6) Shake the Bubble vigorously to spread the confetti uniformly inside.
7) Fully inflate the Bubble with helium and tie.
Note: When inflating a Deco Bubble with confetti, safety glasses are recommended.


I hope that this helps some of you?

Happy Ballooning!

Sue
suebowler.com
Follow me on Instagram @suebowler
Sue Bowler www.suebowler.com


Monday, September 18, 2017

Magical Unicorn - A hot trend and a fabulous new design idea from Luc Bertrand, CBA!

38" Magical Unicorn


If you think that the unicorn is a craze just for children, then you are mistaken. Everyone is unicorn crazy, and it's a trend that is set to stay for a few years yet!


This magical theme is the perfect for birthday parties and Luc Bertand, CBA, of wAw Balloons in Vichte, Belgium, has kindly shared one of his latest designs with the Very Best Balloon Blog!


"Playful Rainbow" Unicorn by Luc Bertrand


Material List


  • 11" Purple Violet Big Stars #38460 - assorted colours
  • 5" White #43607
  • 12" White Quick Links #64151
  • 6" Spring Lilac Quick Link #90200
  • 6" Robin's Egg Blue Quick Link #90424
  • 6" Lime Green Quick Link #90178
  • 6" Pink Quick Link #90180
  • 5" Yellow #43609
  • 260Q White #43962
  • 5" Rose #43600
  • 38" Magical Unicorn #57352


To Make Unicorn Body

  • Make a 4-balloon cluster using the 11" Purple Violet Big Stars inflated to approximately 8". Add a weight into the base.
  • Make 3 x 4-balloon clusters using 5" White inflated to 4".
  • Add one of these clusters into the base cluster.
  • Inflate 2 x 12" White Quick links to approximately 10" and tie together. Connect to the base, and add the remaining white balloons clusters at the centre and to the top.
  • To make the Unicorn tail, inflate one of each of the colours as shown in the picture and decrease the size of each balloon from the Spring Lilac (largest) to the Yellow (smallest.)
  • Inflate the 260Q White balloons to make the arms, add a double pinch twist at the knotted end of the balloon, and secure a 5" Rose inflated to approximately 4". Repeat the process for the second arm. Secure the arms together allowing a little stretch between the knots (see picture 3 above.)
The body of the Unicorn is all air-filled.

The Head
  • Inflate the Magical Unicorn head with helium, and secure to a small weight as shown in picture 1. This will ensure that the helium balloon cannot float away if disconnected from the body and therefore does not break the California Law and follows the Smart Balloon Practice.
  • Cover the weight with an un-inflated latex balloon - Picture 2.
  • Add head to the body - Picture 4.
This is a truly fabulous design and I am sure that they will be very popular with our customers! A huge thank you to Luc for sharing this beautiful design with us all.

Just in case you have not seen the full unicorn range, check out these fabulous new balloons!


18" "Have a Magical Day"
 #57262 (packaged)
 #57260 (flat)

18" "Birthday Magical Unicorn"
#57319 (packaged)
#57317 (flat)

11" "Unicorn" Diamond Clear with Gold Ink
#57435


Happy Magical Ballooning!

Sue


Friday, August 25, 2017

Trade Secrets - Confetti-Filled Deco Bubbles - Tina Giunta, CBA, shares her fabulous technique!


Everyone loves confetti-filled Deco Bubbles. They are fashionable, on-trend and hugely popular with customers. But so many of us are having difficulties making the confetti stick to give an even coverage inside the balloon.

The wonderful Tina Giunta, CBA, of Shivoo Balloons in Melbourne, Australia, has mastered the technique and made this awesome video to show us her top tips on how to create this fabulous effect with success every time!


Materials
  • 20" or 24" Qualatex® Deco Bubble
  • Mixed metallic and tissue confetti - 5 - 6 grams (.2 oz)
  • Small plastic funnel - Funnel nozzle should fit neatly into the neck of the Bubble Balloon®.
  • Helium with tilt valve attachment
  • Hand Pump
  • Scrap of 260Q
  • Ribbon
  • Cloth - Tina suggests that you try with different types of cloth: cotton, nylon, wool, even a kitchen cloth!

Tina is one of our fabulous World Balloon Convention 2018 instructors. Make sure that you sign up for her classes early as they are sure to be very popular! 
Tina will be teaching "Yes, You Can Do Organic" along with fellow instructors Chris Adamo, CBA, and Matt Lewis, CBA, and "Theme Party Centrepieces!"

A huge thank you to Tina for sharing this wonderful technique! I am sure that many of us will benefit greatly from your video!


Happy Ballooning!

Sue
www.suebowler.com


Friday, February 24, 2017

Glitter Balloons!

Last month when I created a design for one of the Spring Fair window displays, I decided to make glitter balloons to complement the new, beautiful — in fact, probably one of my favourite ever Qualatex® birthday Microfoil® balloons — 18" "Birthday Pink & Gold Dots," Who cannot love this balloon!


#49164 18" "Birthday Pink & Gold Dots."
Design by Sue Bowler CBA
Here is the design that I created to show off this fabulous new balloon. I decided to have a go at creating a design using the organic style, which is so very popular at the moment. It was so much fun adding in the balloons, but it's important not to go too wild and still consider elements and principles of design, especially proportion, line, colour, and visual balance.

Monday, November 28, 2016

Fantasy Rose working with Heart Shape Balloons

Fantasy flowers can be made in a number of different ways. For many flower designs, we use floral wire inserted inside latex balloons to form petal shapes. However, when making the rose using the heart shaped latex balloons, we use very little wire.

Sue Bowler CBA


I first saw this type of Fantasy Rose a number of years ago when Jodie White, CBA, created these stunning designs for a photo shoot that we were both working on. She used 6" hearts to create the rose for this beautiful "Mother of the Bride" corsage.

Jodie White CBA
Mother of the Bride corsage by Jodie White, CBA

This is another beautiful design by Jodie. This time, she created a full bridal bouquet using a variety of fantasy techniques, and this occasion she used the 11" latex heart to make bigger roses.


Jodie White CBA
Bridal bouquet by Jodie White, CBA


A few years ago I taught myself how to make this delicate little rose and even attempted to make a small bridal bouquet which I used in a display at Spring Fair a few years ago. 


Sue Bowler CBA

To make the rose you will need the following items:


  • 6" Qualatex® Heart latex balloons ‑ there are no specific number of balloons for each flower, but I would allow approximately 15
  • Elmer's® Rubber Cement
  • 1.2mm/18 gauge wire - only 1 wire per flower required.
  • Floral binding wire
  • Floral Tape


Check out my step-by-step video to see how to create this lovely little rose.


To find out how to make other types of fantasy flowers check out my early post:
The Art of Fantasy Flowers.

Have fun and happy ballooning!

Sue
www.suebowler.com