Showing posts sorted by relevance for query proportion. Sort by date Show all posts

Saturday, May 23, 2020

An Inside into the Instagram Algorithm and The Importance of Understanding It

After watching a free tutorial about Instagram and how to get your 'Dream Followers' earlier this week, I realised as the instructor spoke about how to use the Instagram algorithm to get better engagement that I need to be honest, and confess that I really did not know what the algorithm actually was! Yes, of course, I had heard the term many times, but I had no real idea of how it works, and how it can influence my Instagrams account's effectiveness. 


1. The Instagram Algorithm Predicts How Much You Care About a Post

Your Instagram feed isn’t just based on who you follow, it’s also based on who and what you like. Instagram algorithm keeps tabs on posts that you like. The more photos that you double-click, the more signals you give to the Instagram algorithm that you want to see more content like this in the future.

The more the Instagram algorithm thinks you will “like” that post, the higher it will appear in your feed. Therefore it is important to get your followers to double-click on your posts so that you will always appear in their feed.


2. Instagram Algorithm watches engagement with your followers

According to Instagram, the most important engagements for feed ranking are comments, likes, shares and reposts, and for video posts, views, which is especially helpful to know when you are planning your posts, content, and captions.

It is important that you create content that your followers will enjoy engaging with. If you have the ability you should plan what you are going to post each day. Try to plan a week, or even a month in advance. 
Variety is key, you don't want to be posting the same kind of content every day, or your followers will become bored or worse, unfollow you! 

Here are a few suggestions for some more unusual types of posts from your norm.

  • Post an inspiring quote A surprisingly large proportion of successful posts are quotes/memes, so every business should share this kind of content on occasions as a part of their posting strategy.

When I posted this quote on my Instagram feed it received 100 likes and 4 comments.

  • Ask a question - These can vary greatly, here are a few ideas:
Is there a household chore you secretly enjoy? If so, which one?
What famous landmark would you love to visit?

Or the one that I have used below:


This should initiate quite a few responses. Something you really need to be hot on is responding to comments, even emoji comments. You could respond with another emoji- If someone shows a sad emoji then you can respond with a hug emoji for example. 

Questions are a fun way to interact with your audience, and a good indicator that people enjoy what you are posting.

Make your posts exciting! 
I have used CANVA to create both of the posts above. This makes them much more visual. You can either post them using a background that you feel is appropriate to the post, or you could start branding your posts so that they all have the same look and feel about them, and ultimately become instantly recognisable as one of your posts! If you are unsure how to go about branding your business, check out Creating Your Brand Image by Zoe Adam- Jones. Through a video tutorial, she shows you how to create your brand image. 

Creating Your Brand & Image - Digital Marketing with Zoe Adam- Jones CBA


Comments are the most valuable form of engagement, as a comment is a tangible indication of a follower or customer's loyalty and commitment to you and your brand. The fact that they spent the time to write a comment means your audience is highly engaged with your content. 

Each share of your posts is like a mini organic advertisement for your content, and it rates very high on the engagement scale and is therefore something you want to encourage. A simple way to get people to share or repost your post is to create a competition. This is something that I am seeing more often on Facebook, and I am sure that Facebook algorithm works in a very similar way?


This is a competition that is being run by one of our local butchers on Facebook. They are asking people to LIKE the post, Leave a COMMENT and to SHARE to their own page, all the things that will generate great algorithm. At the time of me copying this post they had already generated 996 comments and 1.2 shares! I wonder how many new followers they have attracted too!


Some while ago I shared this Instagram Social Plan - One Month of Post Ideas by Fiona Flintham - fionaflintham.com.

If you are struggling to find things to post about, this plan will give you some great pointers - and have you noticed that it's not all about the products that you are selling! 


3. It's all about the timing!

Posts that are more recent are more likely to be pushed to the top of people’s feeds. This means that posting when your audience is online is crucial. How do you know when they are online? Check your insights! For example, looking at my insights, the best time for me to post is between 3pm and midnight as that is when my followers are most active on Instagram - hmm, I seem to do most of mine in the mornings, so I will look to change my timing and see if it's make a difference!

The one thing that I truly love about creating posts like this is getting to learn so much while doing the research! I have started to put some of these ideas into practise over the different social media platforms that I work on and the initial results have been amazing! If you are on the QBN Members Facebook group, you may have seen a post that I shared asking members - 

If you could have a day working with anyone in the balloon industry who would you choose and why?

This post received 27 likes but more importantly 202 comments! The responses have been amazing and I feel that this post has re-connected many of the group's members who may  have been inactive for a while! 


Understanding algorithms is not easy, but getting an idea on how to engage with and grow your followers through exciting and consistent content is definitely a solid step towards making those algorithms work for you! 

Happy Ballooning!

Sue
Follow me on Instagram @suebowler


Tuesday, March 6, 2018

Monochromatic Decor — Stylish, Elegant, and Fun!

When it comes to choosing colours for decor, remember that a monochromatic colour theme can look very elegant and stylish, too. So what is monochromatic?

Monochromatic (mon·o·chro·mat·ic)  - consists of one hue (colour) and its tints, tones, and shades, creating a striking yet subtle colour contrast. A tint is made by adding white, a tone by adding grey, and a shade is when we add black to the colour that we are working with.

Sometimes it is very hard to work with a single colour. This is a fantastic way to create a design that has contrast, but without introducing a second or third colour.


Decor by Sue Bowler, CBA and Nicci Rene of Balloon Bouquets, London, U.K.


I have recently had a few opportunities to create decor with a monochromatic colour theme. 

Decor by Sue Bowler and Nicci Rene

This shades of Pink decor was ordered for a corporate Valentine's marketing event. We were asked to create organic style decor to grow up and around an open cube shape. We used a range of pink balloons from Wild Berry, Rose, Pearl Pink, Pearl Magenta, and Pink, plus we added some double-stuffed balloons using Jewel Magenta and Sparkling Burgundy to create some deep rich tones. We also added some White, Diamond Clear, and a smattering of the new Chrome Mauve. For added texture, we used paper honeycomb and tissue balls.

This was one of my first attempts working on a large scale organic style project. I really enjoyed the experience and believe that it was absolutely perfect for the event. I think that it is very easy to forget the elements and principles of design when creating organic decor — visual balance and proportion should not be forgotten.

My second recent experience working with a monochromatic colour theme was last September when I was asked to design and decorate the Pioneer Balloon 100th anniversary Saturday night party at the Wichita Country Club. My objective was to create elegant decor with a fun twist, and that —I believe — is what we achieved.


Guests were greeted at the entrance with this fabulous photo booth. The frame was made using Black & White SuperAgates®, Black with White Polka Dots, White with Black Polka Dots, Spray Decorated Black and White Polka Dots, and Onyx Black Balloons. The combination of these balloons created fabulous visual texture. We made a White Quick Link balloon wall that was positioned behind the booth to give a neutral background.


I love elegant lines, and this arch and the giant numbers looked fabulous, creating a truly stunning backdrop to the main reception room. It also became a great photo opportunity with people posing through the numbers!

Probably one of my favourite designs from this event was the circular wall. Luc Bertrand, CBA, of wAw Balloons, in Vichte, Belgium, created the original wall for a trade stand earlier in the year and when I saw it I really wanted to have a go making it!  Luc very kindly shared his design with The Very Best Balloon Blog. If you would like to know how to make it, click HERE


Giant balloons are very trendy! With the very high ceiling in this venue, it was the perfect opportunity to create these giant balloon bouquets! Using confetti-filled balloons also added a little glamour and a silver sparkle to the decor! 


It truly was an honour to be asked to design the decor for this party, but as you know, it takes a team to create decor on this scale! I would like to thank everyone who worked with me; Cam Woody, CBA, John Bowler, Amanda Armstrong, CBA, LaDonna Belcher, CBA, Cheryl Skoric, CBA, Eve Antonello, CBA, Syliva Santos, CBA, and Edward  Muñoz, CBA —  you're the best!! 

To see more photographs from this event, visit Qualatex.com - Inspiration - Balloon Decor - Black & White or click HERE. If you are a QBN member, you can download the photographs to use for marketing purposes.

I love working with a monochromatic colour theme. It gives me the opportunity to use the full range of balloons that fall within the parameters of the colour that I am working with, plus all the additional colours that I can create by double stuffing! I love being able to add visual texture by using printed and the new Chrome Balloons™. It's certainly not boring!

Happy Ballooning!


Sue
www.suebowler.com


Friday, May 29, 2020

Part 1. Baby Moon Design - Step-by-Step Tutorial - How to Make the Frame

The frame is probably the most important part of any frame based design. Get it right, and your design will look amazing! But getting wrong - out of proportion, or the wrong shape, can lead to you being disappointed with the end result.


Frame Material and Equipment List:


  • 1 x 3m length - 6mm or 1/4" Aluminium Rod 
  • Pipe or Bolt Cutters
  • Gaffa or Duct Tape
  • Pipe Bender if you have one but it's not essential
  • NOT (Lamp) Base - this is an inexpensive IKEA (lamp) product that many balloon professionals use to support designs.
  • NOT (Lamp) Pole x 1 (If you don't have access to an IKEA NOT Base and Pole you will need to find a good, similar alternative.) 
  • White Floral Quick Drying Spray Paint 
  • String or ribbon to measure
  • Circular Template - such as a hoop


Balloon Material List:

Although I am not adding the balloons in Part1. here is a list of the balloons and accessories that I will be using so that you can get them prepared for when your frame is ready! 


  • 18" Baby Girl Pink Stripes Microfoil Balloon
  • 11" White - only a few for the cloud base
  • 5"  Pink or Rose 
  • 5"  Pearl Pink - optional
  • 5"  White 
  • 5"  Pearl White - optional, but it does give a slightly different textural look to the plain white
  • 5"  Diamond Clear - approximately 10
  • 7"  Chrome Gold - approximately 10
  • 260Q Chrome Gold - approximately 15
  • 260Q Pink - 4-5 


All the balloons that I am using for this design are Qualatex - www.Qualatex.com

Gold Confetti - ideally a small square cut
Hi-Float - I like to use the new 148ml (5oz) bottle as the nozzle is perfect for 5" and 260Q
Castration Pliers - ideal 'Stretching Tool' for balloons - available through some balloon wholesalers, Amazon, and farming supply companies.

I will be using a Premium Twin-Air Sizer to inflate the balloons, as it will allow me to use the "10th's of a seconds" timer adjustment to give me the perfect graduated sized balloons. Using a hand pump is not so easy to get the precision for this design.


Part 2 is now available! Just click on the link below! https://theverybestballoonblog.blogspot.com/2020/06/part-2-baby-moon-design-step-by-step.html

Happy Ballooning! 


Sue

www.suebowler.com
Follow me on Instagram @suebowler

Sunday, October 27, 2019

Hoops, Beautiful Hoops! - Inspiring Design Ideas


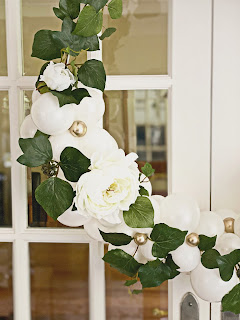
White with Greenery Wedding Wreath by Sue Bowler
From tiny to giant, hoop and wreath designs have become increasingly more popular within both balloon and floral markets. As they continue to pop up on the wedding and party scene, these impressive works of art can act as stunning ceremony backdrops, as reception decor, or as unique staging for photos.


This very pretty Pink, White and printed
Diamond Clear hoop is perfect for weddings
and baby showers. 

I have actually been creating hoop designs for a while now, long before the organic style became the hottest trend! My first hoop designs were primarily constructed using the precision of Classic Decor style, which I still enjoy using quite a bit. And while I do also like building organic style decor, I still consider the basic elements and principles of design. For example, the balloons should be in  proportion to the size of the frame. How we use colour and space is also important, as getting this wrong can result in a haphazard-looking mess.


If you want to make a smaller hoop design, this can be done using hoola-hoops. Another option for smaller hoop designs is actually a recent discovery of mine, using wire hoops. You can find wire hoops like the white wire hoops that I used for the "White with Greenery Wedding" featured at the start of this blog post from Oasis Floral Products . The Ivy Garland and Peony flowers are also from Oasis Floral Products.


I occasionally will use the Structured Organic style to create hoop and wreath designs. Structured Organic style is done using a combination of the classic technique to create the hoop, then adding an organic element to the design afterwards. I really like this style as it adds a level of formality to the design without it looking too structured. 


To make larger hoops, you can purchase pre-made metal hoops, which are perfect for balloons, flowers and greenery. There are some truly inspirational designs on Instagram, just look under the hashtag #balloonhoops shown below.


One of my favourite hoop designers is #balloonilicious

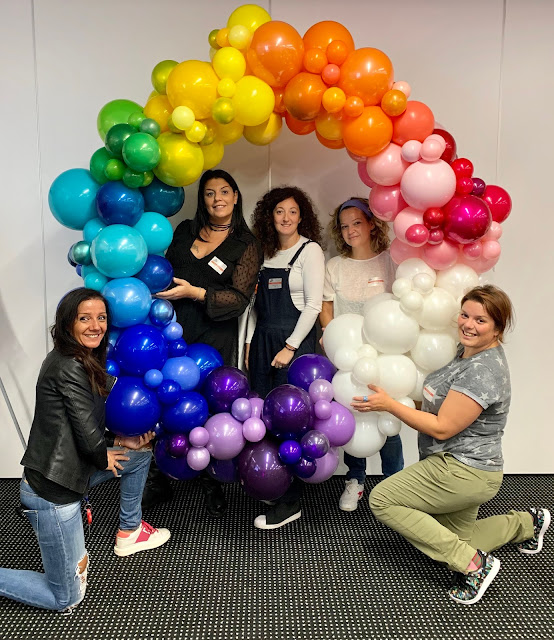
Another alternative to metal hoops is to use round, heavy duty PVC conduit that is available in hardware stores. You can usually buy it in 12ft (3m) lengths, and easily connect them together using compression joints. I recommend making hoops that use approximately 14.5ft (4.5m) of conduit. However, it should be noted that these are not as strong as the metal hoops, and therefore cannot support too much additional weight such as flowers and greenery, without distorting the roundness of the hoop. The rainbow hoop below was made using PVC conduit.


This fabulous "Rainbow Hoop" design was made by a group of student's
during a Simply Organic's class that I recently
taught in Paduva, Italy.

Here are a few more examples of hoop designs that use florals and greenery to add accents.


Photo credit: Alisha Crossley Photography


To find even more inspiration check out this great article: How to Create and Display Circular Wedding Arches. The designs shown are all floral, but with some creative thinking they could easily be adapted for balloons or balloons with floral accent details.


"Wedding gates. Moon gates. Infinity arches. Circular wedding wreaths. Circular wedding arches...

Whatever you call them, large circular floral arrangements are topping the wedding charts this year..."

I love creating hoop designs, and I truly look forward to seeing some of your amazing creations! Don't forget to hashtag #suebowler so I get to see your fabulous creations! 

Happy Ballooning!

Sue
www.suebowler.com
#suebower


Thursday, October 18, 2012

Balloon Distortion Techniques Part 1

By definition distortion is the alteration of the original shape... we can use various distortion techniques with balloons to enhance our designs!


My first public attempts at distortion had varying degree's of success. However, before I talk about my own experiences, I have taken a look back through my IMAGES magazines archives to see when I was first inspired by distortion!

Dream Maker - Jim & Pat Skistimas 1993


Jim & Pat Skistimas created 'Dream Maker' at the 1993 International Balloon Arts Convention (IBAC). The wizards face was created. Balloons, foam board, and wire frames were stuffed inside balloons that were sometimes partially inflated to create facial features! 


Up until then, there had been very few examples of the distortion technique... bearing in mind, we did not have the luxury of the internet and the World Wide Web to see all the amazing balloon work that we see almost by the minute today!

Distortion can apply to both latex and Microfoil balloons.

When we think of distorting balloons, we generally think of using latex balloons, and in the main creating faces. But there are other forms of distortion techniques!

4" Lime Green Microfoil Star & 4" Red Microfoil Heart... I have drawn a line to show where to heat seal these balloons,  remember not to fully seal as you will not be able to inflate both sides!
I like to distort foil balloons, we can use 4" & 9" Microfoil Star and by simply heat sealing the star down the centre we can create a Holly leaf or with 4" & 9" Hearts some great lips!


These would look fantastic in a Valentines centrepiece design!


Ideal as leaves using both Lime Green and Green Microfoil Stars... for other leaf shapes try the same technique with Microfoil rounds!


Mardi Gras Centrepiece by Chris Horne
You can be more adventurous with Microfoil balloons using an Iron, I found a fantastic 'vintage' travel iron on Ebay that has a small but heavy solid base, perfect for 'ironing' balloons, which I used when I created the shade for my 'Tiffany Lamp'  earlier this year at BACI, but a good 'Craft Iron' works well too! 

Create a template of the shape that you want to make in the foil (keep the valve within the design so that you can easily inflate the balloon once you have created the shape), draw around your template, then using the hot iron, seal around the shape you have drawn! To keep your iron clean use greaseproof paper between the balloon and the iron as the heat will remove some of the colour from the balloon.

Chris Horne created this beautiful centrepiece using this method!
Craft Iron


Stuffing machines can really help when distorting a latex balloon, look at these awesome 'eyes'! Perfect for Halloween! Pat Billups CBA, created these 'eyes', using an 18" Diamond Clear (stuffing balloon), opened it up in her stuffing machine, and the "pupil" and "Iris" positioned between the Diamond Clear and a 16" White!

Eye's by Pat Billups, CBA

My first true attempt at using the distortion technique was at IBAC 13, where I used it a few times in both my large sculpture and my centrepiece design.

I encountered many problems with my large sculpture, I really wanted to create an exciting and large Alien head, but after popping too many 3' balloons in the process, I ended up making it far too small, and the head became totally out of proportion with the rest of the Aliens body! This was one of my first big sculptures, it is not my favourite but it was a great learning curve!
Sue Bowler
Alien and Boy! by Sue Bowler CBA

Sue Bowler
Frances Meyer Bear - by Sue Bowler CBA
My other attempt at distortion at IBAC 13 had much greater success and in fact it came first in the centrepiece category... my first IBAC and a 1st place, you can imagine my excitement!
Sue Bowler
I used a combination of foam board and balloons to create the Bear


Here are a few more examples of distortion. Distortion is fantastic for making shaped heads, like the bear and rabbit!

Sue Bowler

Sue Bowler

Today, I see many very advanced techniques used to create amazing distortion effects for faces and heads.


Qualatex Event
These amazing hands where part of the sculpture built by the Brazilian Team at the Qualatex Event UK 2011!  

Qualatex Event
The heads on these 2 fantastic character would not been the same without the use of the distortion technique. This sculpture was built by Team Russia also at the Qualatex Event UK, 2011 

Please read part 2 of this blog where I will give you some good pointers towards making a face!

Happy Ballooning!


Sue

Friday, December 6, 2013

A Christmas Snowman - Step By Step by Sue Bowler - updated


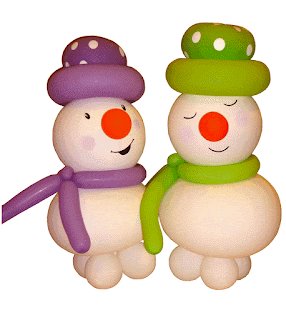
Balloon Snowmen by BalloonArtbySueBowler - www.suebowler.com
Colourful Snowmen by Sue Bowler, CBA.

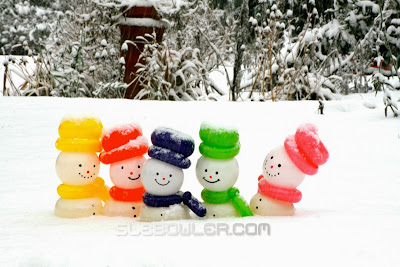
A few winters ago during one very snowy day, when snowed into our home, I decided to make a collection of snowmen for my garden (picture below). I expect many of you will remember the picture! They were amazing. They lasted for two weeks — long after the snow had melted. These little guys were made from 5" balloons, and with their brightly coloured hats and scarves, they looked fabulous! 


Balloon Snowmen by Sue Bowler

I have since gone on to create many different sizes and variations and have now created an easy to follow step-by-step recipe.

Material List:  All Qualatex balloons, of course!

8 x 5" White (double stuffed for the water weight base)
1 x 16" White
1 x 12" White QuickLink™ Balloon
1 x 11" Printed balloon for the hat
1 x 260Q or 350Q for the hat
1 x 260Q for the scarf 
1 x 5" Orange for the nose - or you can draw the nose.
1 x 5" for the pompom if you want to add a pompom to the hat!

Method:

1. To give this design stability, I use four water-weights at the base. You could use sand weights if you prefer. I size the balloons to measure approximately 3" or 7cm's.
2. I recommend that you use a White 16" balloon for the body and use an Apple Twist to give it a more donut-like shape. Add 260Qs at each end of the donut-twisted balloon to allow you to connect the body to the base and the head to the body. 
3. Inflate the 12" White QuickLink balloon for the head. Make sure that it is in proportion to the body! Connect the head to the body.
4. For the nose, you can either under-inflated a 5" orange balloon and connect this to the face using a r
Raisin Twist, glue dot, or draw on a carrot-style nose.
5. The eyes, mouth, and cheeks have been added using a pen (see below for detail). If you have a die-cutter, such as a Silhouette Cameo, you could cut out the eyes and mouth.
6. To make the hat, use an 11" balloon. I like using polka dots as they look really fun. Create an Apple Twist in the hat balloon and secure this to the head using the link.
7. Inflate either a 260Q or a 350Q to wrap around the hat to create the brim. Connect using a pinch twist and remove any excess balloon.
8. Use a 260Q to create a scarf to wrap around the snowman's neck.

Pens for face - the Pink pen that I use for the cheeks is a ZIG Art & Graphic Twin. It has a double end with one end almost like a paintbrush.
The other pens are Sharpies and edding markers, for the eyes and mouth.


Snowmen faces, hand-drawn by Sue Bowler


If you have never made a snowman before, you will love making this design! 


Happy Ballooning!

Sue
www.suebowler.com
#suebowler