Showing posts sorted by date for query proportion. Sort by relevance Show all posts

Tuesday, March 6, 2018

Monochromatic Decor — Stylish, Elegant, and Fun!

When it comes to choosing colours for decor, remember that a monochromatic colour theme can look very elegant and stylish, too. So what is monochromatic?

Monochromatic (mon·o·chro·mat·ic)  - consists of one hue (colour) and its tints, tones, and shades, creating a striking yet subtle colour contrast. A tint is made by adding white, a tone by adding grey, and a shade is when we add black to the colour that we are working with.

Sometimes it is very hard to work with a single colour. This is a fantastic way to create a design that has contrast, but without introducing a second or third colour.


Decor by Sue Bowler, CBA and Nicci Rene of Balloon Bouquets, London, U.K.


I have recently had a few opportunities to create decor with a monochromatic colour theme. 

Decor by Sue Bowler and Nicci Rene

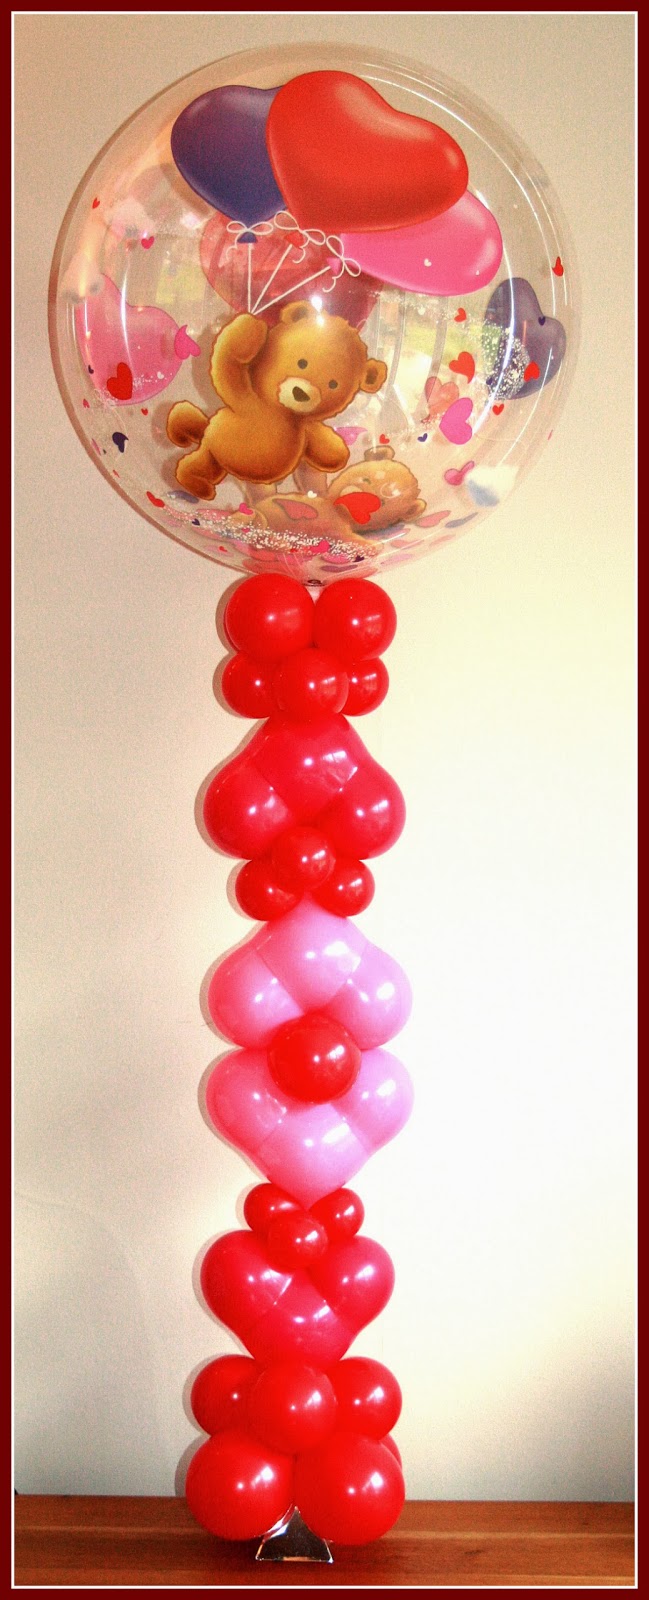
This shades of Pink decor was ordered for a corporate Valentine's marketing event. We were asked to create organic style decor to grow up and around an open cube shape. We used a range of pink balloons from Wild Berry, Rose, Pearl Pink, Pearl Magenta, and Pink, plus we added some double-stuffed balloons using Jewel Magenta and Sparkling Burgundy to create some deep rich tones. We also added some White, Diamond Clear, and a smattering of the new Chrome Mauve. For added texture, we used paper honeycomb and tissue balls.

This was one of my first attempts working on a large scale organic style project. I really enjoyed the experience and believe that it was absolutely perfect for the event. I think that it is very easy to forget the elements and principles of design when creating organic decor — visual balance and proportion should not be forgotten.

My second recent experience working with a monochromatic colour theme was last September when I was asked to design and decorate the Pioneer Balloon 100th anniversary Saturday night party at the Wichita Country Club. My objective was to create elegant decor with a fun twist, and that —I believe — is what we achieved.


Guests were greeted at the entrance with this fabulous photo booth. The frame was made using Black & White SuperAgates®, Black with White Polka Dots, White with Black Polka Dots, Spray Decorated Black and White Polka Dots, and Onyx Black Balloons. The combination of these balloons created fabulous visual texture. We made a White Quick Link balloon wall that was positioned behind the booth to give a neutral background.


I love elegant lines, and this arch and the giant numbers looked fabulous, creating a truly stunning backdrop to the main reception room. It also became a great photo opportunity with people posing through the numbers!

Probably one of my favourite designs from this event was the circular wall. Luc Bertrand, CBA, of wAw Balloons, in Vichte, Belgium, created the original wall for a trade stand earlier in the year and when I saw it I really wanted to have a go making it!  Luc very kindly shared his design with The Very Best Balloon Blog. If you would like to know how to make it, click HERE


Giant balloons are very trendy! With the very high ceiling in this venue, it was the perfect opportunity to create these giant balloon bouquets! Using confetti-filled balloons also added a little glamour and a silver sparkle to the decor! 


It truly was an honour to be asked to design the decor for this party, but as you know, it takes a team to create decor on this scale! I would like to thank everyone who worked with me; Cam Woody, CBA, John Bowler, Amanda Armstrong, CBA, LaDonna Belcher, CBA, Cheryl Skoric, CBA, Eve Antonello, CBA, Syliva Santos, CBA, and Edward  Muñoz, CBA —  you're the best!! 

To see more photographs from this event, visit Qualatex.com - Inspiration - Balloon Decor - Black & White or click HERE. If you are a QBN member, you can download the photographs to use for marketing purposes.

I love working with a monochromatic colour theme. It gives me the opportunity to use the full range of balloons that fall within the parameters of the colour that I am working with, plus all the additional colours that I can create by double stuffing! I love being able to add visual texture by using printed and the new Chrome Balloons™. It's certainly not boring!

Happy Ballooning!


Sue
www.suebowler.com


Friday, January 26, 2018

Valentine's "Love You" Guy - Step-by-Step - by Sue Bowler, CBA

Sue Bowler CBA - Valentines "Little Guy" design
"Love You" Guy by Sue Bowler CBA


Here is a quick and easy design that would be perfect for Valentine's deliveries. Don’t delay, and make some of these truly cute guys today! Simply change the colours so that it’s perfect for any occasion. I have matched my “little Guy" design to complement the fabulous 22" “Love You Confetti Hearts" Bubble Balloon®.


Material List 

 5" Onyx Black - 9
 6" Wild Berry Quick Link - 1
 5" Wild Berry - 2
 5" Masculine Face - 1
 160Q Blush - 2
 160Q Wild Berry - 2
 160Q Onyx Black - 1
 160Q scraps

Hand Pump

Ribbon 


Method


Make a 4-balloon cluster base that is weighted - I like to double stuff each of the 5" Onyx Black balloons and make each balloon a water-weight. Tie together to form a 4-balloon cluster.


Inflate the 6" Wild Berry Quick Link - 5 pumps using a Qualatex® Green Pump. Secure this to the base cluster.


Add a “raisin twist” into the top of the Masculine Face balloon and add a scrap of 160Q to create a fixing point. Inflate the head to the desired size, making sure that it is in proportion to the body.


Connect the head to the body.


Using the 5" Wild Berry, create two “split bubbles” and twist these together to form a cluster. 


Add this cluster in between the body and the head.


Using a 5" Onyx Black, make an “apple twist” and secure with a 160Q scrap. 


You can now connect this to the head. Make sure that you tie the ends tightly together and remove any excess balloon.


Partially inflate the 160Q Onyx Black. Make two small “pinch twists.” Now wrap the 160Q around the base of the hat to form the brim. Twist the 160Q at the point where it fits neatly around the hat and remove the excess 160Q, making sure that it’s connected securely into the double “pinch twist.”


To make the hands, inflate the tip of a 160Q Blush balloon, then secure a partially-inflated 160Q Wild Berry.  


Make two small pinch twists to hide the mechanics. Repeat to make the second arm.


Adjust the arms to the desired length, and tie both arms together leaving a little stretch between the two. 


Slide into position so that they sit neatly either side of the collar.


Add ribbon or a bow to add detail and a helium-filled balloon or a balloon bouquet to complete the design.


Valentine's Guy by Sue Bowler

Don't delay, and make up some of these truly cute guys today! Show them off in your store and if you are an online retailer, post a cool photo of them on your social media channels!

Trade Tip
If you want the 160Qs to last longer, use a tiny amount of HI-FLOAT inside the balloons - it really works! 

Happy Ballooning!

Sue
www.suebowler.com


Wednesday, April 5, 2017

The Qualatex® World Tour Has Started - Enter the Mystery Box Competition to win a free registration to WBC 2018!

The Qualatex® World Tour—#QualatexWorldTour17—has officially started! With sixty-six stops scheduled across the globe, this is going to be one amazing worldwide Qualatex event! 


Tina Giunta, CBA and Chris Adamo, CBA kick off the Q-Tour in Sydney, NSW, Australia.
Australia and New Zealand opened up this amazing tour with classes being held in Melbourne, Brisbane, Sydney, Perth and Adelaide, Australia plus Auckland, New Zealand.  In Europe, the tour kicked off in Belgium, closely followed by Greece! The U.S. tour starts in Miami on the 30th of March! To find out all the stops and class details click HERE for the U.S. and HERE for the rest of the world.

Friday, February 24, 2017

Glitter Balloons!

Last month when I created a design for one of the Spring Fair window displays, I decided to make glitter balloons to complement the new, beautiful — in fact, probably one of my favourite ever Qualatex® birthday Microfoil® balloons — 18" "Birthday Pink & Gold Dots," Who cannot love this balloon!


#49164 18" "Birthday Pink & Gold Dots."
Design by Sue Bowler CBA
Here is the design that I created to show off this fabulous new balloon. I decided to have a go at creating a design using the organic style, which is so very popular at the moment. It was so much fun adding in the balloons, but it's important not to go too wild and still consider elements and principles of design, especially proportion, line, colour, and visual balance.

Monday, October 24, 2016

Tips and Tricks of the Trade - Part 2


Learning how to do things easily or in a better way can take many years of trial and error. I know this well as I have been learning for the past 26 years! "Tips and Tricks of the Trade" is a series of posts that will help you with a variety of different techniques that will make life easier and your work look better.

In Part 1 of this series, Chris Adamo, CBA, of Balloons Online, in Sydney, NSW, Australia, shared some fabulous techniques for filling latex balloons with confetti and also how to easily apply vinyl to foil and Bubble Balloons. To view this post, click HERE

One of my favourite tricks is to cover a base board* using the same Microfoil® balloon that I am featuring in a design.


How to cover a base board.

Here are two designs I made that use a covered base as part of the design. The covered base helps to create visual balance, good proportion, and perfect unity.


Friday, October 24, 2014

Part 6 Beginners Guide to the Elements and Principles of Design - Unity & Harmony

I would like to conclude this series of blogs by taking a look at Unity and Harmony.


Unity
Unity refers to the relationship and incorporation of all the elements in a design or decor such that it imparts a sense of wholeness or 'oneness'.

I find it very easy to create unity when I am working with Qualatex balloons as many of the balloon designs co-ordinate... let me show you what I mean.

Here is a really obvious one to start with. Let's say that we want to create a design with a farming theme for a birthday, look at all the balloons we can use, and there are others too!


The Very Best Balloon Blog

Anne Cahill McGovern made a great design using a selection of these balloons, along with added texture with a little raffia added into the base, this design demonstrates perfect unity!

Tuesday, October 7, 2014

Part 5. Beginners Guide to the Elements & Principles of Design - Proportion and Scale

Scale and Proportion are closely linked and both are concerned with size. 


So let's consider how important is it for us to understand proportion & scale when designing our everyday displays. 
Here is a scenario  - " I have been asked to create table arrangements for a party in a venue that I have never visited".
When we start our design process, we think about the colours that we are going to use, and if there is a theme that also take high priority, but I wonder how many of us consider proportion and scale?

For me this is now a very important part of the design process that I need to consider right from the start. 
  • How big are the tables that the designs are being used on?
  • What is the size and height of the room?
Without knowing and using this information very early on in our design process we could suggest, propose and cost work that is total inappropriate for the room that it is intended to be used in! Believe me, I have been there... balloons too small or too big for the height of the ceiling and the size of the room and centrepiece that are too big or too small for the tables! 

You are the expert and you can use your knowledge and skills to advise and recommend to your customers.


So lets look at proportion and scale in greater detail.

Tuesday, September 9, 2014

Part 3 The Beginners Guide to the Elements & Principles of Design - Texture & Balance

Texture is the final 'element' of design that we are going to look at in this series of blogs, we have already looked at Colour in Part 1 and Line in Part 2.

Texture

When working on balloon decor it is often harder to create a design that has contrasting textures as the visual texture of a balloon is the same. However if we can include other components with a different textural difference we are able to create designs with greater impact, therefore we need to look at other mediums to help us achieve this.


The Very Best balloon Blog


This is a great example of texture, this centrepiece design is based around the Peacock Accent Pattern Diamond AccentsTM Microfoil® Balloon #41227. To enhance this centrepiece design a feather boa, faux feathers and coiled metallic decorative wires have been used, all giving different visual textures that strengthen's the theme, making this a fantastic design.


This design can be found on the Qualatex website in the Wedding Business Booster along with the instructions on how to make it!


Monday, August 11, 2014

Part 1 Beginners Guide to the Elements and Principles of Design - Colour

Elements & Principles of Design

Creating the 'perfect' design is not something that just happens, well not for most of us anyway!  There are a number of factors that make it a perfect design, so lets take a look at what those factors are?

Elements of Design:
These are parts that make up the design, you can either touch or see the elements of design. These include colour, line, shape and texture.

Principles of Design: 
The basic principles of design include unity, proportion and scale, balance, rhythm and harmony.

By applying the principles to the elements of design brings them together into one design. How you apply these principles determines how successful a design may be!

Monday, June 9, 2014

The Spring Contest... and the winners are!

101 fantastic designs were entered into our recent Facebook Qualatex Spring Deliveries & Balloon Gifts Contest!

For a design to qualify, balloon artists from all over the World were invited to submit a design or designs created by themselves that was inspired by 'Spring'. The design had to be given a creative name and the balloons used within the design had to be Qualatex.


1st Place Winner

'Spring is coming',
 by Colin Stewart of Stewarts Baskets and Balloons, Canada.
As with all contests there is an overall winner... the 'Best in Show'! Colin Stewarts stunning Butterfly sculpture is the worthy recipient of this award!

Colin's design is Classic Balloon Decor at it's best! Colin has created this beautiful air-filled Butterfly as a showpiece to highlight a spring theme in one of the many stores that he regularly decorates.
Colin's work is very precise with all his balloons perfectly sized, the colours that he has chosen to use are bright and vibrant, using the darker at the centre to create a strong focal point and bringing the lighter to the outer edge. His design demonstrates great rhythm as well as perfect unity, both the proportion and scale are perfect for it's surrounding!
Congratulations Colin on a truly great design!


Monday, February 10, 2014

'Your store window is your face'... some great window display advice from Doctor Bob BALLOONS UNLIMITED

You should never underestimate the power of a great display, whether a store window or exhibition!
Very Best Balloon Blog
Doctor Bob - BALLOONS UNLIMITED

Last Christmas many of us were completely wowed by the Christmas window display that was created by Bob Armstrong CBA and his team at Dr Bob BALLOONS UNLIMITED in BARRY, WALES.

Christmas Window display
by Doctor Bob BALLOONS UNLIMITE

The window was filled with a magical selection of balloons, everything from a Tin Solder, Christmas tree's, Elves, snowmen and of course Santa Claus! I can imagine small children with their parents peering through to see all the beautiful displays... a true winter wonderland of excitement!
But these displays are not merely to create a display, each and every item on display is something that can be purchased by their customers, what a fantastic way to show off your skills!

Thursday, January 16, 2014

Inside Out and Upside Down... the versatility of a Qualatex Geo Blossom!

'Love Stack' - A great design for Valentines
Created by Sue Bowler CBA
Here is my newest design idea for Valentines Day, I have named it 'Love Stack' (designs are easier to sell when you name them). The name Love Stack is a play on that very famous song 'Love Shack' (baby love shack) by the B52's - you'll be humming that all day now...

It uses Qualatex Geo Blossoms in a different way (which I know some of you do this already), but this is my first time for a while and I have enjoyed re-visiting this technique!

So for those of you who have not used the inside-out method here's how simple it is!

Geo Blossom Flower Assortment

Friday, December 6, 2013

A Christmas Snowman - Step By Step by Sue Bowler - updated


Balloon Snowmen by BalloonArtbySueBowler - www.suebowler.com
Colourful Snowmen by Sue Bowler, CBA.

A few winters ago during one very snowy day, when snowed into our home, I decided to make a collection of snowmen for my garden (picture below). I expect many of you will remember the picture! They were amazing. They lasted for two weeks — long after the snow had melted. These little guys were made from 5" balloons, and with their brightly coloured hats and scarves, they looked fabulous! 


Balloon Snowmen by Sue Bowler

I have since gone on to create many different sizes and variations and have now created an easy to follow step-by-step recipe.

Material List:  All Qualatex balloons, of course!

8 x 5" White (double stuffed for the water weight base)
1 x 16" White
1 x 12" White QuickLink™ Balloon
1 x 11" Printed balloon for the hat
1 x 260Q or 350Q for the hat
1 x 260Q for the scarf 
1 x 5" Orange for the nose - or you can draw the nose.
1 x 5" for the pompom if you want to add a pompom to the hat!

Method:

1. To give this design stability, I use four water-weights at the base. You could use sand weights if you prefer. I size the balloons to measure approximately 3" or 7cm's.
2. I recommend that you use a White 16" balloon for the body and use an Apple Twist to give it a more donut-like shape. Add 260Qs at each end of the donut-twisted balloon to allow you to connect the body to the base and the head to the body. 
3. Inflate the 12" White QuickLink balloon for the head. Make sure that it is in proportion to the body! Connect the head to the body.
4. For the nose, you can either under-inflated a 5" orange balloon and connect this to the face using a r
Raisin Twist, glue dot, or draw on a carrot-style nose.
5. The eyes, mouth, and cheeks have been added using a pen (see below for detail). If you have a die-cutter, such as a Silhouette Cameo, you could cut out the eyes and mouth.
6. To make the hat, use an 11" balloon. I like using polka dots as they look really fun. Create an Apple Twist in the hat balloon and secure this to the head using the link.
7. Inflate either a 260Q or a 350Q to wrap around the hat to create the brim. Connect using a pinch twist and remove any excess balloon.
8. Use a 260Q to create a scarf to wrap around the snowman's neck.

Pens for face - the Pink pen that I use for the cheeks is a ZIG Art & Graphic Twin. It has a double end with one end almost like a paintbrush.
The other pens are Sharpies and edding markers, for the eyes and mouth.


Snowmen faces, hand-drawn by Sue Bowler


If you have never made a snowman before, you will love making this design! 


Happy Ballooning!

Sue
www.suebowler.com
#suebowler


Friday, May 17, 2013

'Balloon-Pops' - cute and simple air-filled balloon designs.


'Balloon Pop's©' - it's all in the name!

How many of us name our designs? Sure we sell 'Bouquets of Balloons' or 'Balloon Arrangements' even balloons on a ribbon & weight, but do you name each of your designs?

Balloon-Pop's© by Sue Bowler  
I recently did a little 'snooping' around the internet and viewed a variety of websites. I started with the floral market and checked out a selection of companies, the results were very interesting. Some the florists named each of their beautiful creations, making it really easy to identify and order, some simply gave their designs a number (a bit boring) and others no name or description at all, which made me wonder if I found an arrangement on their website that I really liked how would I go about asking for it?
I then looked at other retail businesses, let's take IKEA, they name everything that they sell! Many of us use the 'NOT' lamp for example and without having a name, how easy would it be for us to identify the lamp when we visit the store... probably not easy at all? Perfumes all have names as do cars... there really has to be something in giving  a product or design a name!

Thursday, October 18, 2012

Balloon Distortion Techniques Part 1

By definition distortion is the alteration of the original shape... we can use various distortion techniques with balloons to enhance our designs!


My first public attempts at distortion had varying degree's of success. However, before I talk about my own experiences, I have taken a look back through my IMAGES magazines archives to see when I was first inspired by distortion!

Dream Maker - Jim & Pat Skistimas 1993


Jim & Pat Skistimas created 'Dream Maker' at the 1993 International Balloon Arts Convention (IBAC). The wizards face was created. Balloons, foam board, and wire frames were stuffed inside balloons that were sometimes partially inflated to create facial features! 


Up until then, there had been very few examples of the distortion technique... bearing in mind, we did not have the luxury of the internet and the World Wide Web to see all the amazing balloon work that we see almost by the minute today!

Distortion can apply to both latex and Microfoil balloons.

When we think of distorting balloons, we generally think of using latex balloons, and in the main creating faces. But there are other forms of distortion techniques!

4" Lime Green Microfoil Star & 4" Red Microfoil Heart... I have drawn a line to show where to heat seal these balloons,  remember not to fully seal as you will not be able to inflate both sides!
I like to distort foil balloons, we can use 4" & 9" Microfoil Star and by simply heat sealing the star down the centre we can create a Holly leaf or with 4" & 9" Hearts some great lips!


These would look fantastic in a Valentines centrepiece design!


Ideal as leaves using both Lime Green and Green Microfoil Stars... for other leaf shapes try the same technique with Microfoil rounds!


Mardi Gras Centrepiece by Chris Horne
You can be more adventurous with Microfoil balloons using an Iron, I found a fantastic 'vintage' travel iron on Ebay that has a small but heavy solid base, perfect for 'ironing' balloons, which I used when I created the shade for my 'Tiffany Lamp'  earlier this year at BACI, but a good 'Craft Iron' works well too! 

Create a template of the shape that you want to make in the foil (keep the valve within the design so that you can easily inflate the balloon once you have created the shape), draw around your template, then using the hot iron, seal around the shape you have drawn! To keep your iron clean use greaseproof paper between the balloon and the iron as the heat will remove some of the colour from the balloon.

Chris Horne created this beautiful centrepiece using this method!
Craft Iron


Stuffing machines can really help when distorting a latex balloon, look at these awesome 'eyes'! Perfect for Halloween! Pat Billups CBA, created these 'eyes', using an 18" Diamond Clear (stuffing balloon), opened it up in her stuffing machine, and the "pupil" and "Iris" positioned between the Diamond Clear and a 16" White!

Eye's by Pat Billups, CBA

My first true attempt at using the distortion technique was at IBAC 13, where I used it a few times in both my large sculpture and my centrepiece design.

I encountered many problems with my large sculpture, I really wanted to create an exciting and large Alien head, but after popping too many 3' balloons in the process, I ended up making it far too small, and the head became totally out of proportion with the rest of the Aliens body! This was one of my first big sculptures, it is not my favourite but it was a great learning curve!
Sue Bowler
Alien and Boy! by Sue Bowler CBA

Sue Bowler
Frances Meyer Bear - by Sue Bowler CBA
My other attempt at distortion at IBAC 13 had much greater success and in fact it came first in the centrepiece category... my first IBAC and a 1st place, you can imagine my excitement!
Sue Bowler
I used a combination of foam board and balloons to create the Bear


Here are a few more examples of distortion. Distortion is fantastic for making shaped heads, like the bear and rabbit!

Sue Bowler

Sue Bowler

Today, I see many very advanced techniques used to create amazing distortion effects for faces and heads.


Qualatex Event
These amazing hands where part of the sculpture built by the Brazilian Team at the Qualatex Event UK 2011!  

Qualatex Event
The heads on these 2 fantastic character would not been the same without the use of the distortion technique. This sculpture was built by Team Russia also at the Qualatex Event UK, 2011 

Please read part 2 of this blog where I will give you some good pointers towards making a face!

Happy Ballooning!


Sue