Showing posts sorted by relevance for query unity. Sort by date Show all posts

Friday, June 15, 2012

Graduation time is here- decor ideas!


I had to start this blog with this great poster... did you know that you can download it now, today and it's free!
What better way to start your 'Graduation' campaign!

Boost graduation and year-round sales with this new “Celebrate with Balloons!” poster from Qualatex! Save the file to your computer or flash drive, and then take it to Fed Ex Office or your local copy and print store to have it professionally printed.
Boar-round saes with this new “Celebrate with Balloons!” poster from Qualatex! Save the file to your computer or flash drive, and then take it to Fed Ex Office or your local copy and print store to have it professionally printed.
Let's make sure we remind our customers at every opportunity how we can make their special occasion even better with balloons! It only takes one picture or concept to spark a little bit of interest... and even in a recession we all still want to celebrate special occasions and great achievements!
So how can we find our inspiration, idea's and some truly great sales tips too!

Lets start with the Qualatex.com Graduation Business Booster! As with all the Business Boosters, it is packed with some great ideas!


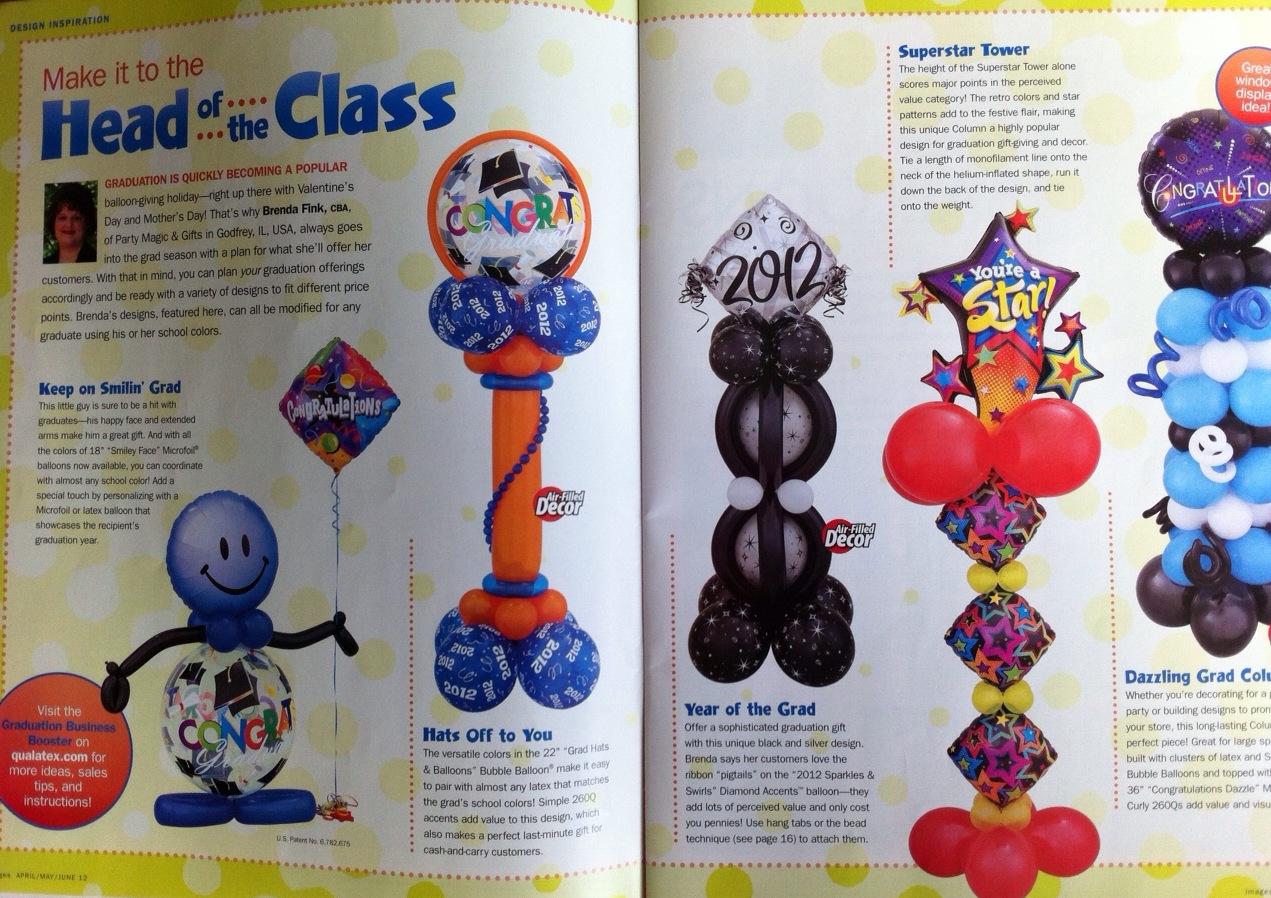
 In the last issue of Balloon Images (APR/MAY/JUN 2012) there is a great article by Brenda Fink, CBA, with some truly inspiring idea's for the Graduation season. Brenda has created a selection of designs ranging from fun to sophisticated, these designs can also be easily adapted and use for other occasions too!


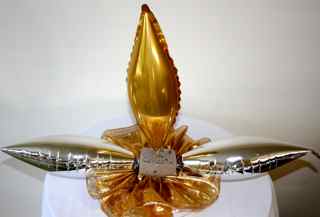
 A few years ago I taught a class and created a few very simple designs, perfect for both decor or to be given as a gift!


Sue Bowler
Design created by Sue Bowler CBA
This first design is pretty easy to re-create. You will need:
  • 4 x 11" inflated to approx. 6" for the base cluster - I used Big Polka Dots!
  • 1 x Congratulations Graduate! Caps Qualatex Bubble # 11999 or you could use Gar Hats & Balloons Qualatex Bubble # 18693
  • 4 x 5" Onyx Black inflated to approx. 4"
  • 2 x 350Q Black for the arms
  • 1 x Smiley Face - this could be latex (I would use a 16" inflated to approx.  12" and make nice and round), Microfoil (there are some great colours in the Microfoil Smiley Face range) or a Bubble Smile Face!
  • You'll need a Super Grip Tab or similar to create a fixing point at the top of the Bubble balloon to attach the collar and the Smiley Face * Conwin Grip Tabs work very well on Qualatex Bubbles balloons when the glue part of the tab has been heated to make it extra sticky - I use a hairdryer!!
  • A weight for the base
This design can be created with air-filled balloons!


Sue Bowler
Design created by Sue Bowler CBA
This second design has great visual impact at it stands so tall, I love using Qualatex Taper balloons as bodies!
You will need:
  • 4 x 11" Onyx Black - inflated to approx. 7"
  • 8 x 5" Onyx Black - inflated to approx. 4" - 1 x cluster at the base and the other at the top.
  • 1 x Taper Swirl- I used the 38" Magenta #22823  however, you could use any of the colours that appear on the Smile Face Party Grad to create Unity.
  • 1 x Smile Face Party Grad 36" #61605
  • 2 x 260Q Onyx Black
  • Weight for the base
You will need to use helium to inflate the 36" Smile Face Party Grad, all the other balloons can be filled with air.

Sue Bowler
Design created by Sue Bowler CBA
And finally here is a very simple 646Q Graduation Guy! Once again he is tall, so he has great visual impact!

  • 4 x 11" Onyx Black - inflated to approx. 7"
  • 1 x 646Q Onyx Black - almost fully inflated.
  • 4 x 5" Onyx Black - Inflated to approx. 4.5"
  • 2 x 350Q
  • 1 x Smile Face Party Grad 36" #61605
  • 1 x Weight for the base
I think that when I made this, I used helium inside the Micro Foil balloon, but I think that air-filling this should be OK?

If it's bouquets you are looking to create, there are some great ideas on the Qualatex website!


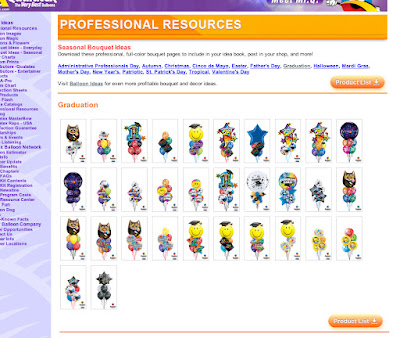
And did you know that each of these design has a product list too! Just simply click on the button at the bottom that says PRODUCT LIST... it's so easy and will save so much time!

To download the poster that I have shown at the start of this blog, simply visit the Graduation Business Booster www.Qualatex.com click on the SALES TIPS 

Balloons are perfect for ALMOST every occasion, we have to find every opportunity to promote them, and offer our customers something different, something special and something memorable!

Happy Ballooning!

Sue

Wednesday, April 5, 2017

The Qualatex® World Tour Has Started - Enter the Mystery Box Competition to win a free registration to WBC 2018!

The Qualatex® World Tour—#QualatexWorldTour17—has officially started! With sixty-six stops scheduled across the globe, this is going to be one amazing worldwide Qualatex event! 


Tina Giunta, CBA and Chris Adamo, CBA kick off the Q-Tour in Sydney, NSW, Australia.
Australia and New Zealand opened up this amazing tour with classes being held in Melbourne, Brisbane, Sydney, Perth and Adelaide, Australia plus Auckland, New Zealand.  In Europe, the tour kicked off in Belgium, closely followed by Greece! The U.S. tour starts in Miami on the 30th of March! To find out all the stops and class details click HERE for the U.S. and HERE for the rest of the world.

Tuesday, September 9, 2014

Part 3 The Beginners Guide to the Elements & Principles of Design - Texture & Balance

Texture is the final 'element' of design that we are going to look at in this series of blogs, we have already looked at Colour in Part 1 and Line in Part 2.

Texture

When working on balloon decor it is often harder to create a design that has contrasting textures as the visual texture of a balloon is the same. However if we can include other components with a different textural difference we are able to create designs with greater impact, therefore we need to look at other mediums to help us achieve this.


The Very Best balloon Blog


This is a great example of texture, this centrepiece design is based around the Peacock Accent Pattern Diamond AccentsTM Microfoil® Balloon #41227. To enhance this centrepiece design a feather boa, faux feathers and coiled metallic decorative wires have been used, all giving different visual textures that strengthen's the theme, making this a fantastic design.


This design can be found on the Qualatex website in the Wedding Business Booster along with the instructions on how to make it!


Sunday, April 23, 2023

Throwing it back with Birthday Retro Daisies!

 One of my favourite new Qualatex 18" Microfoil™ Balloons is the Birthday Retro Daisies.

Daisies were a popular floral motif in the 1960s and 70s. This flowers simple, cheerful appearance and association with innocence and purity made it a favourite among the hippie counterculture of the era. Today, daisies are still used in retro-inspired designs as a nod to the past, but they can also be incorporated in more modern designs for a fresh and playful touch.

This week, I enjoyed creating a design using this new balloon to make an air-filled arrangement that would be perfect for a delivery. It is bright, fun and relatively easy to make once you learn how to make the flowers (see video below)

In this design there are two types of twisted flowers: the larger flowers were made using 350Q balloons and the smaller flowers were made using 160Q balloons, and there is one 260Q flower (pink) in the design.


Although I did not use all of these techniques to make my flowers, you may find it helpful when recreating this design... you can add your own creative flair to it! 

How to Create Balloon Daisies 3 Ways!


To make this design, I started with a wooden centrepiece stand from Gibs On It.


I covered the base using a stretched 16" white balloon. I pre-stretch the balloon first, then cut off the neck and make a small hole at the top of the balloon. It is a little tricky to stretch it over, but with a little care it is possible to get it to cover the base.


I also covered the pole, this time with with a pre-stretched 350Q. I slipped that over the pole and secured it at the base using a scrap 160Q balloon.


Finding reliable bases and poles for designs such as this is not always easy. You could always use a PremiumConwin Deco Stick and Cup glued to a tile base, though it will not be as stable as this wooden pole and base. 

Once my base was prepared it was time to start to creating!

To support the 18" foil balloon, I used an odd sized balloon cluster, keeping the balloons on one side smaller than the other side.


I then added the 18" foil to the base of the design.


As my design was designed around the Retro Daisies balloon, I sat down and created a range of twisted flowers using the same colours that are on the foil to create unity and a sense of oneness in my design.

Birthday Retro Daisies Design by Sue Bowler
www.suebowler.com 

I secured the twisted daisy in Caribbean Blue to the wooden pole, and the remaining flowers have been secured to the design using UGlu Dashes. This type of glue dot is extremely strong and easy to apply - Uglu Dashes are available at many balloon wholesalers and suppliers! 

So now to get the perfect and most appealing shot of my design! One of my latest challenges is to to improve my photography skills. Taking that perfect shot is not my strong point, and I definitely know that sharing an appealing photograph on socials is extremely important!

I don't have a photo backdrop in my studio so I rely on tools such as CANVA to help me to make my photo a little more appealing! I also recently attended a free "How to Use Your iPhone Camera" course at my local Apple Store, which was super helpful, and was made even better because I was the only person who had signed up to the course that day so I got one-to-one tuition!

Here are a few of the photographs that I captured, which one do you think would be the most appealing for social media?

Do you think that a coloured boarder helps to bring more colour to the shot?

How about no background at all?

I introduced an Arch frame to give my design a stronger background 

And finally, I have cropped right into the photo, this brings the design closer and is a little bit more dramatic! 


I love taking the time to be creative! It is an opportunity to play around and truly enjoying doing what you love best... having fun with balloons! 

I always look forward to seeing what you create, especially with the new Qualatex balloons! 

Happy Ballooning! 

Sue
Follow me @suebowler


Thursday, March 12, 2015

Elegant or fun, there is alway's something perfect for Mother's Day.


How we present our balloon's to our customer's can make the difference between selling a single balloon versus a complete design. Here are a few ideas that are perfect for Mother's Day!


'I Love you M♡M' says it all, add it to an arrangement of 'Smile Face Flowers' and we have a wonderful gift!

This design was very simple to make. I found a range of lovely inexpensive tin jugs at my local floral wholesaler and simply secured a 'cup' from a Cup and Stick inside the jug - I used the stick to make the stems of the Smile Face Flowers and use these to secure the design in place. The vase can be filled with treats such as sweets and candy.


This design is very elegant using the 'To a Wonderful Mum Cupcake' 18" # 90585 . The addition of the precision bubbles and bow around the edge of the balloon really make a lovely finishing touch and also add's value to this design.


Monday, June 9, 2014

The Spring Contest... and the winners are!

101 fantastic designs were entered into our recent Facebook Qualatex Spring Deliveries & Balloon Gifts Contest!

For a design to qualify, balloon artists from all over the World were invited to submit a design or designs created by themselves that was inspired by 'Spring'. The design had to be given a creative name and the balloons used within the design had to be Qualatex.


1st Place Winner

'Spring is coming',
 by Colin Stewart of Stewarts Baskets and Balloons, Canada.
As with all contests there is an overall winner... the 'Best in Show'! Colin Stewarts stunning Butterfly sculpture is the worthy recipient of this award!

Colin's design is Classic Balloon Decor at it's best! Colin has created this beautiful air-filled Butterfly as a showpiece to highlight a spring theme in one of the many stores that he regularly decorates.
Colin's work is very precise with all his balloons perfectly sized, the colours that he has chosen to use are bright and vibrant, using the darker at the centre to create a strong focal point and bringing the lighter to the outer edge. His design demonstrates great rhythm as well as perfect unity, both the proportion and scale are perfect for it's surrounding!
Congratulations Colin on a truly great design!


Friday, December 16, 2011

An elegant centerpiece idea for a New Year's Gala Party!


Sue Bowler
Picture 1
I was recently looking back through some of my photographs and came across the centerpiece that I designed and created for the Gala Party at the World Balloon Convention 2010.  I thought that this design would be perfect for an elegant New Years celebration party! 


I would like to clarify at this point that the design you can see in picture 1 is not the final design that I used, this was the first of a few that I created during the design process and as you can see this is not a centerpiece, more of an arrangement! Why... because there is no visual gap between the base and the top elements, which means that if I was to put this in the middle of a table, the guest would not be able to see each other! But this picture shows clearly both the base and the top designs, which is why I have used it in this blog!


Celebrate New Year Sparkle # 99797 34"

Looking at the fantastic range of Qualatex New Year's Microfoil and latex balloons available I can see how this design would really work well for a New Years party! The color palette is Black, Gold and Silver, Stars and Swirls are the main design element that repeats throughout most of the New Years balloons, allowing us to create unity.

Rather than teach you how to re-create this design as shown above, I thought that I would take you through each of the elements step-by step, you can then decide if you would want to make the whole design or maybe just part of it, which is what we did for the World Balloon Convention.

There are quite a few different elements that make up this design.

Picture 2
I started with a Lomey dish base, this is a product made by Smithers Oasis, many balloon distributors sell this and other Smithers products. I then secured a square of DRY floral foam using a cool glue gun.
TIP 1. Do not be tempted to use too much floral foam, the more you use, the more you have to fill or hide!
Picture 3
Talking about hiding the mechanics, I knew that this may be a problem, so I started by creating a 'skirt' of fabric around the edge of the foam before I even started to add any elements. Try using a fabric that has a finished edge rather than a 'raw' edge that may fray and look untidy. This fabric is also a Smithers product and has a lovely metallic look. I used floral 'reel' wire to gather up the fabric and then pulled it into the dry foam, I did not need to use any glue! If you look at Picture 1, you will see that I used a Silver fabric for the base cover.

Picture 4
Now I added in the 13" Tapers (these balloons need to be heat sealed, if you are unsure how to do this see Tip 2 below). These were placed in different positions. Picture 4 represents the base design and Picture 5 is the top element. If you were going to only create a base design, you will need to work with Picture 4 as the Tapers in Picture 5 would make your design too tall for a base - 
Remember the 14" height rule!
Picture 5


To secure the tapers into the Dry Foam, I used Premium Balloon Cups-N-Sticks. If you can get the clear one's these are perfect!

The Tapers create the visual line of the deign creating both horizontal and vertical lines and are the main focal point, all the other elements that we add are known as 'accent elements' and should compliment the design and not compete!


Picture 6


Picture 7


The first of the accent detail is adding in 4" Microfoil Stars, picking out all the colours in the design. If you currently do not use these wonderful little balloons you should! They are for me what really makes our centerpiece work amazing. They can be prepared well in advance as they will last forever!


TIP 2. If you are unsure how to heat seal the small Microfoil balloons then visit my earlier blog - Heat Sealing Qualatex Microfoil Balloons!

Once again I use Premium Balloon Stems and Cups-N-Sticks to position them into my design. However, if I remember correctly, on the day of mass production, I think that we started tying the stars into groups of 3 and then used a floral wire 'pin' to secure the cluster in position.

Pictures 7 & 8 shows you how I placed the stars for best effect.

Picture 8


Picture 9


I love the technique shown in Picture 9, it is still all balloons, but allows us to create some beautiful lines within a centerpiece! What you need to do is take a 260Q, remove the bead or lips, then take a floral wire 18 gauge or 1.02mm wire- try and get the longest wires possible and plastic coated too, otherwise the steel can get rusty and you will need to clean them before you use!
Bend the very tip of the wire over using a pair of 'Pinch Nose' pliers and then wrap the bent tip with a little floral tape. Now gently pull the 260Q over the wire, using the removed bead you can secure the 260Q to the wire at the tip. Now 'scrunch' the 260Q by pushing it up the wire, see Picture 9 then use a little floral tape to hold the balloon in position. I used 3 of these together to create the elements in Picture 9.

Picture 10
I also used 160Q's and 260Q's inflating the tips only (Picture 10) , using the warmth of my hand bend these into curves, again to create elegant lines within the design.


Picture 11
Position both the 260Q 'Scrunchies' and the 160Q & 260Q 'Curves', into the design, look back at Picture 1 and see how these elements create fantastic visual movement.


Finally, I added 2 x 3-balloon clusters of under-inflated 5" (one on each side), which I double stuffed to create a really intense metallic color! The 'Silver' balloon are Black inside Silver and only inflated to approx. 2", be careful not to make them too big!

Picture 12

This is not the easiest of designs to explain or create, but there maybe some ideas and techniques that you can use to make yours!  I hope that you have some great bookings for the New Years celebrations! Good luck!
New Years Sparkle # 27673 18"

With seasonal best wishes!

Sue 

The tools that you will need:
Floral Tape

18 Gauge or 1.02mm Floral Wire

Pinch Nose Pliers

Reel Wire